Trainingzone Multipurpose Business Theme Guide
- created: 06/28/2015
- latest update: 09/23/2015
- by: OpalTheme
- Support email: [email protected]
- Information: [email protected]
HELLO ! FIRST OF ALL WE WOULD LIKE TO THANK YOU SO MUCH FOR CHOOSING OUR THEME!
Here are some basics on installing, configuring and customizing the Opal Template If you have any questions that are beyond the scope of this help file, please feel free to contact us via email : [email protected]
We truly appreciate and really hope that you'll enjoy our theme!
If you like this theme, Please support us by rating us 5 stars (How to rate?)
Purchase another our best themes
Best Regards,
Opal WordPress Team
Installation
To install this theme you must have a working version of WordPress already installed. Make sure your installed Wordpress version is 4.0 or higher. You also need to have PHP 5.3 or higher versions (recommended is php 5.3+) and MySQL 5.0 in order for OpalTheme to function correctly. If you need help installing WordPress, follow the instructions in WordPress Codex or you can watch the Instructional Video created by Woo Themes.
1. Download
Purchase Trainingzone template from ThemeForest then you can download our template package on there.
Extract package that include all files and folders of theme. When done, you should see Trainingzone_theme.zip (zip file name can be changed from version to version).

2. Installing Theme From the WordPress Dashboard
Installing a WordPress theme is super easy, you’ll see our video guide:
- Step 1: Navigate to Appearance → Themes in your WordPress admin dashboard.
- Step 2: Click the Add New button at the top of the page and go for the Upload option.
- Step 3: Choose Trainingzone_theme.zip then click Install
- Step 4: Wait while the theme is uploaded and installed then activate the theme.
3. Installing By FTP
Many users are on shared hosting with low upload limits, and in such situations the Trainingzone theme is often too large to install through Wordpress. We suggest you should upload it via FTP.
If you don't know how to use FTP visit this link for information: http://codex.wordpress.org/FTP_Clients . You will need to first uncompress the PACKAGE-theme.zip file you have found in the master zip downloaded from Themeforest. This zip uncompresses into a normal folder. This unzipped folder is all you need to transfer via ftp and if you open it, you will see all sorts of folders and css and php files which together contain all the theme coding.
Using the FTP program transfer this folder which contains the above files to the Wordpress installation theme root directory: /wp-content/themes.
Do not upload any of the other files or folders such as licensing or resource or documentation. Uploading any of the other folders may cause problems resulting in the theme not working properly. Learn from Wordpress Official Documentation about installing theme with FTP client or with cPanel: http://codex.wordpress.org/Using_Themes
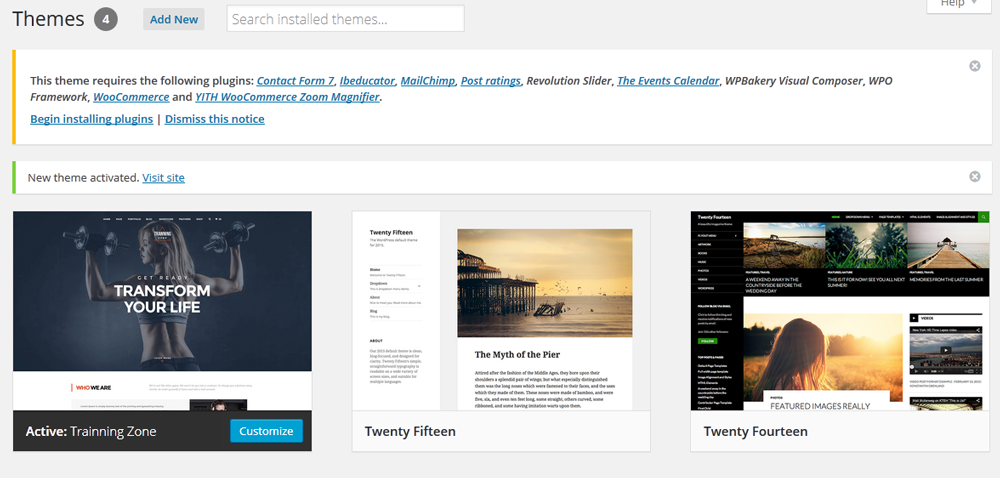
4. Activate Trainingzone As Default Theme
After completing the upload, activate the theme as per activating any other theme.
Goto your Dashboard >> Appearance >> Themes >> Activate Trainingzone template
Follow that images:
5. Known problems when installing the theme
If you get an error saying that the stylesheet is missing, then you have uploaded the wrong folder. Please check that you are uploading the Trainingzone_theme.zip within the Theme Files folder. You have to unzip the package file that you download from Themeforest to find this.
You may check your file upload limit on Your Media Uploader page in WordPress. Depending upon the web hosting company and the conditions of the service they provide it may vary. The most common is about 8 MB which is more or less enough. But uploading some media files like audio and video may become a problem with for example 2 MB upload limit.
We decided to share some tips about how to extend your maximum file upload size in WordPress:
1. Through functions.php file:
You may add the below mentioned code in the functions.php file of your theme
@ini_set( 'post_max_size', '64M');
@ini_set( 'max_execution_time', '300' );
2. Through PHP.INI file:
If you cannot see the php.ini file in your directory create the new one with below mentioned code and upload it to your root folder on your web server.
If you can see the php.ini file then change parameters or add :
post_max_size = 64M
max_execution_time = 300
In case that tip does not work with 64MB, try it with 10MB.
3. Through .htaccess method
You may try modifying the existing .htaccess file in the root directory or creating a new one.
Add the following code in the existing or new htacess file:
php_value post_max_size 64M
php_value max_execution_time 300
php_value max_input_time 300
You can reset all of the setting for the each page on our custom panel by clicking “Reset” button on the bottom.
Install Plugins
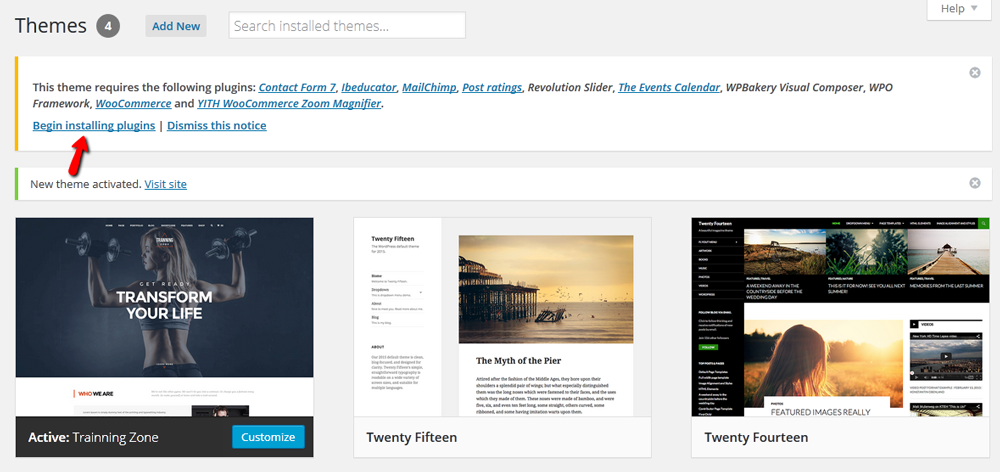
Right after the theme was activated, a notification at the top of the screen will suggest to continue with the installation of the plugins recommended for getting the best our of your theme.
Follow steps to install:
Step 1. Click ‘Begin installing plugins‘ and select the plugins you need to install from the list.
Step 2: Select all plugins then choose Install , Click Apply to install all plugins
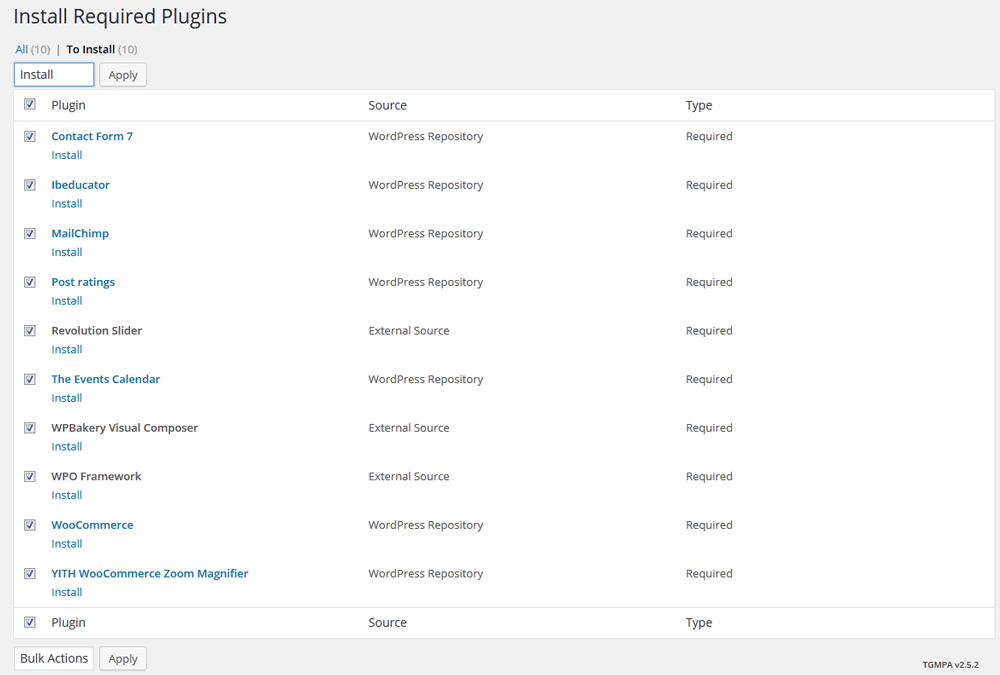
- Plugins Using in Trainingzone theme
- Contact Form 7: Allow you create contact forms on Contact Page.
- MailChimp : to use newsletter function
- Revolution Slider: premium responsive slider.
- WPBakery Visual Composer: powerful visual composer to create page layout.
- WooCommerce: The Shop engine for your WordPress site.
- The Events Celendar: help you create even post and pages.
- YITH WooCommerce Zoom Magnifier: to zoom product and make carousel thumbnail
- WPO Famework: to use custom any options.
- Post ratings : Show to you number of ratings.
- Ibeducator : Use to create course and lesson.
Step 3: After Installing all Plugins, select Activate then click Apply to active all plugins.
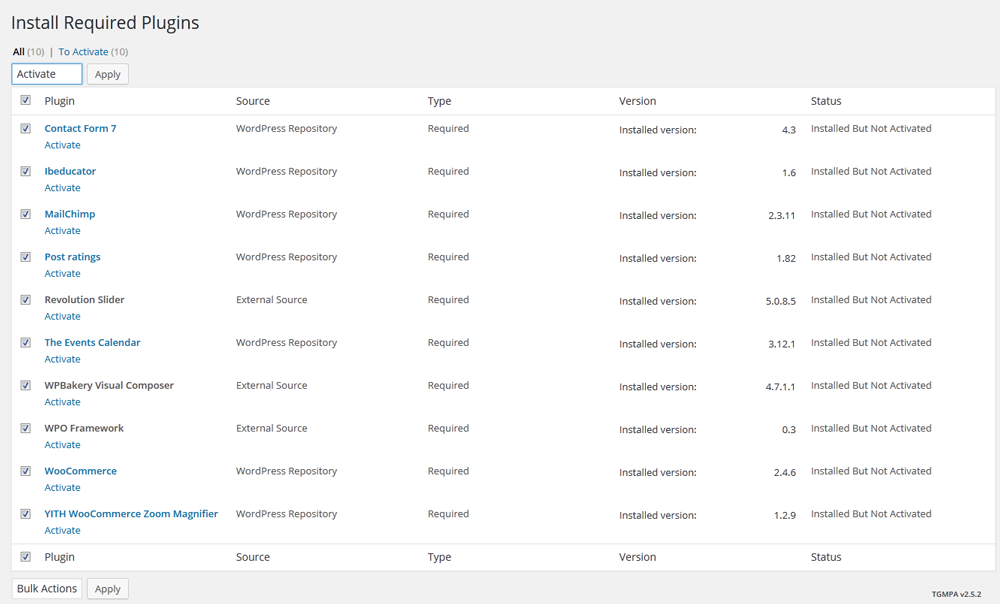
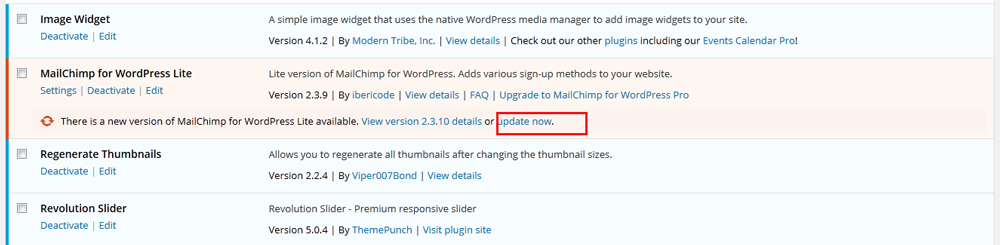
Step 4: Update plugin.
Go to "Plugins" -> "Installed plugins" you can see that plugin have to update and click "Update now" to begin update.
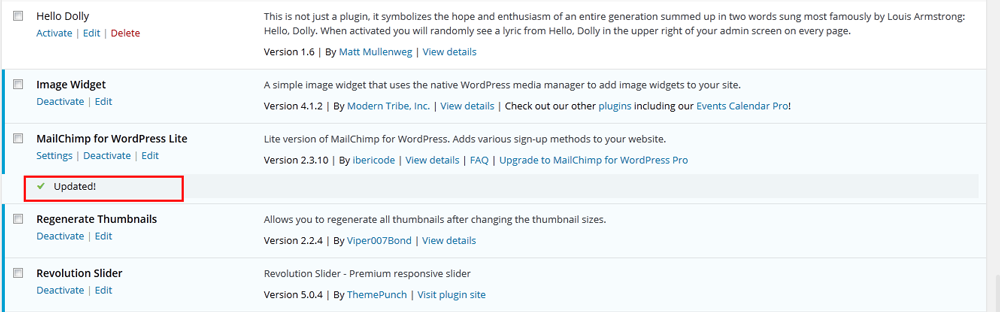
When update has finished you can see :
Follow our video guide to know more :
Install Data Demo
1 :Install Data Demo
Opal Team very happy to provide for customer a new function to import data more quickly. It is "One click import"
With "One click import", customer do not import step by step data as import usual. It import all data like : Content, Widget, Revolution slider, Menu, Customize...
One click import data
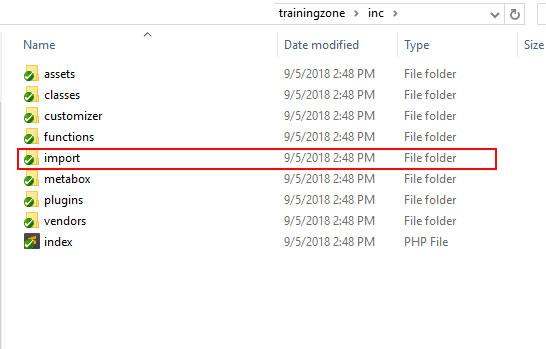
To use it make sure file of your theme have to "import" folder in "inc" folder like this:
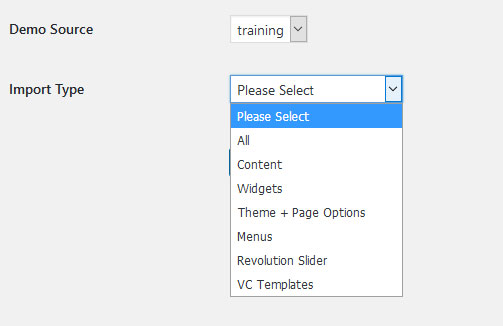
Go to Dashboard -> Appearance -> WpOpal Import . You can see " Get demo from live server", please click in "RTrainingzone sample" :
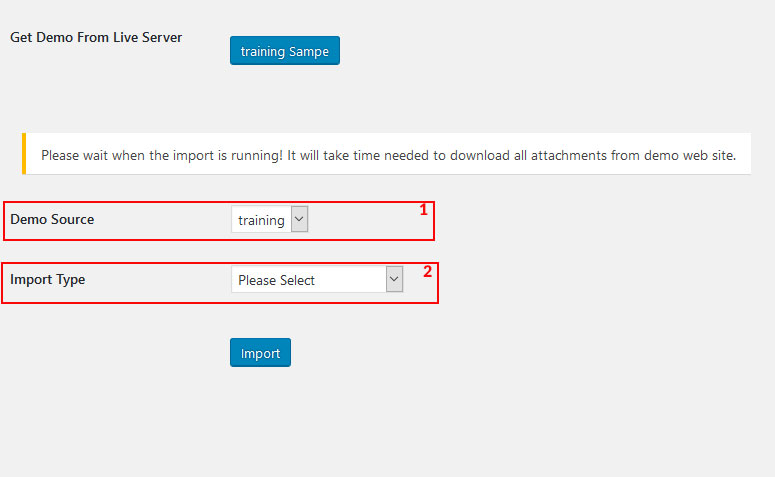
1. Demo Soure : Choose name of demo to import .
2.Import Type : Choose name of type to import ( choose All or chose one of types to import)
- All - suggested option: the option will import all demo content (products, menus, theme options, ect) to replicate Trainingzone demo on your server without any other step.
- Content - import site content: posts, products.
- Widgets - import widgets used in Trainingzone demo site.
- Theme + Page options - import theme and page settings.
- Menu - import all menus.
- Revolutions Slider - import sliders built with with revolutions slider plugin.
- VC Template - import pages built with king composer plugin.
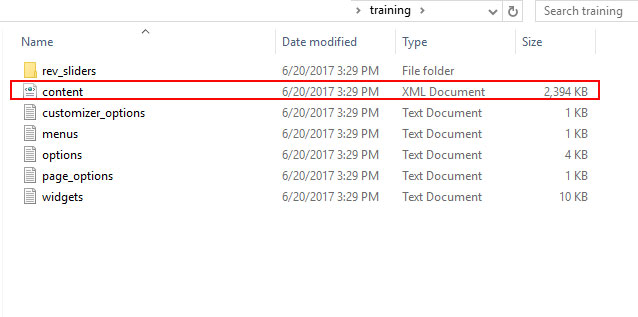
File to import all data is : content.xml
Specially, You can go to Wpopal Import to import config of menu, widget, page and theme options.
Click "Import" and popup is displayed, click "OK" to continue import data
When import has been imported it will display popup : "Import is successful"
Follow our video guide to know more :
Or You can import data by tool of wordpress.
The Trainingzone theme comes with importable demo data, such as pages, products, blog, posts, portfolio items, etc, to help you get started in case you’re running on a fresh WordPress installation.
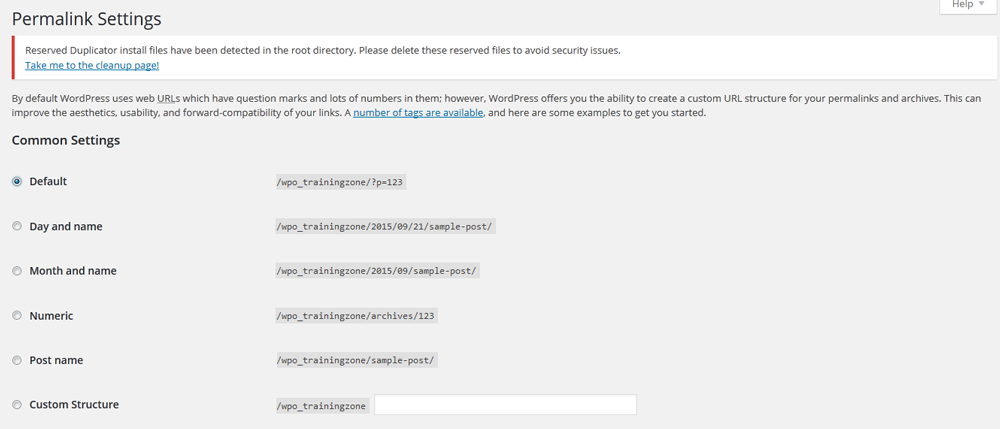
But before import data you should go to "Settings->Permalinks and choose Default in common settings" , you import or export data will not be lost.
And then go to step by step bellow:
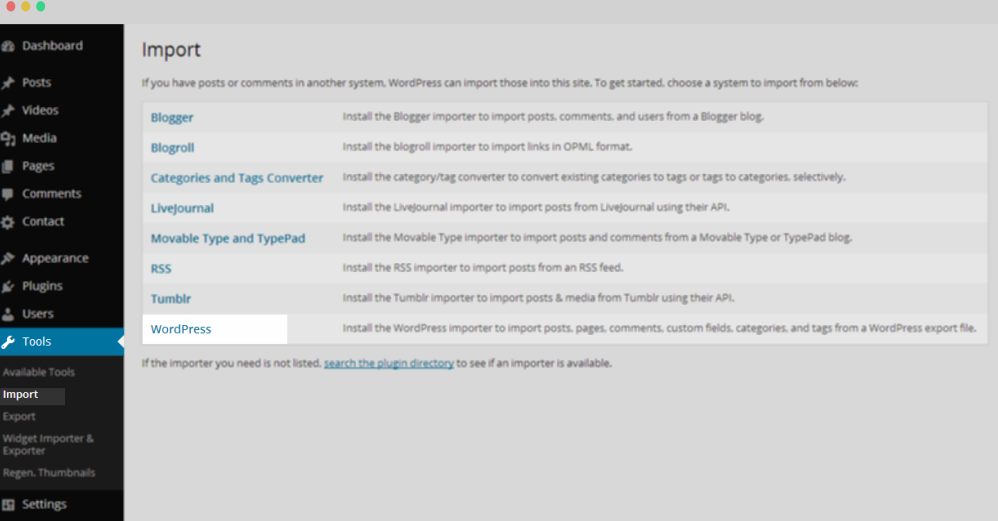
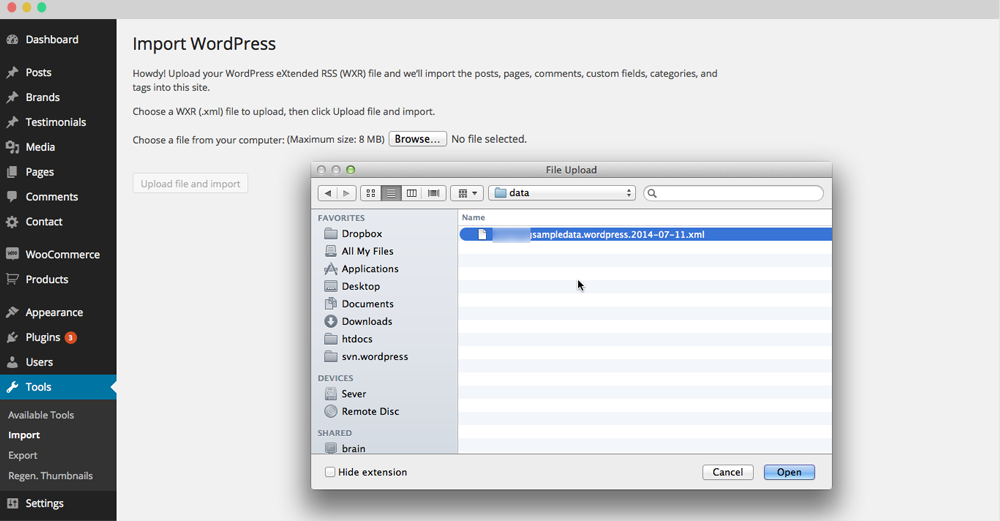
Step 1: From the WordPress admin area go to Tools >> Import and click on the WordPress link.
Step 2: You can import all of our demo by one step
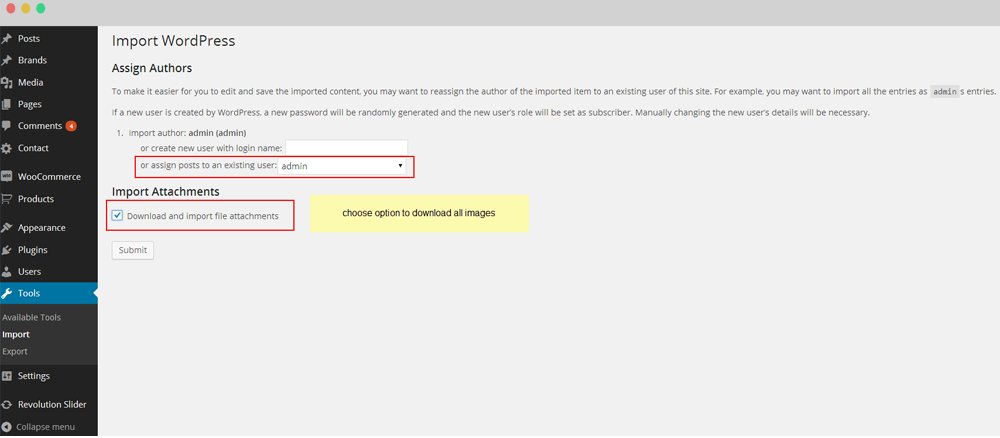
Step 3: Assign Authors
Choose the option to download all data sample file and click Submit. Do not interrupt/cancel the import process!
The importer should be run only once. If something went wrong and you need to import the content again, you may need to reset your WordPress.
Use this plugin to reset the WordPress database : http://wordpress.org/plugins/wordpress-database-reset/
Step 4 :Set a page as Home Page
After import Dummy Data you need to set default Home page for your site, from your WordPress dashboard, navigate to Settings → Reading.
Select “A static page” and choose “Dummy Homepage” as the Front Page.
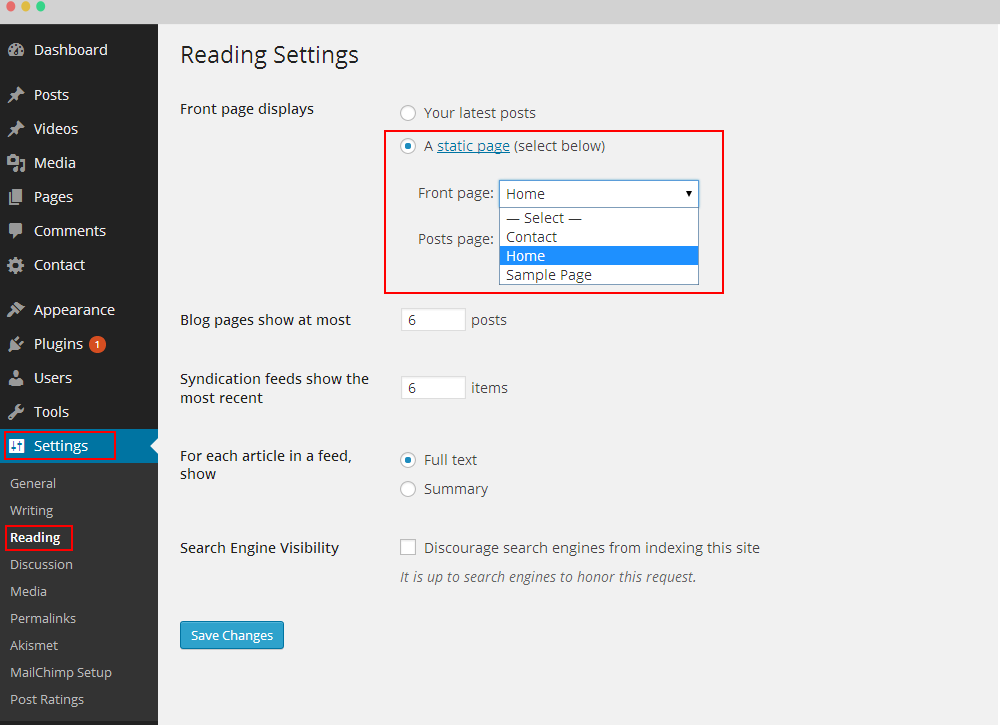
Save change then Homepage data sample will be set.
Step 5 - Done! But you still need to set the Menu, Widget, Slider. Follow more on bellow
Follow our video guide to know more :
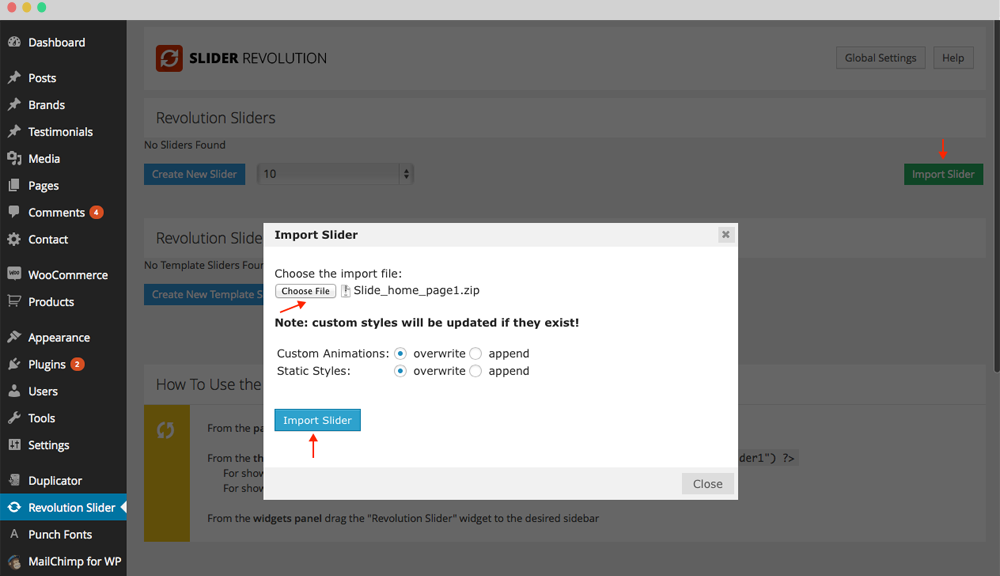
2. Import Revolution Slider
From the WordPress admin area go to Revolution Slider >> Import Slider and select Slider file on our package.
you can see all slider displayed in here and you can
+ Embed slider.
+Export.
+Delete.
+Duplicate.
+Preview.
+Settings.
+Edit slider.

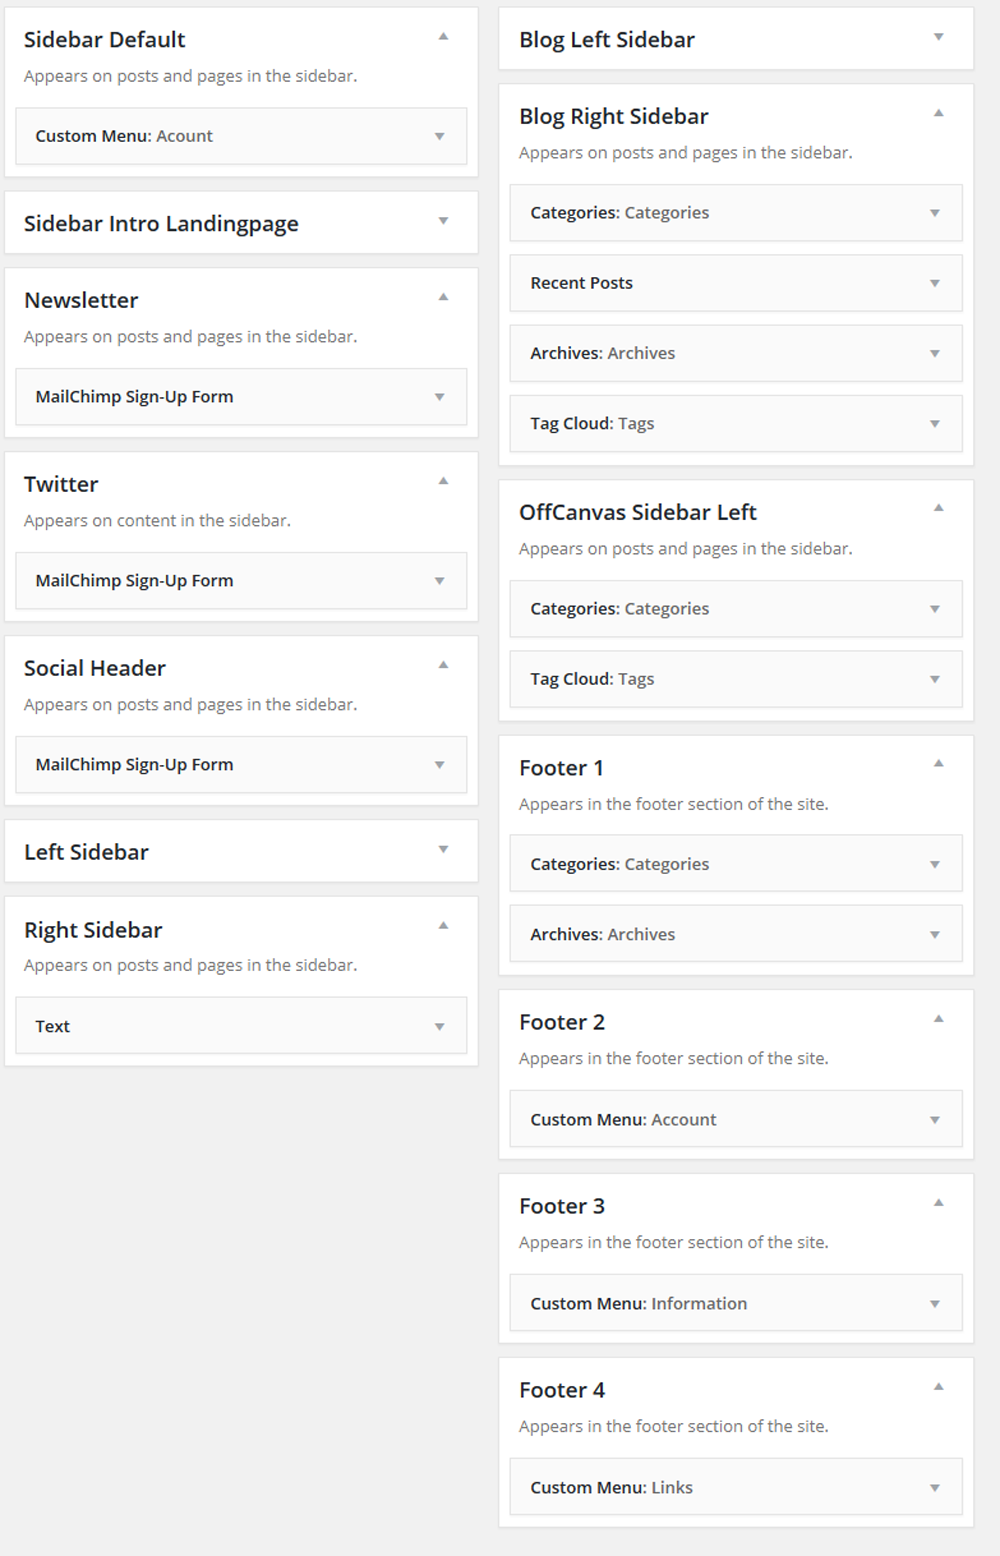
Install Widgets
1. Install widget
Go to Admin Panel -> Appearance -> Widgets.
You can see all our widgets, easy to configure by drag and drop Widgets to sidebar.
Then you can use sidebars to position you want. Even you can use sidebar for MegaMenu.
Morever you can search and add more plugins for your purpose by searching on the internet.
Follow our video guide to know more :
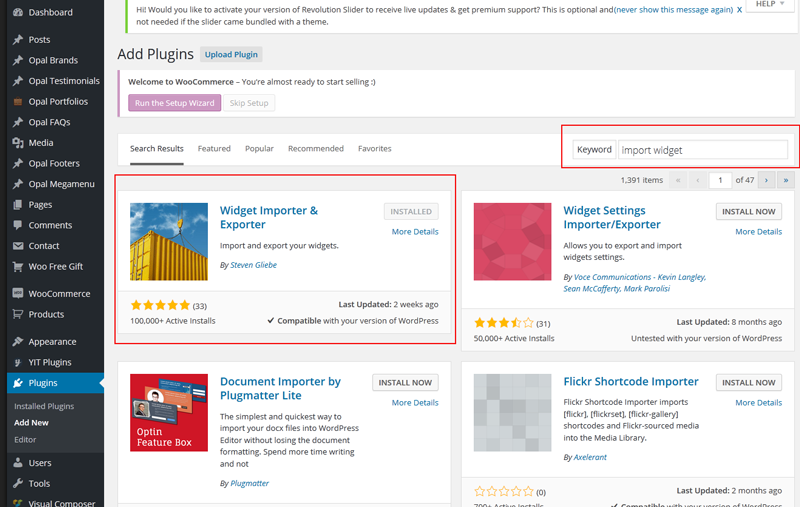
2. Install widget by plugin import widget
Go to Admin Panel -> Plugins-> Add new
You can see broad add new plugin, please fill in " import widget" to search plugin.
and go to Tool -> widget importer & exporter then you choose widget to import in your site.
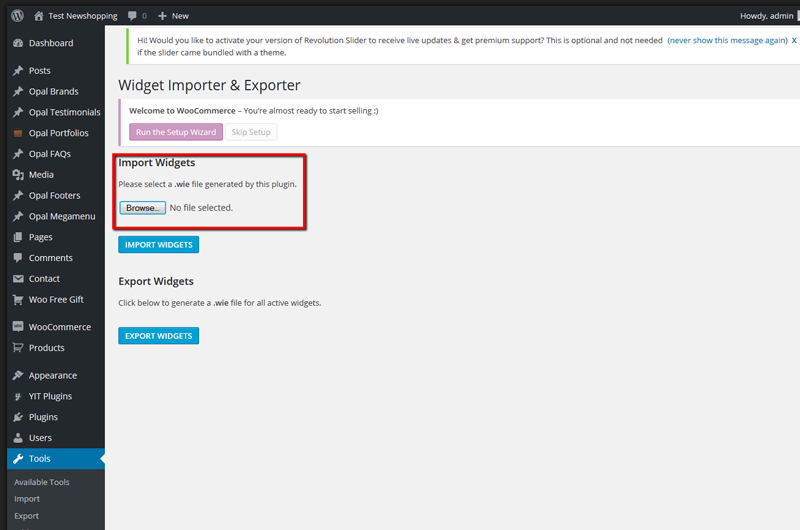
When import finish you can see widget :
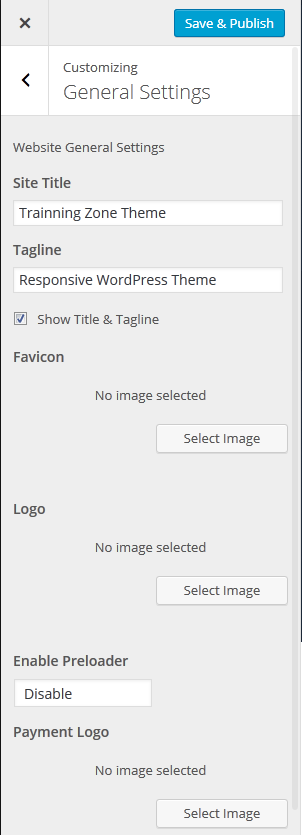
Set Up Logo
You can upload your logo image in the Customize. If the logo is not uploaded, then your site name will be used.
Please, follow the steps below to upload your logo:
Step 1 - Login to your WordPress Dashboard.
Step 2 - Go to Appearance > Customize > General Settings Tab.
Step 3 - Upload your logo by clicking on Select Image ( our current Trainingzone logo is 150px x 50px ).
Step 4- Upload your favicon - should be a 32px x 32px Png/Gif image.
Set Up Menu
1. Creating your menu
Step 1 - Login to the WordPress Dashboard.
Step 2 - From the 'Appearance' menu on the left-hand side of the Dashboard, select the 'Menus' option to bring up the Menu Editor.
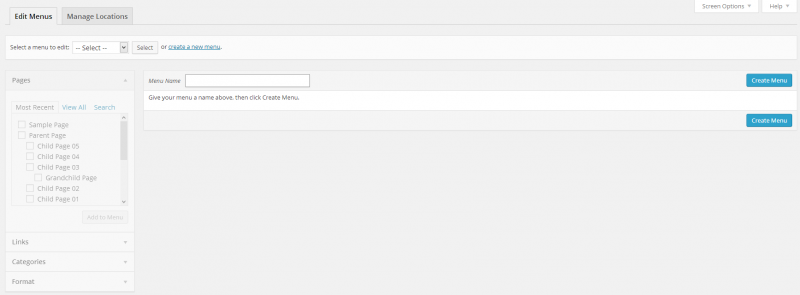
Step 3 - Select Create a new menu at the top of the page.
Step 4 - Enter a name for your new menu in the Menu Name box.
Step 5 - Click the Create Menu button. Your menu is now defined, and you can now add pages to it (steps below).
2. Adding pages to your menu
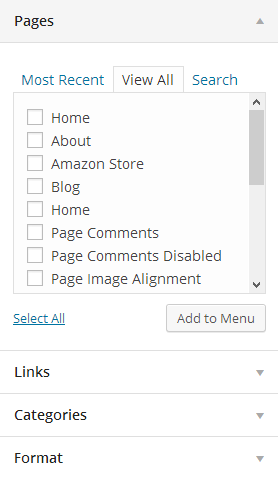
Step 1 - Locate the pane entitled Pages.
Step 2 - Within this pane, select the View All link to bring up a list of all the currently published Pages on your site.
Step 3 - Select the Pages that you want to add by clicking the checkbox next to each Page's title.
Step 4 - Click the Add to Menu button located at the bottom of this pane to add your selection(s) to the menu that you created in the previous step.
Step 5 - Click the Save Menu button once you've added all the menu items you want. Your custom menu has now been saved.
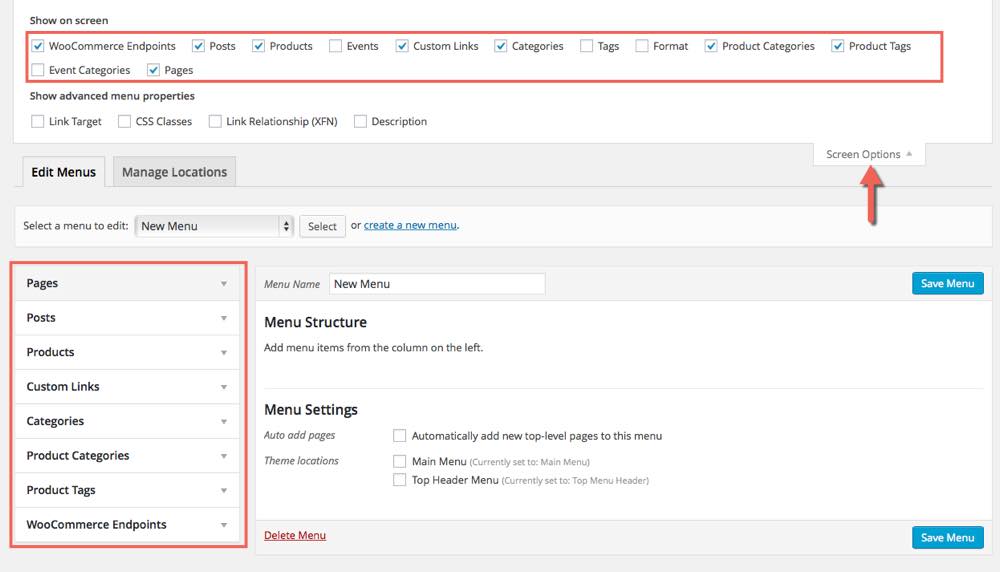
The Screen Options allow you to choose which items you can use to add to a menu. Certain items, like Posts or Products are hidden by default. The Screen Options are located in the top right corner of your WordPress Dashboard.
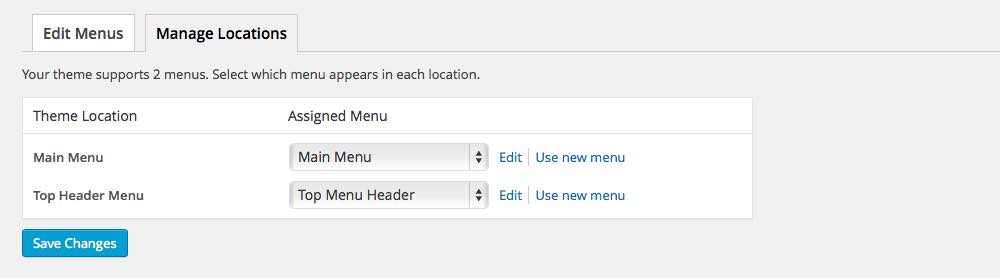
3. Assigning a Menu to a Location
Once you've created a menu and filled it with items, it's time to assign it to one of the theme pre-defined locations.
Step 1 - Go to Appearance > Menus and click Manage Locations.
Step 2 - Assign each Theme Location with a menu. You can assign menus to multiple Theme Locations.
Step 3 - Click the Save Changes button.
The following steps will guide you in defining your menus using the WordPress menu editor and Opal Megamenu.
Opal MegaMenu is a user-friendly, highly customizable responsive Mega Menu WordPress plugin to create Menu.
In each menu, you can add as many items you need: links, pages, posts, custom links, shop categories, direct links to products, internal or external link even sidebars
4. Using Opal Megamenu tools.
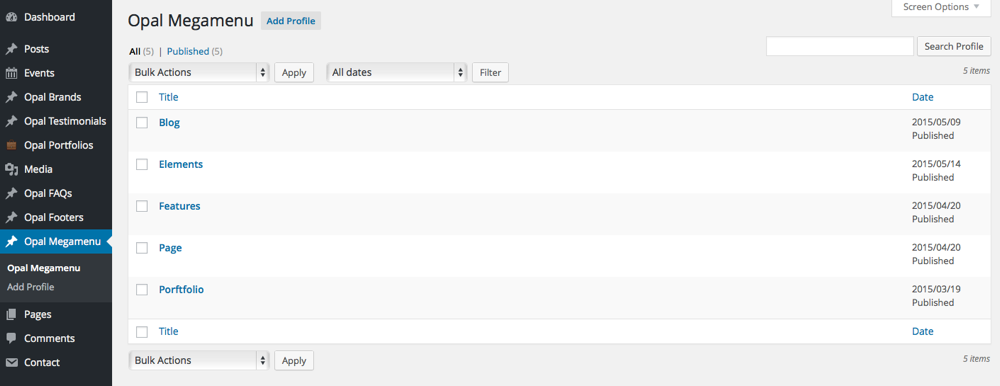
Step 1 : From your Admin Dashboard - Navigate to Opal Megamenu. Then create new Megamenu profiles.
Step 2: Create Megamenu profiles by Visual Composer Elements. That can help you create anything you want. Drag any contents you need to your menu.
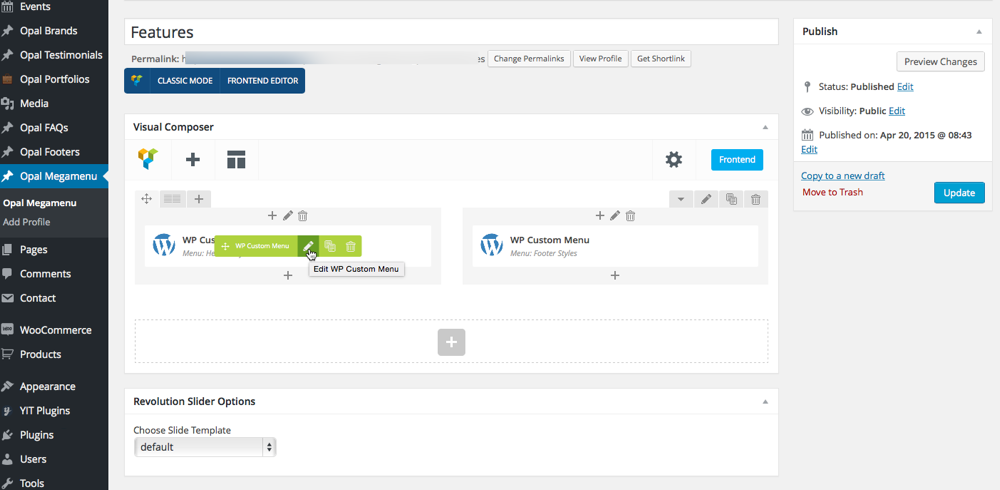
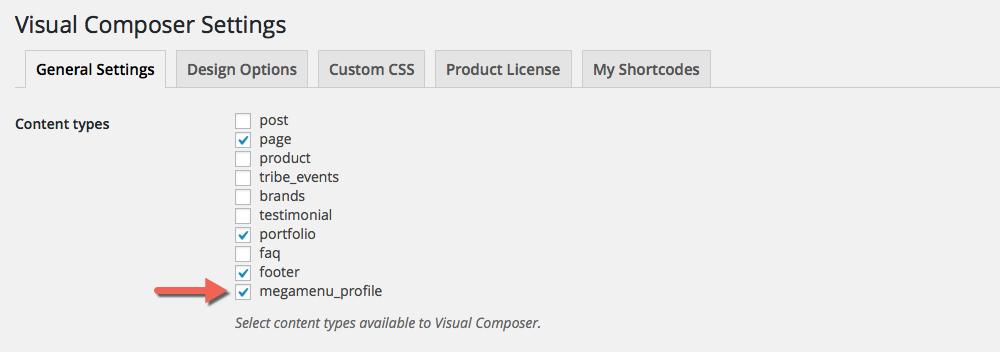
If you do not see Visual Composer editor on Opal Megamenu tools, You need to active it by go to : Visual Composer > Enable Visual Composer on Opal Megamenu profile.
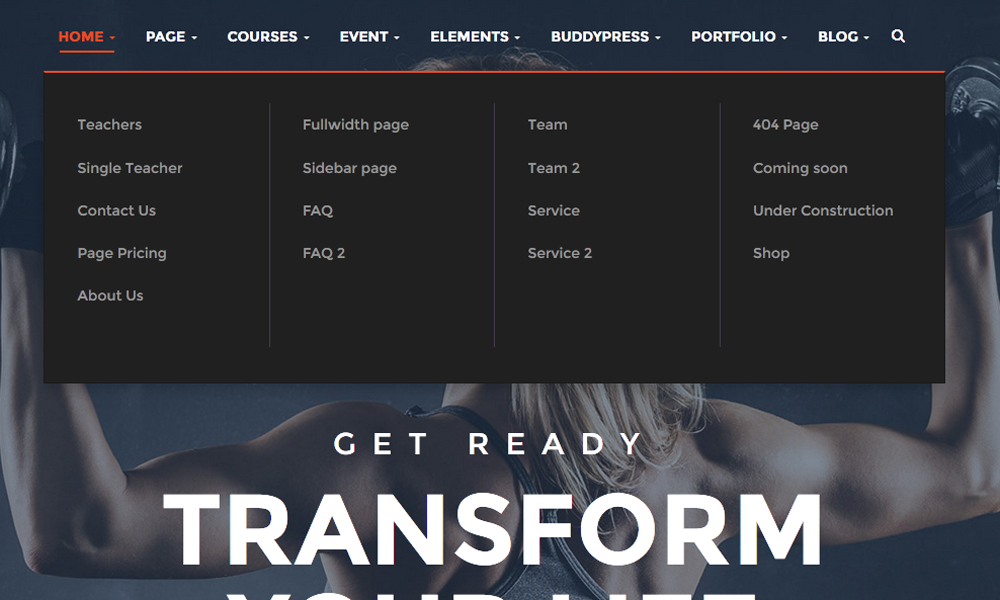
Follow that image to know more
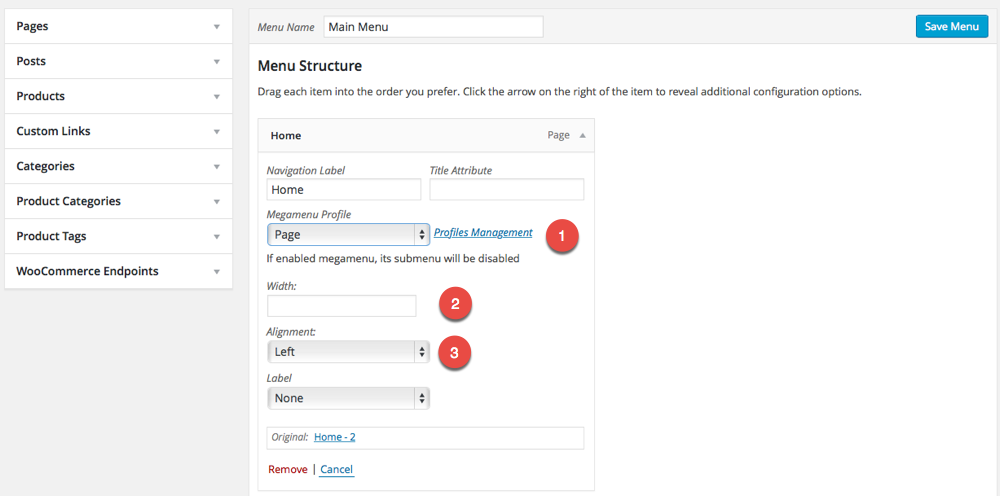
Step 3 : Enable Megamenu profile on Menu.
- Go to your menu. Under each menus option you can see.
1. Megamenu Profile : You can select Megamenu Profile to display on Front End. That profiles was created on step 1. If you select disable, submenu will be displayed.
2. Width : setting width of megamenu content.
3. Alignment : setting position of megamenu content.
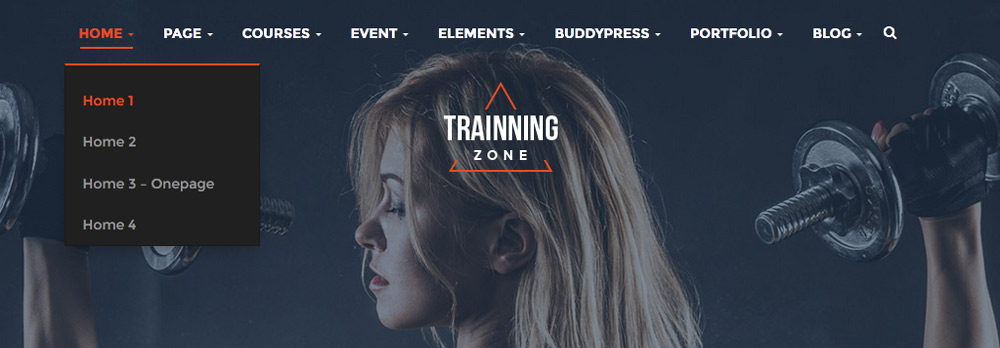
Front end look like
1. Menu Home have megamenu Page profile. Width : 800 , Alignment left.
2. Menu Home have disable Megamenu profile. Submenu will be displayed.
Set Up Home Page
You can quickly build a home page using Visual Composer for WordPress that is drag and drop frontend and backend page builder plugin that will save you tons of time working on the site content. You will be able to take full control over your WordPress site, build any layout you can imagine – no programming knowledge required
From your Dashboard admin Navigate to Pages
- Select All Pages to see all page then click edit one page you want
- Select Add New to create new page
A. How to use Visual Composer
Official Plugin Documentation For More information about the Visual Composer check the official documentation.
Watch video about Visual Composer
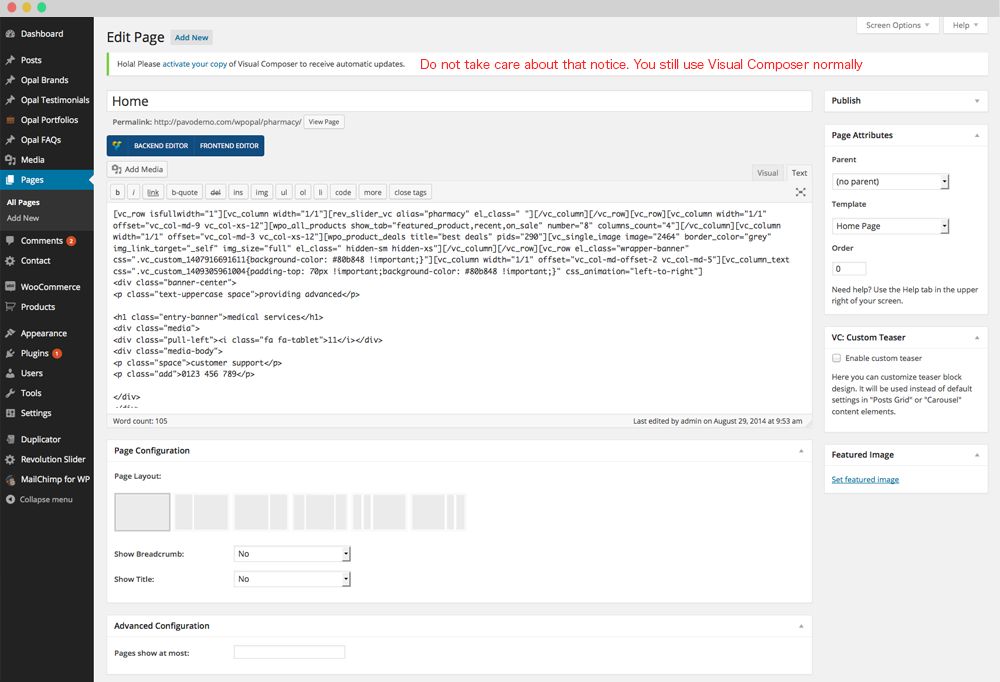
1. Classic Mode.
You can insert code on table then Home page will be created automatically.
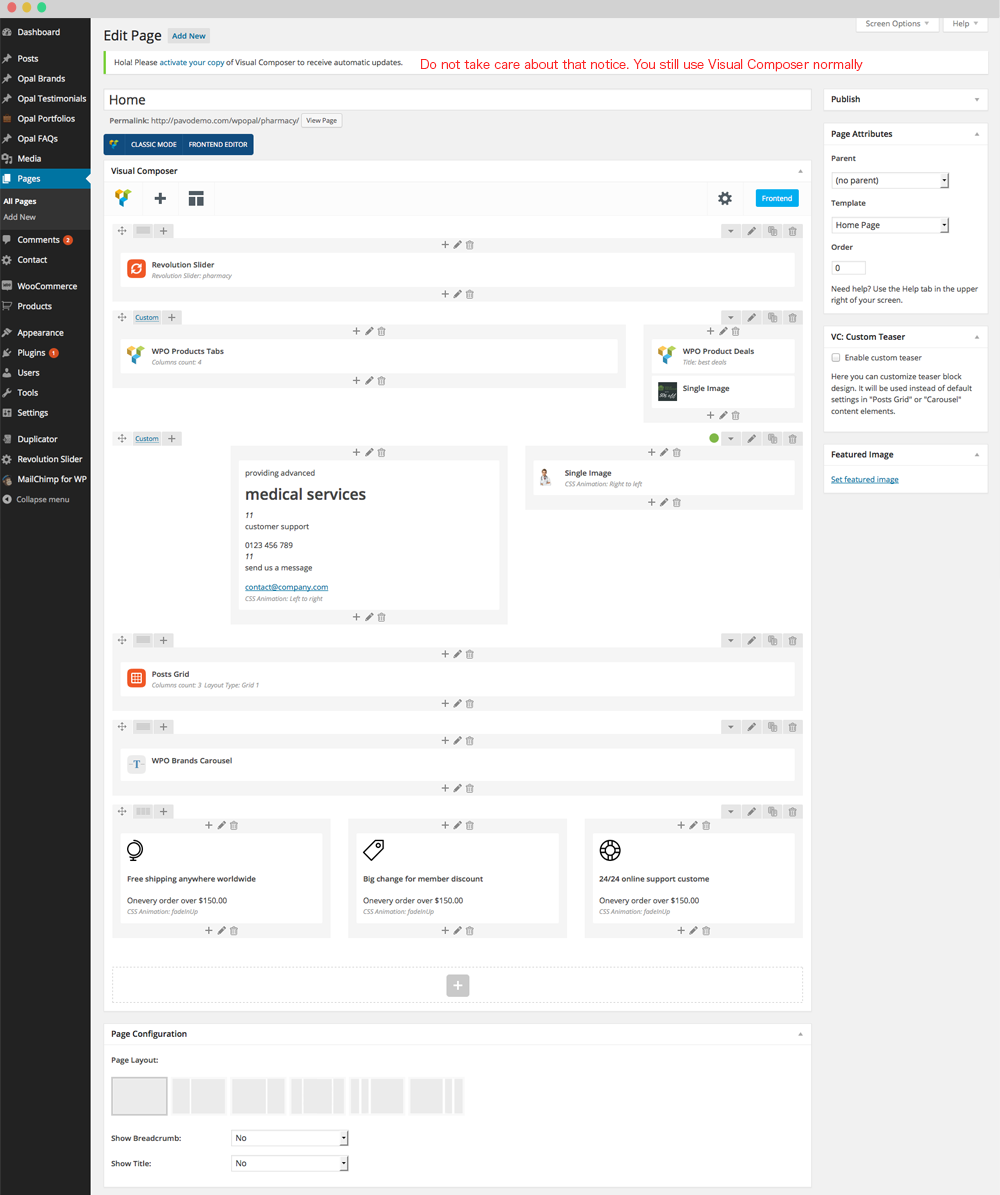
2. Backend Editor Mode
Drag and drop elements you need to build your page layout.
How to use Back End Mode
a. Add and modify Row Layout
Step 1 - Go to your page / post, first activate the backend editor and click Add Element.
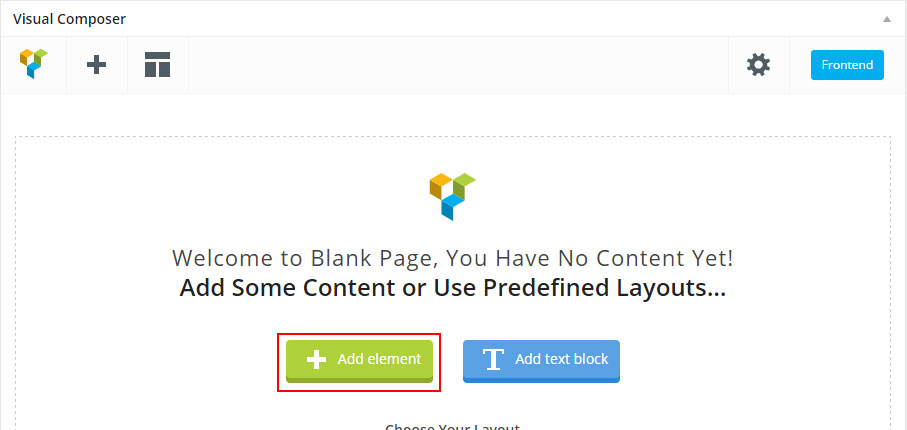
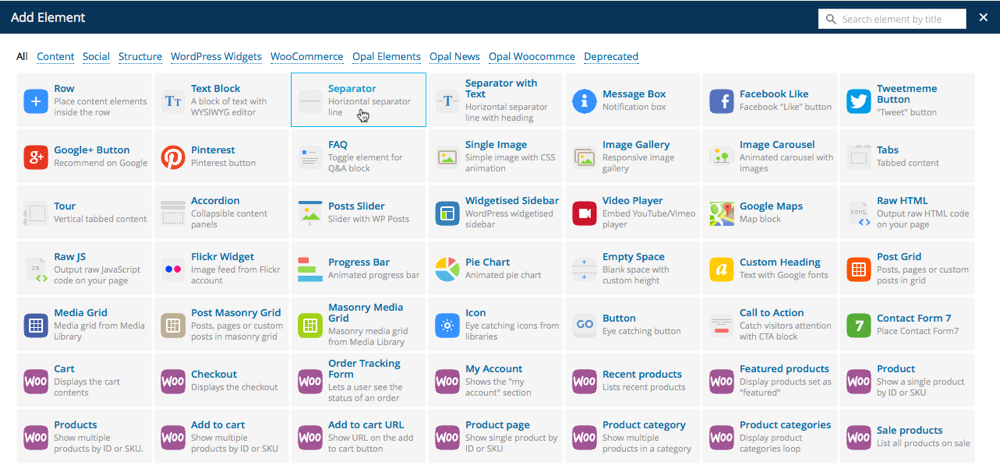
Step 2 - Select the Elements you want to use.
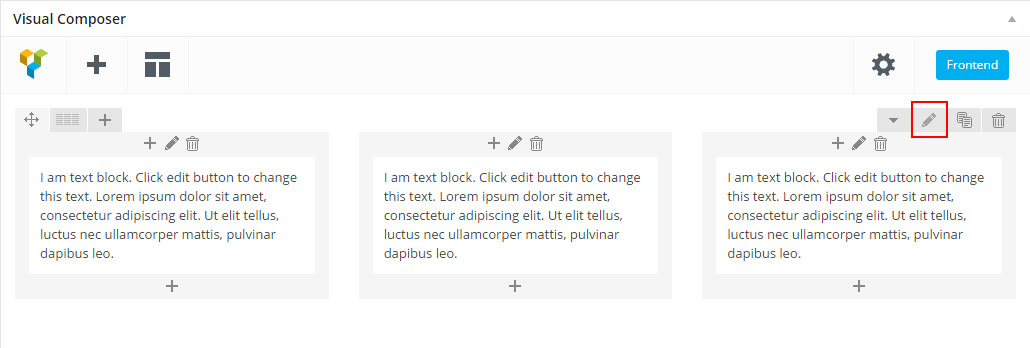
Step 3 - Click on the Edit This Row (pencil icon) to Edit the Row element ( in our example we use row with 3 columns filled with text block ).
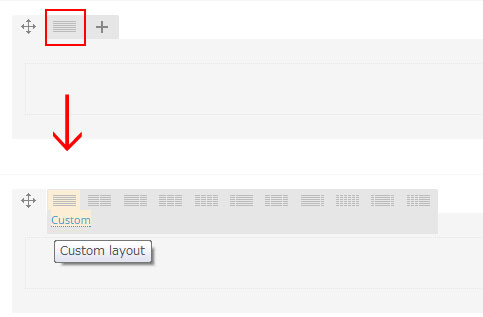
Step 4 - To change the Row layout ( number of columns ) you need to click the second Icon from the left then select a layout or custom to make your own.
b. Edit Element
Pencil Icon - To Edit Row, Column or Module you need to click the Pencil icon.
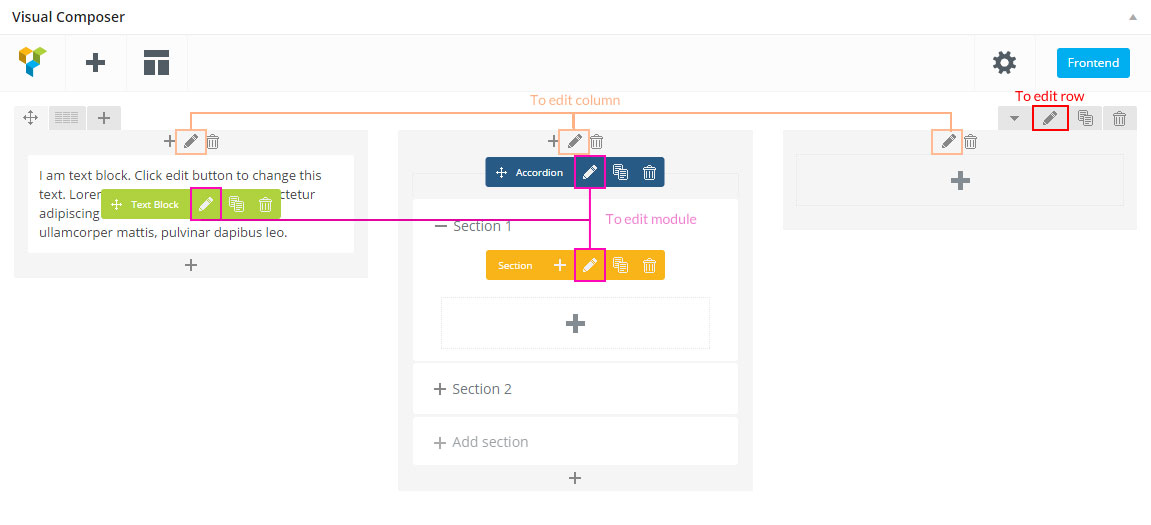
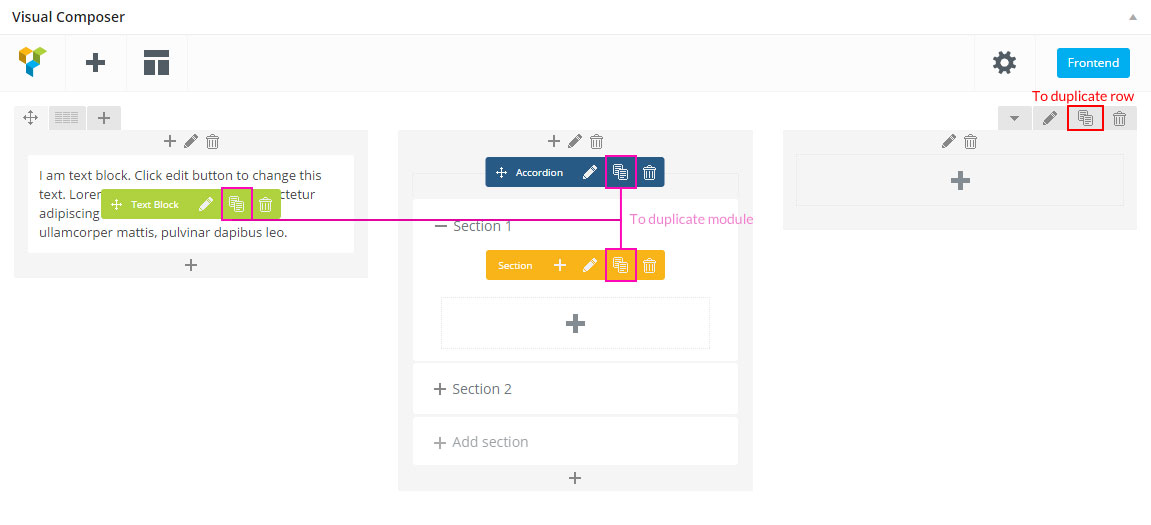
c. Duplicate Element
Pages Icon - To Duplicate Row or Module you need to click the Pages icon.
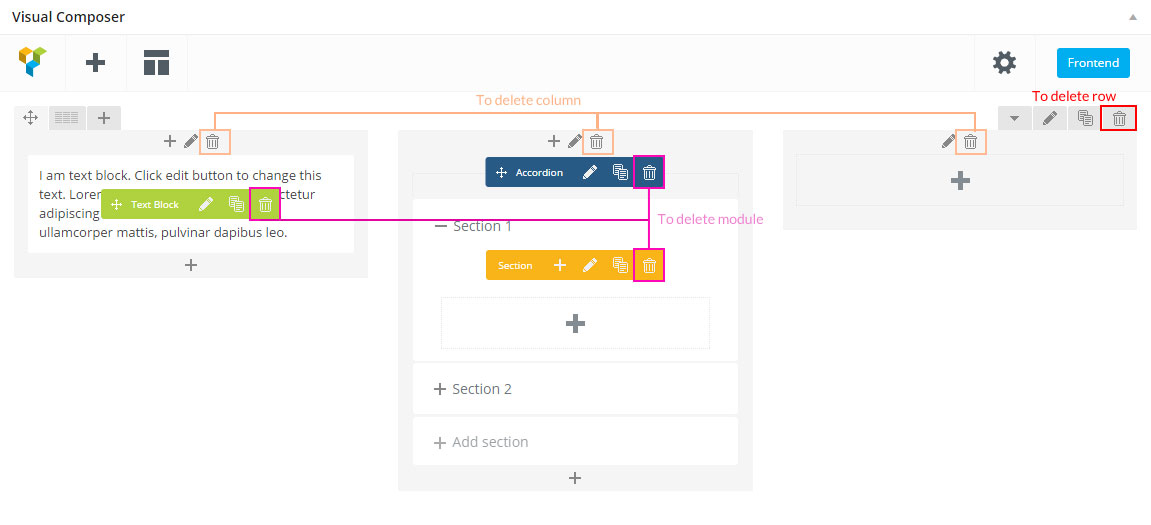
d. Remove Element
Trash Box Icon - To Remove Row, Column or Module you need to click the Trash Box icon.
e. About Row / Column / Custom heading / Text Block Design options
Design Options - When you edit row / column / custom heading / text block module, you can edit the design options
.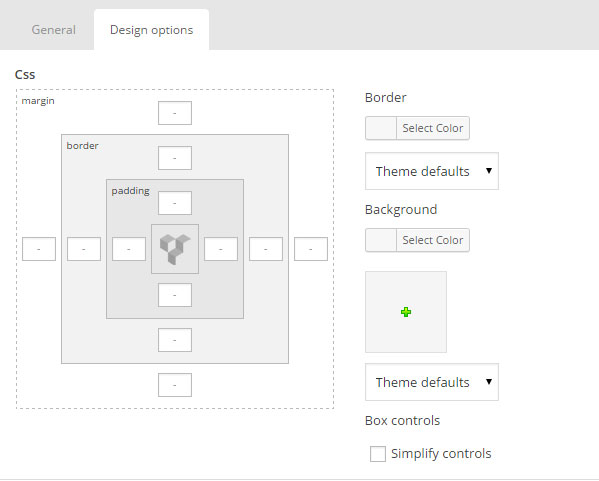
Row / Custom Heading / Text Block element have a default Bottom Margin of 35 pixel, you may want to set it to 0 if you don't want to have bottom space
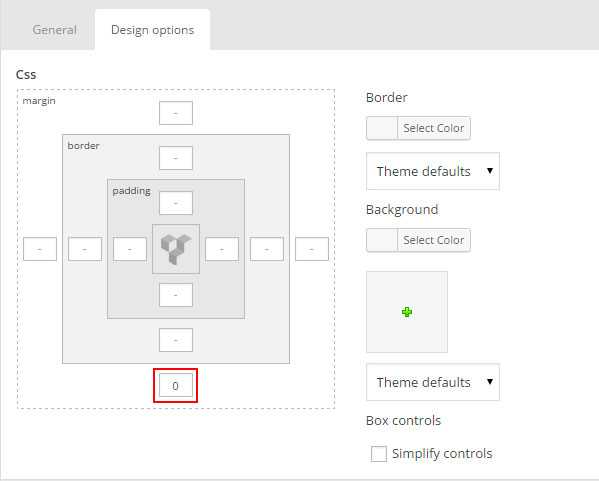
It is Good to add bottom Padding to your Column, so they will looks good on mobile
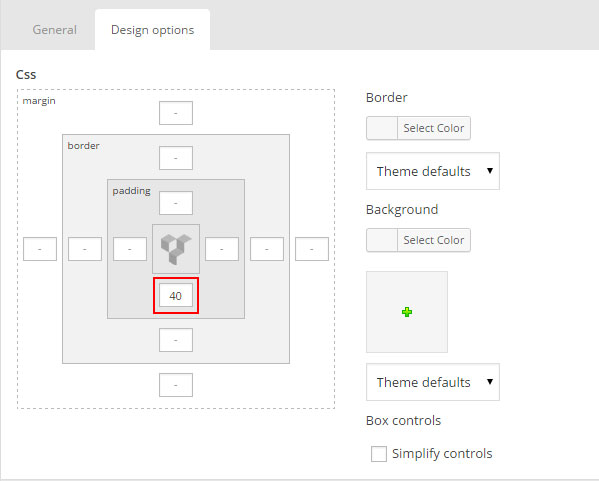
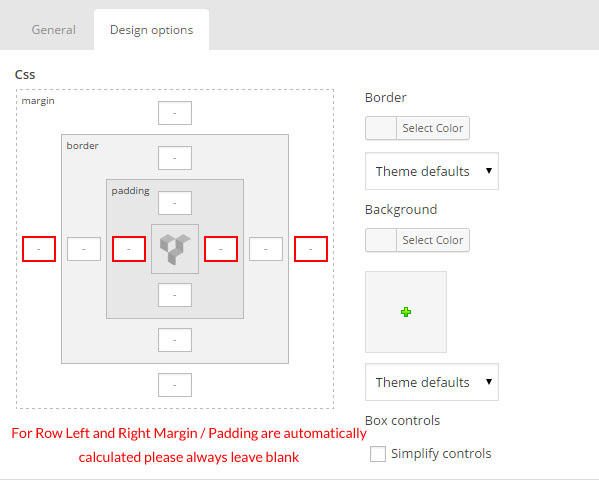
Left and Right Margin should NEVER be modified, please left blank
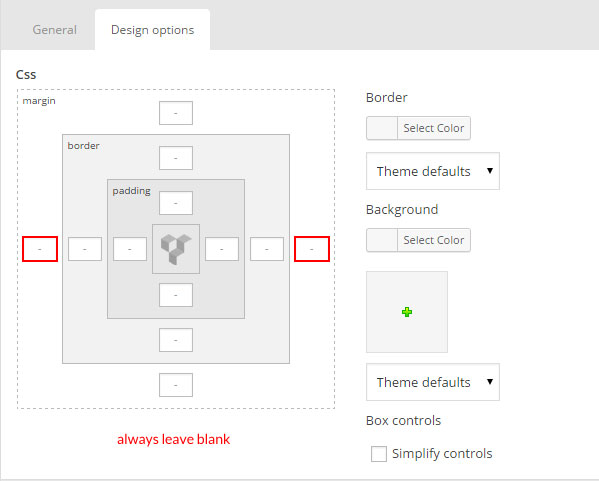
For Row module the Left and Right Padding should also NEVER be modified, please left blank
3. Page Options
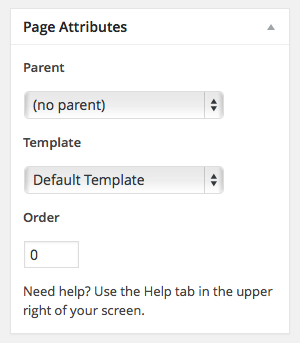
a. Page Attributes
You can select page attributes on right sidebar of page admin layout. Each Page templates have each styles
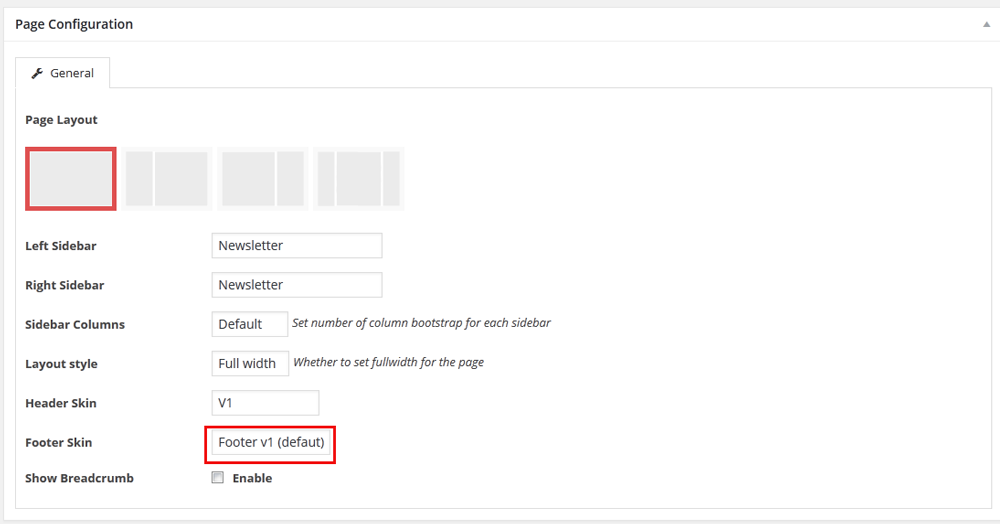
b. Page configure default template
For each page you can change the page layout style, header skin, footer skin and much more! Check the screenshot and read the documentation to see how it works
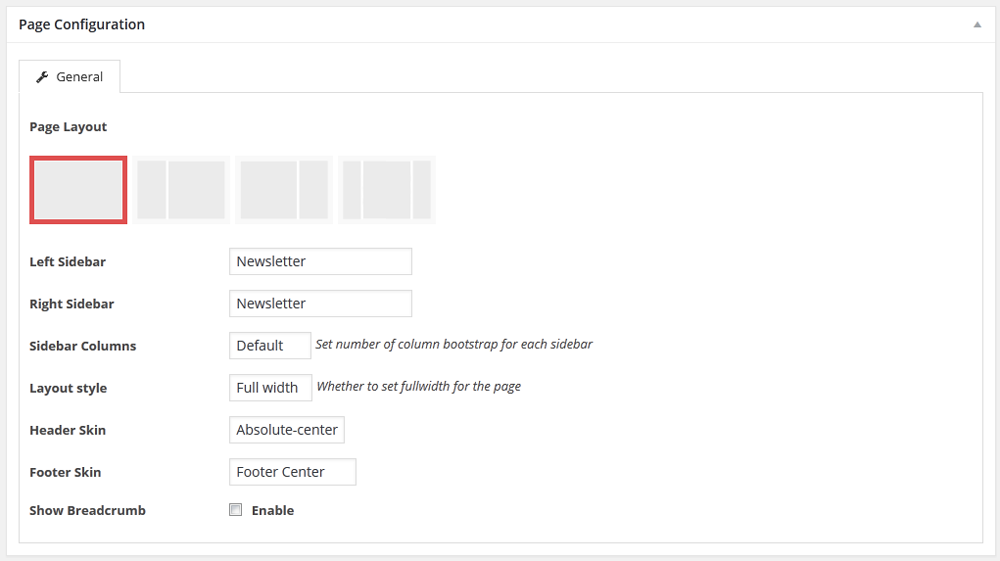
- Page Layout - Select if you want the page to have a Right Sidebar / Left Sidebar / No Sidebar.
- Left Sidebar - Select your sidebar content will be displayed when you choose page with left sidebar
- Right Sidebar - will be display when you select page layout with right sidebar
- Sidebar Columns - Select columns of sidebar
- Layout Style - Select style for page to have a Full width, Boxed or use Global
- Header Skin - Select skin specific for Header on page or use Global
- Footer Skin - Select skin specific for Footer on page or use Global
- Show Breadcrumbs - Select if you want to show the subtitle and breadcrumbs.
B. Trainingzone Home Page Layout
Trainingzone come with more than 4 home page layout. Please check out landing page to know more and build your home page you need.
1. Home 1

2. Home 2

3. Home 3

4. Home 4

C. Set a page as Home Page
Step 1 - Go to Settings > Reading in your WordPress Dashdoard panel.
Step 2 - Set "Front page displays" to a "Static Page".
Step 3 - In the drop down menu for "Front Page" choose a page which will be your home page.
Step 4 - Leave the drop down menu for "Posts page" empty, as this is not used by the theme.
Step 5 - Save changes.
Create teacher
1.Create category teachers
Step 1 - Log in to your WordPress Administration Panel (Dashboard)
Step 2 - Click the 'Teachers' tab.
Step 3 - Click the 'Categories' sub-tab.
Step 4 - Start filling in name of teacher categories that the name is how it appears on your site
Step 5 - Filling Slug :The “slug” is the URL-friendly version of the name. It is usually all lowercase and contains only letters, numbers, and hyphens.
Step 6 - Parent: select parent for teacher
Step 8 - Description: fill in about this teacher categories
Step 9 - Image: upload image to display on categories
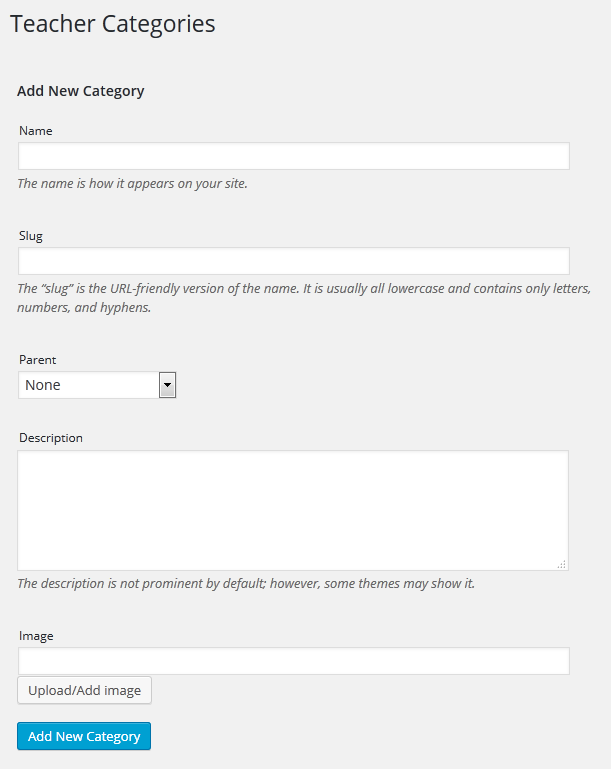
Finally: Click button "Add new category" to create categories
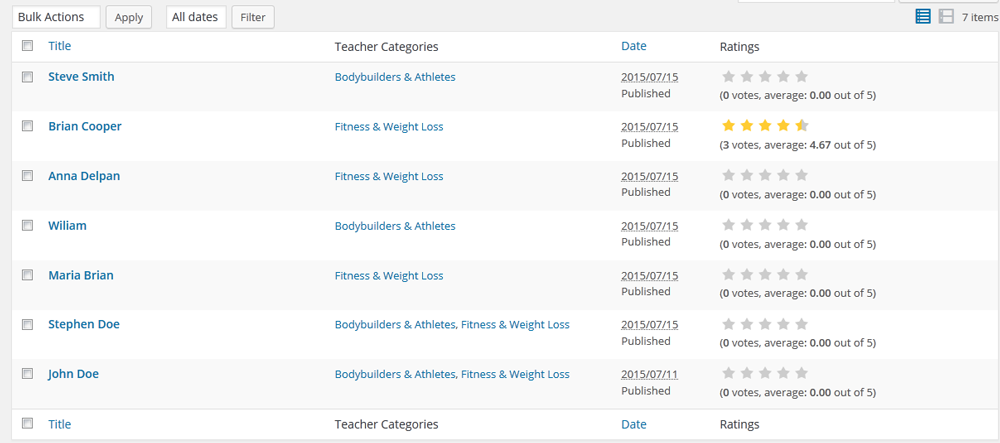
Here all teacher categories has created.
2.Create teacher
Step 1 - Log in to your WordPress Administration Panel (Dashboard).
Step 2 - Click the 'Teacher' tab.
Step 3 - Click the 'Add New Teacher' sub-tab.
Step 4 - Start filling in the blanks: enter your post title in the upper field, and enter your post body content in the main post editing box below it.
Step 5 - As needed, select a teacher categories setings below the editor.
Step 6 - Upload a featured image for your Teacher.
Step 8 - Scroll down until you see the Teacher options box, there you will be able to customize the teacher.
+ Job: Fill in job of teacher such as CEO, Marketer.....
+ And fill in more option such as : Phone, Email,Facebook,Twitter, Linked In.
+ Experience : Write about exprience of teacher.
+ Specialized In : Fill in specialized of teacher that they have.
+ Skills : fill in about skills of teacher that they have.
+ Education :Fill in course that taught by teacher.
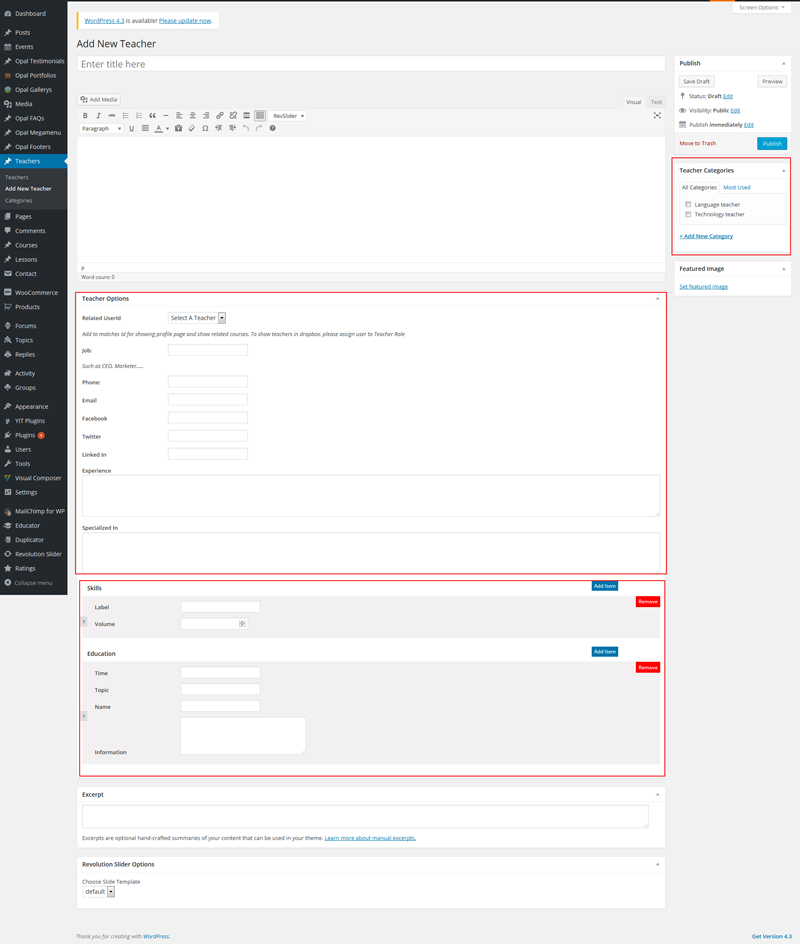
Step 9 - When your Teacher is ready, click Publish.
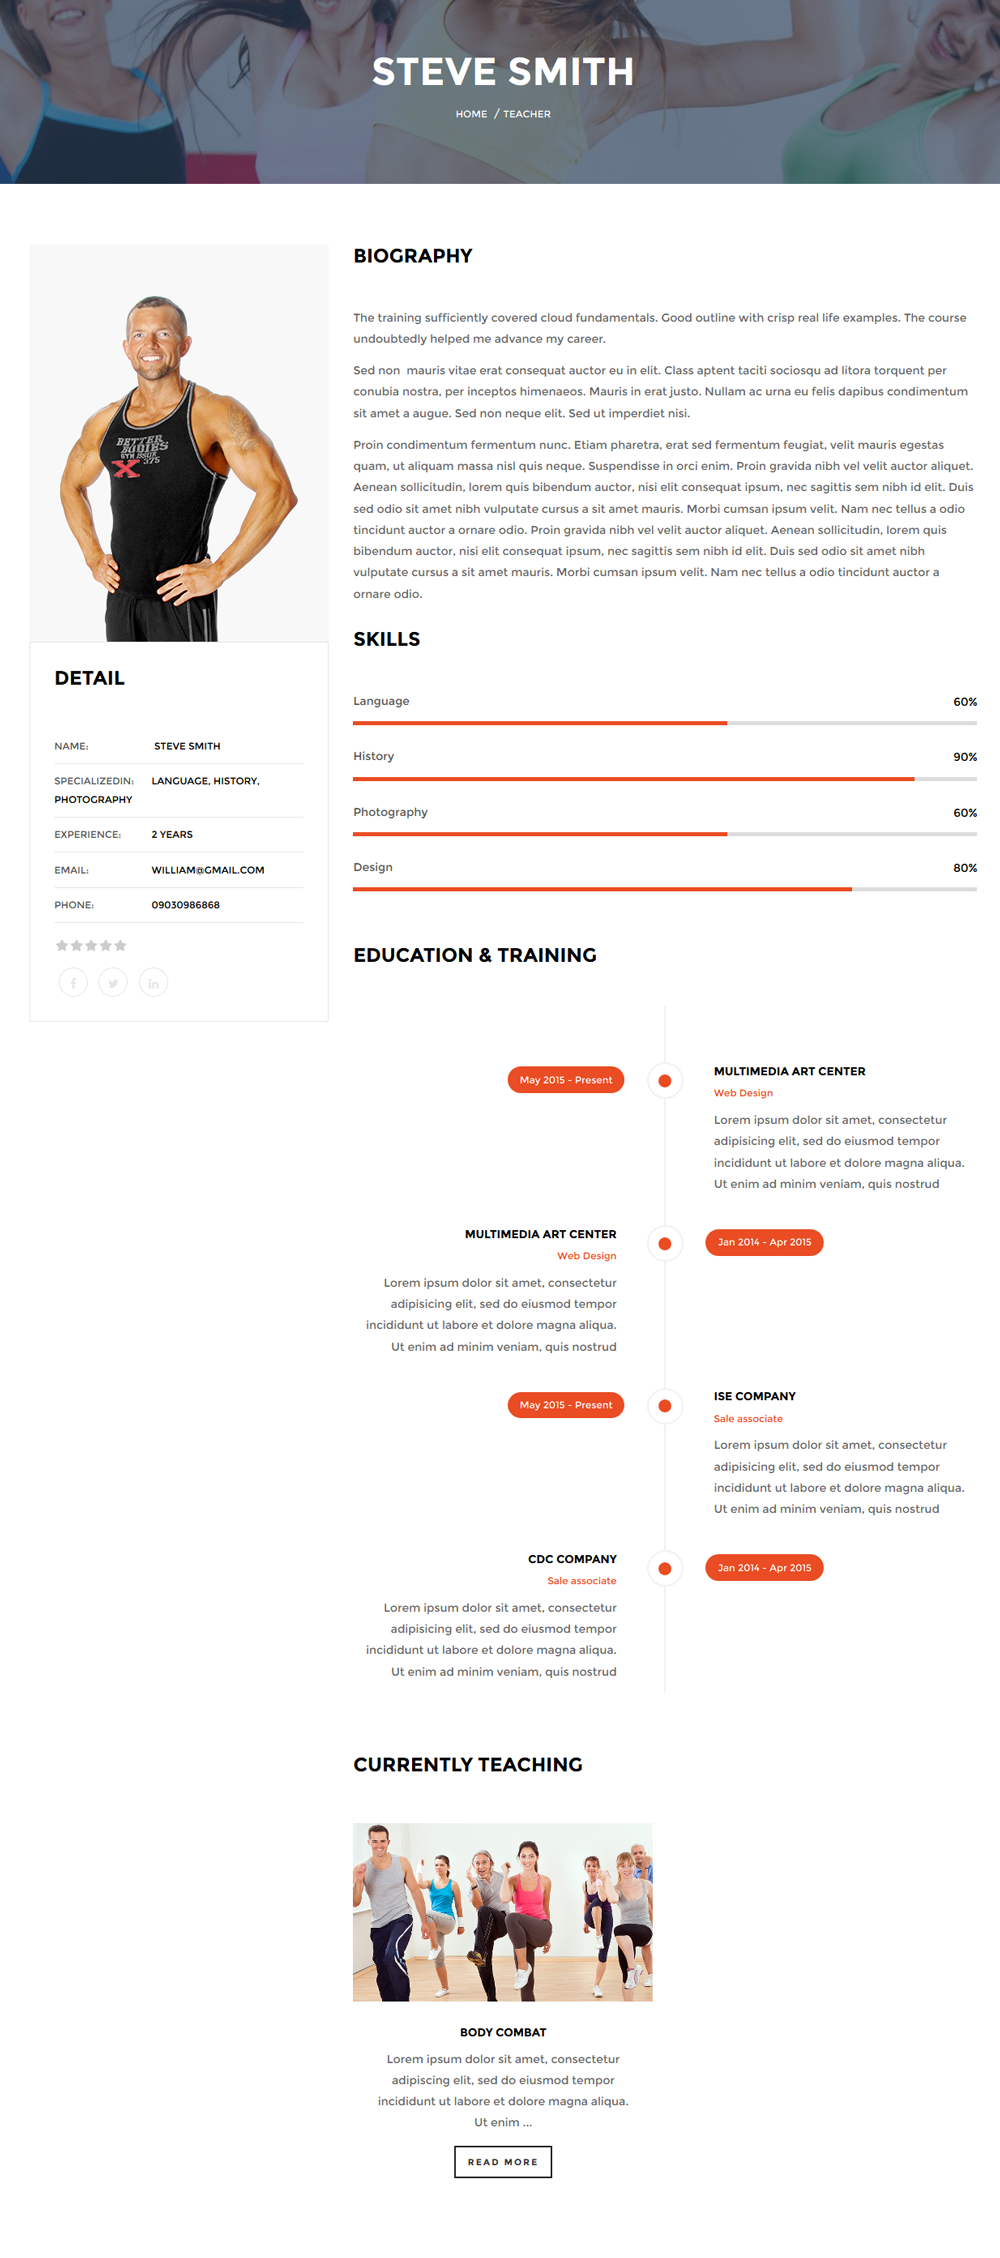
Front end look like when you finish all information of teacher:
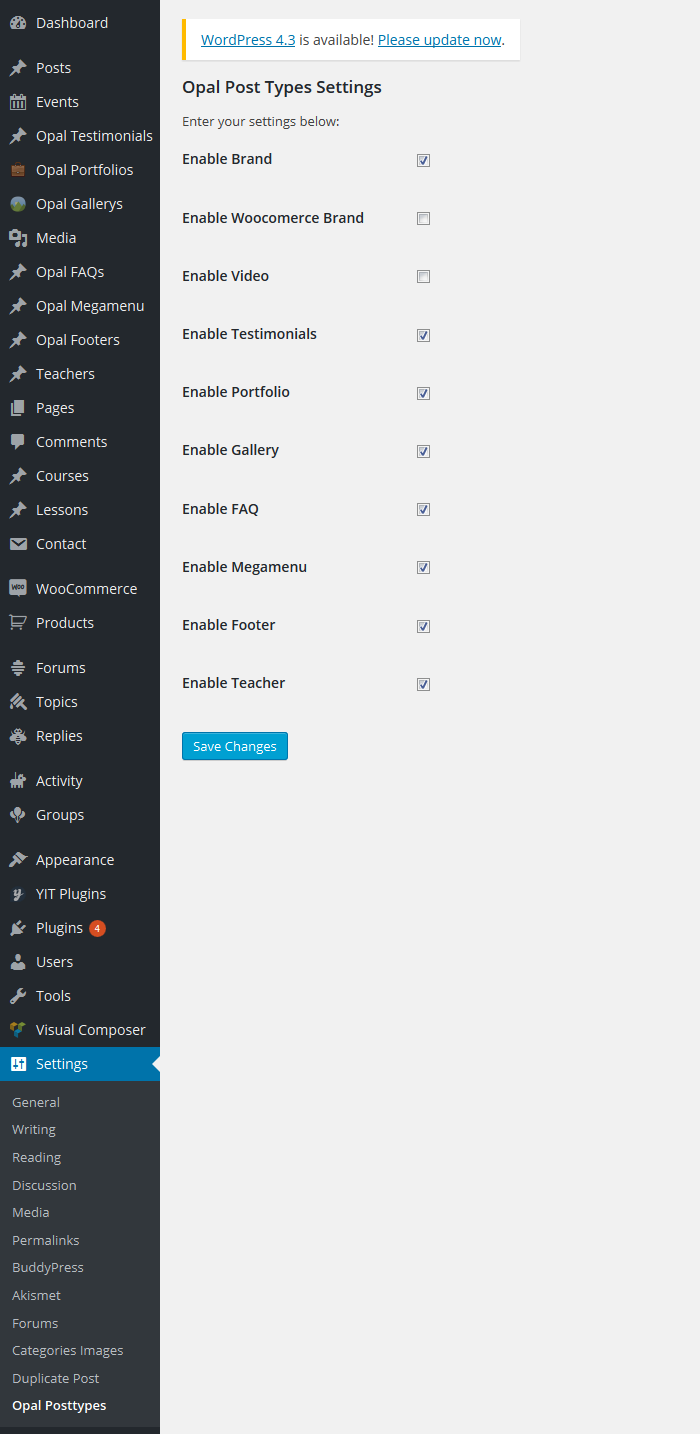
And then go to "Settings->Opal Post Types" check any box to config enable element in your site.
Create courses
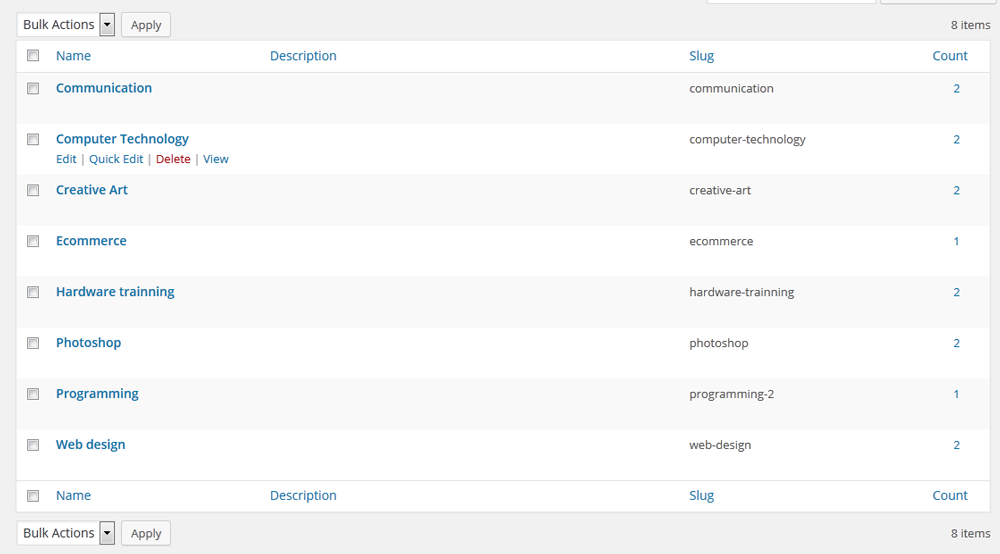
1.Create category courses
Step 1 - Log in to your WordPress Administration Panel (Dashboard).
Step 2 - Click the 'Courses' tab.
Step 3 - Click the 'Course Categories' sub-tab.
Step 4 - Start filling in name of course categories that the name is how it appears on your site.
Step 5 - Filling Slug :The “slug” is the URL-friendly version of the name. It is usually all lowercase and contains only letters, numbers, and hyphens.
Step 6 - Parent: select parent for course.
Step 8 - Description: fill in about this course categories.
Step 9 - Icon: This support display icon from material design iconic.
Step 10 - Icon color :Input color for icon.
Step 11 - Image : Upload image to display on categories.
Step 12 - Thumbnail : Upload thumbnail for course.
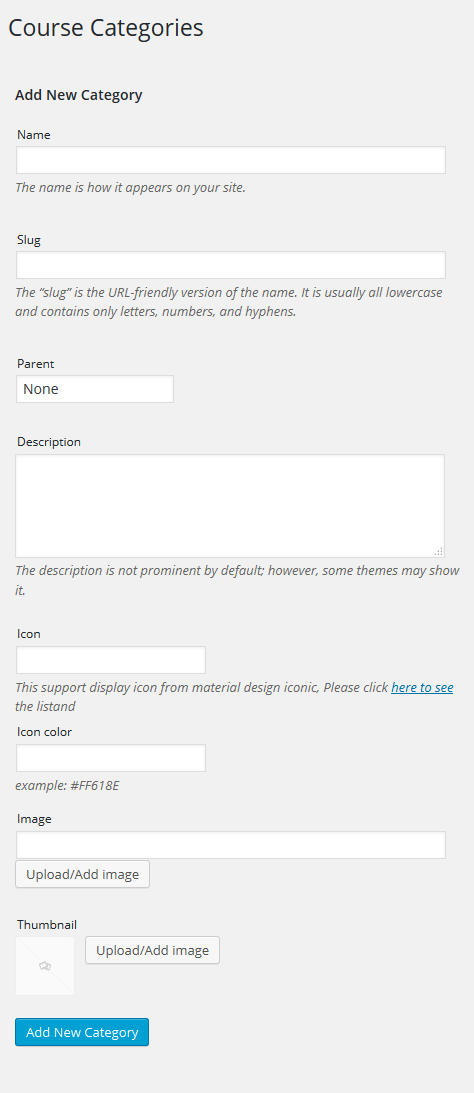
Finally: Click button "Add new category" to create categories
Here all course categories has created.
2.Create Course
Step 1 - Log in to your WordPress Administration Panel (Dashboard).
Step 2 - Click the 'Course' tab.
Step 3 - Click the 'Add New ' sub-tab.
Step 4 - Start filling in the blanks: enter your post title in the upper field, and enter your post body content in the main post editing box below it.
Step 5 - As needed, select course category setings below the editor.
Step 6 - Upload a featured image for your Course.
Step 8 - Scroll down until you see the Course options box, there you will be able to customize the course.
+ Is Featured Course: Enable or disable.
+ Is certificates Course : Yes or no.
+ Duration Time: This is time of begining and finish.
+ Features : Fill in all features of course.
+ Course settings: setting about" , , , .
+ Teacher settings: Select teacher that they will teach this course.

Step 9 - When your Course is ready, click Publish.
Front end look like
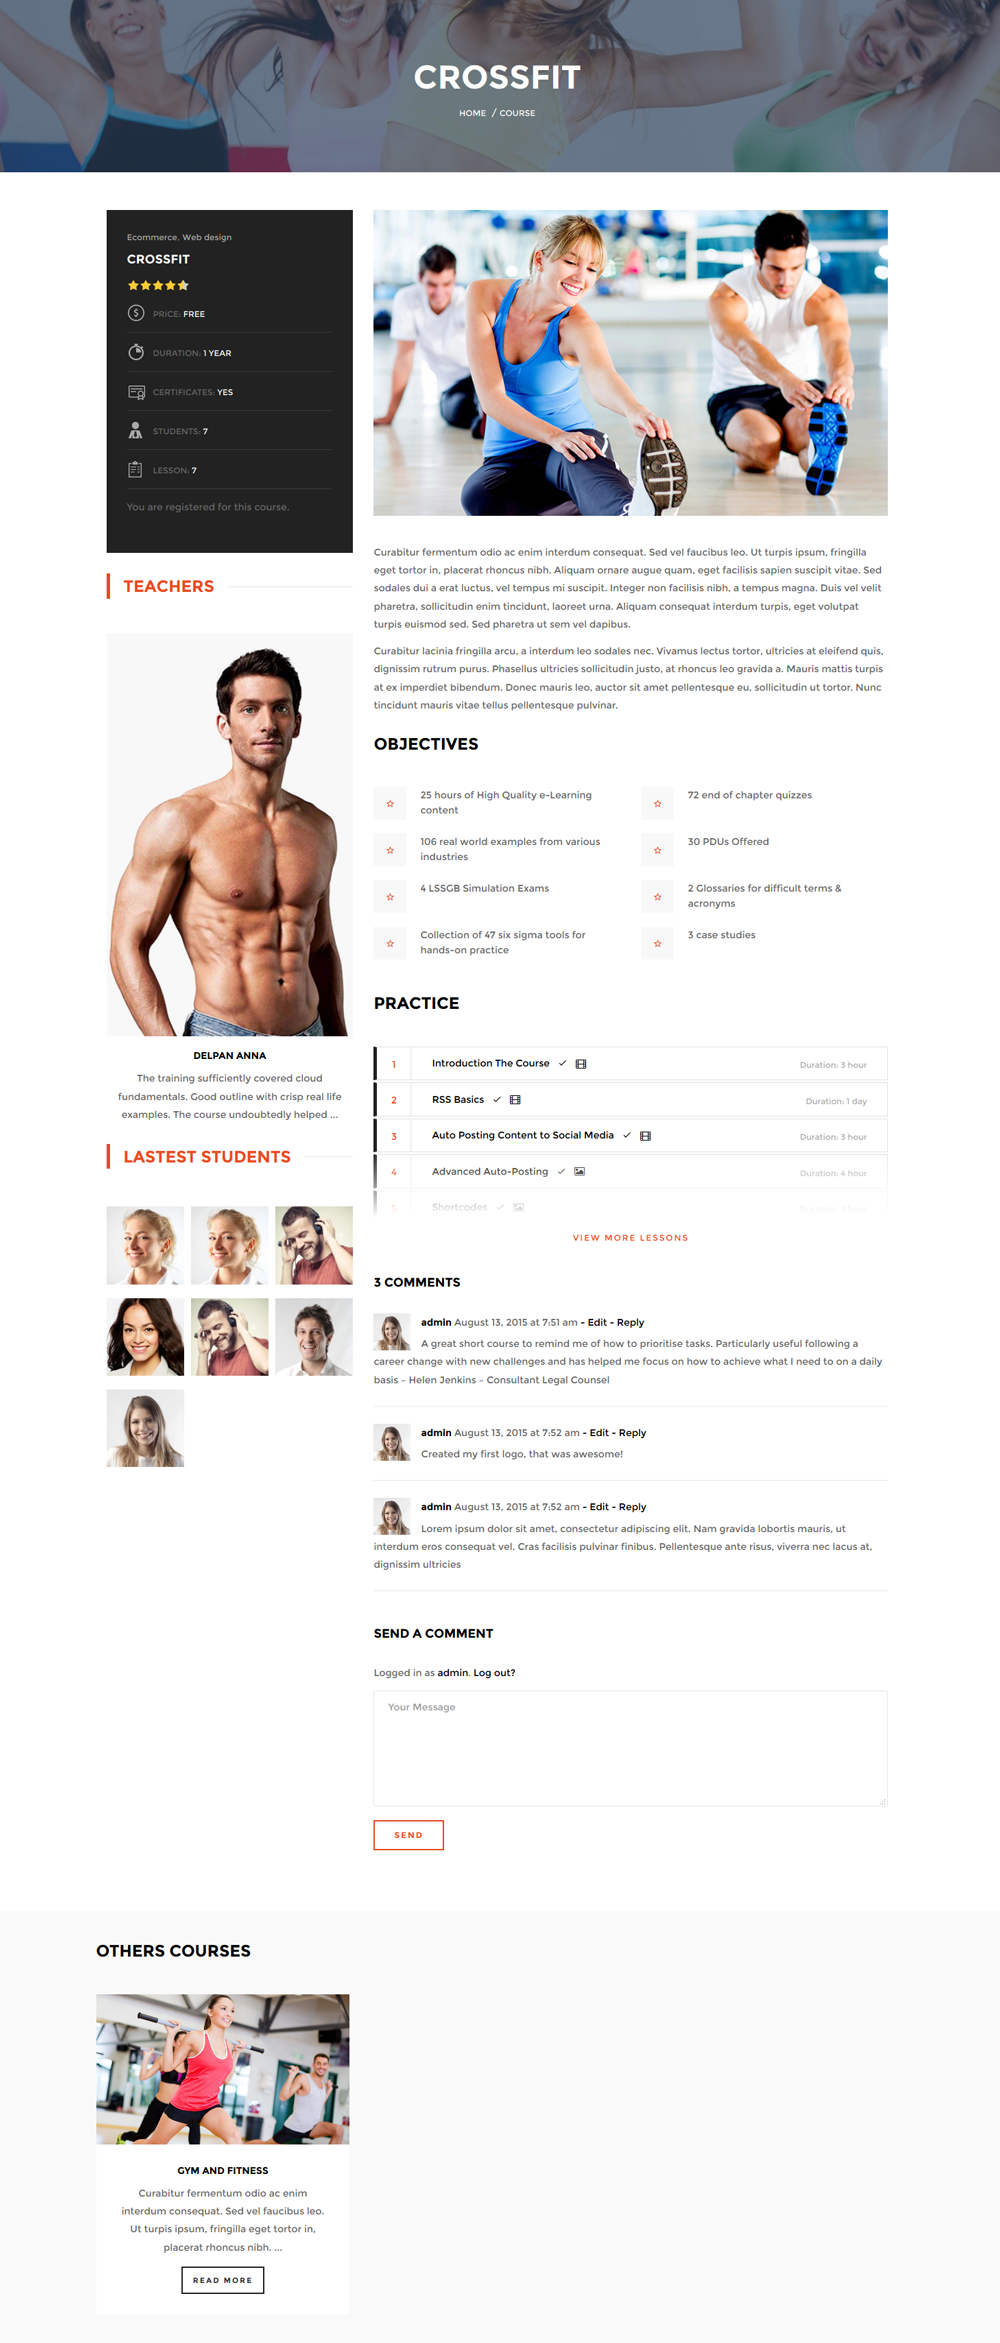
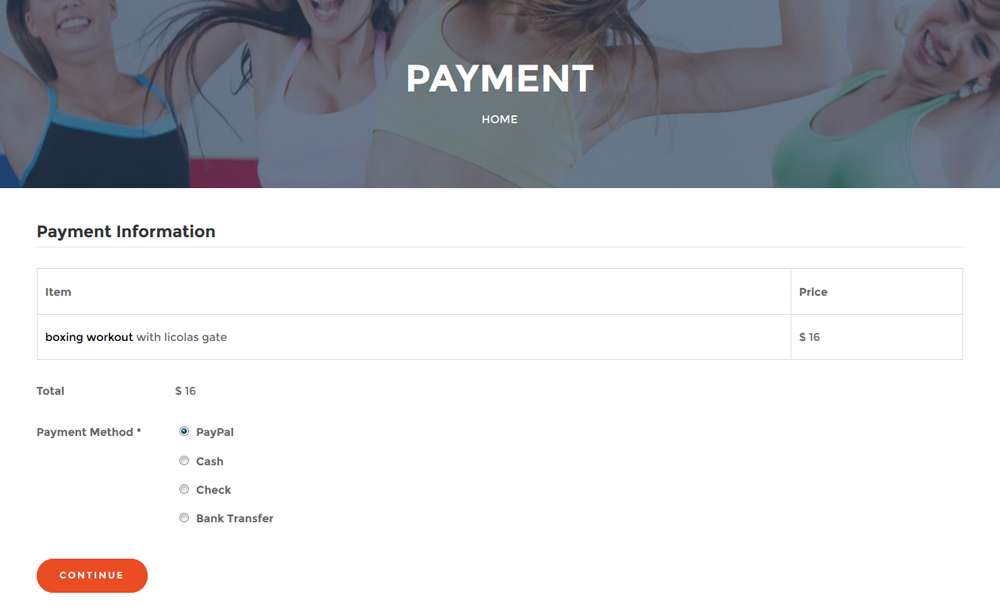
You can see button " Apply to course now" if you click this button you can see payment page to payment for this course you want to learn and click button " Continue" to finish your payment.
Educator
1. Settings
Step 1 - Log in to your WordPress Administration Panel (Dashboard)..
Step 2 - Click on Educator > Settings.
Step 3 -In general : + Student's courses : Select your coures.
+ Payment : This page outputs the payment details of the course.
+ Memberships : Select memeber ship page.
+ User's Membership : This page outputs the membership settings for the current user.
+ User's Payments : Select my payment.
+ Location : The location where you sell from.
+ Show course lecturer on the payment page : If you check box, Lecturer of course wil be displayed.
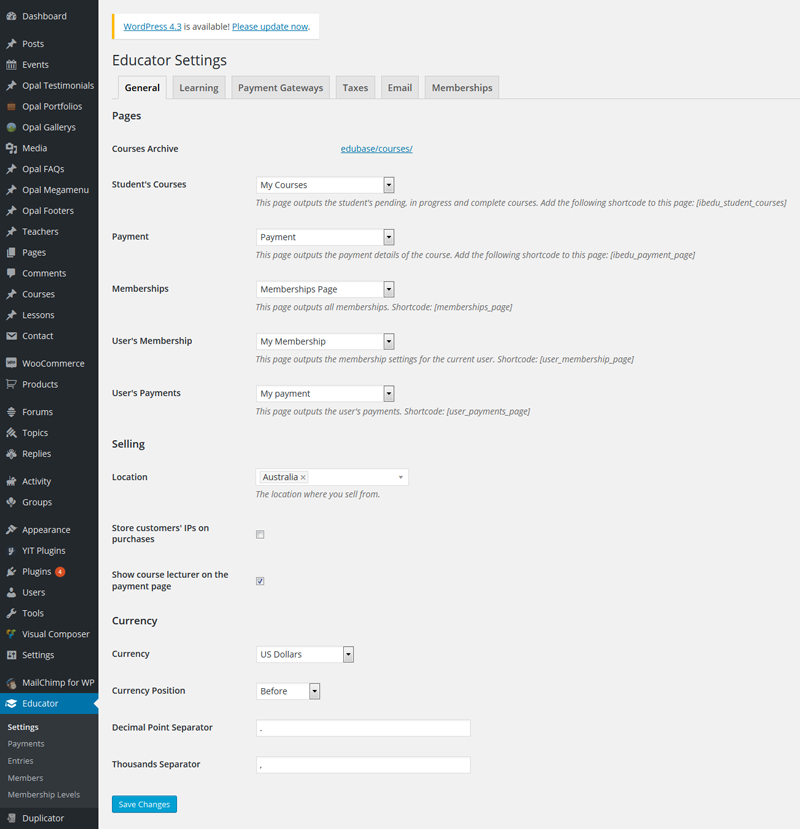
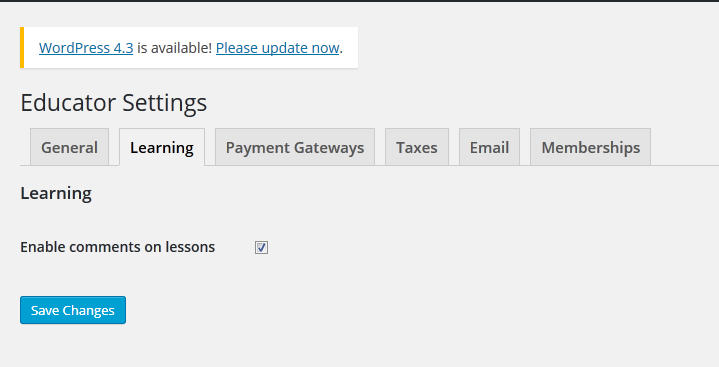
In Learning tab :
Check box comments of user will be displayed on lesson.
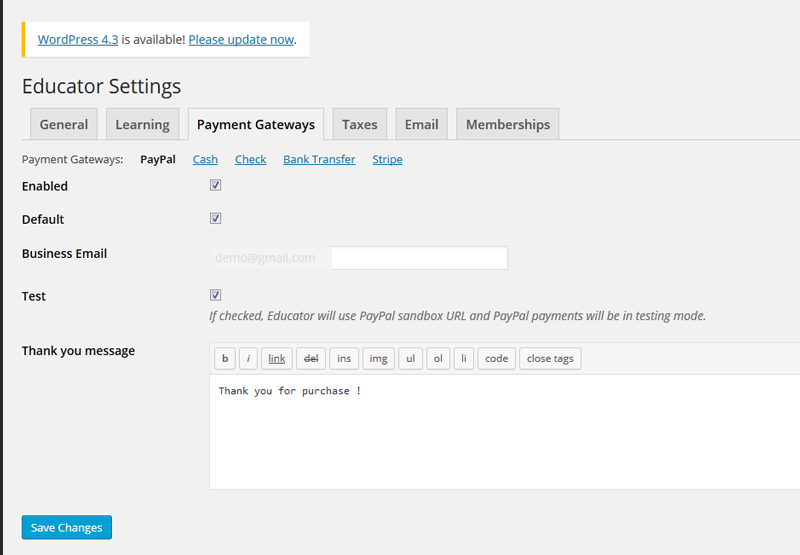
In Payment gateway and taxes
Check any box if you want.
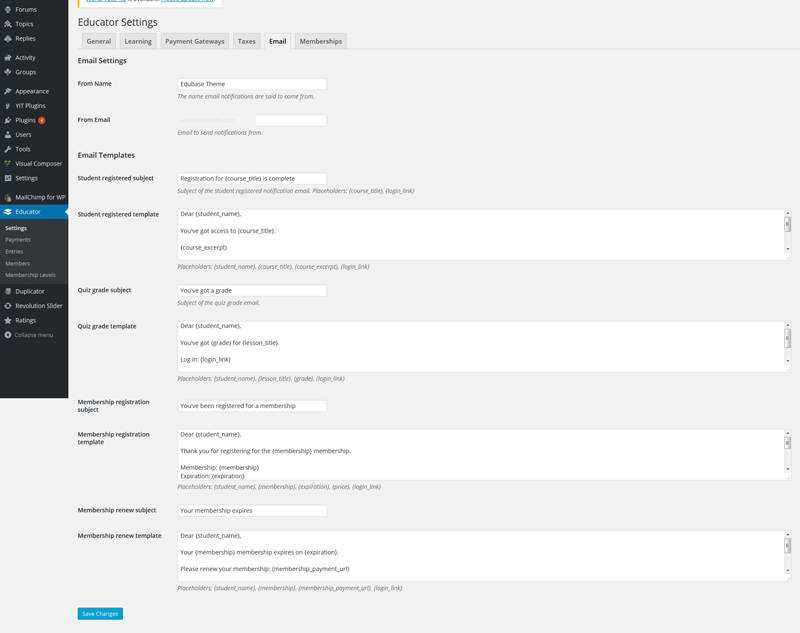
In Email tab:
Please fill in all information in this box. Then click "Save change" to finish setting.
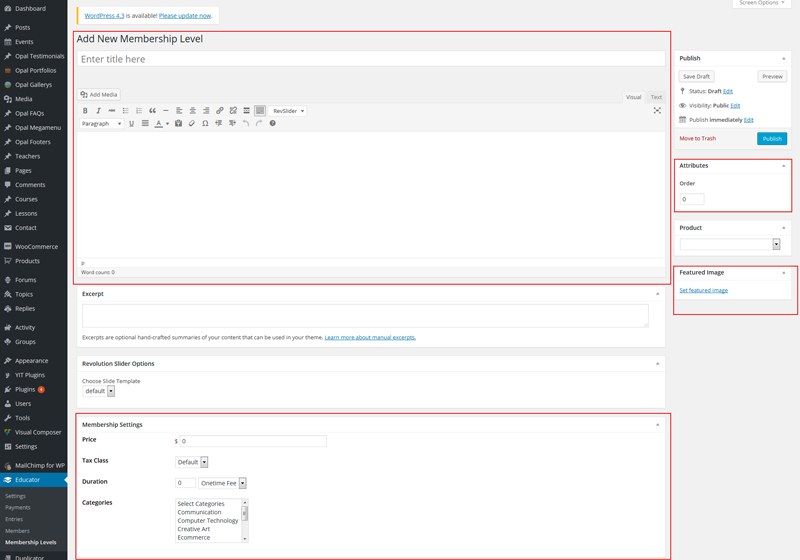
2.Membership Level
Step 1 - Log in to your WordPress Administration Panel (Dashboard).
Step 2 - Click the 'Educator' tab.
Step 3 - Click the 'Membership Level' sub-tab.
Step 4 - Start filling in the blanks: enter your membership level title in the upper field, and enter your membership level body content in the main post editing box below it.
Step 5 - As needed, select attributes fill in the meta setings below the editor.
Step 6 - Upload a featured image for your membership level.
Step 7 : Membership settings: +Price : Fill in price of membership level.
+Tax class : choose one of option in this box.
+Duration : Choose time for membership level.
+ Categories : Select one of categories for membership level. It will be apply for this category.
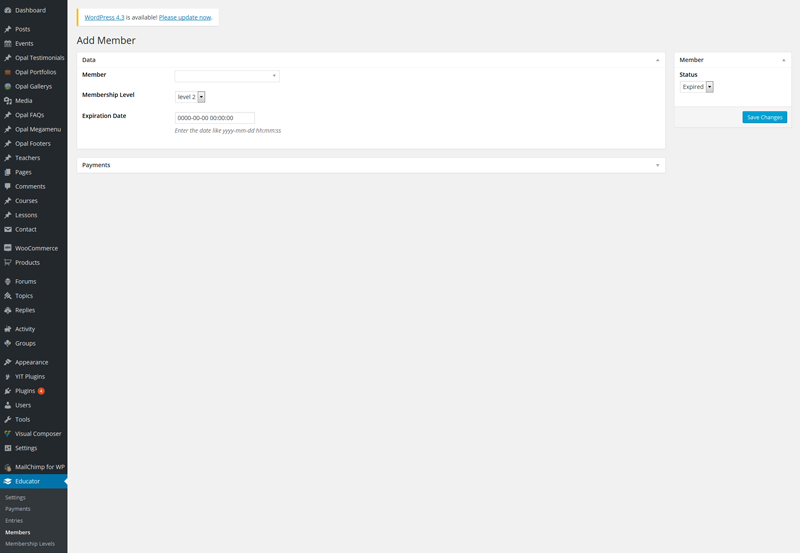
3. Members
Step 1 - Log in to your WordPress Administration Panel (Dashboard)..
Step 2 - Click on Educator > Members.
Step 3 - Click button "Add member".
+Member : fill in name of member.
+ Membership level : choose level for member.
+ Expiration date : Input date for member.
+ Status : Choose expired or active.
Finally click button "Save change" .
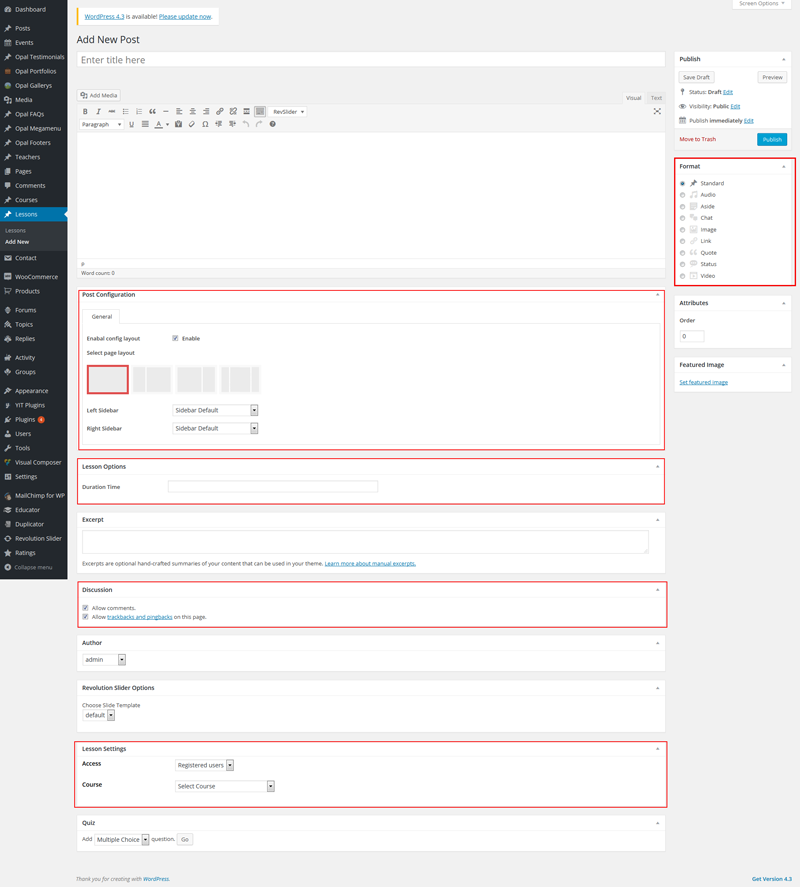
Create lessons
Create Lesson
Step 1 - Log in to your WordPress Administration Panel (Dashboard).
Step 2 - Click the 'Lesson' tab.
Step 3 - Click the 'Add New ' sub-tab.
Step 4 - Start filling in the blanks: enter your post title in the upper field, and enter your post body content in the main post editing box below it.
Step 5 - Select Lesson Format. You can create lesson with a lot of Formats like link, gallery, image ..... Select format on Format box from in right sidebar.
Step 6 - Upload a featured image for your Lesson.
Step 8 - Scroll down until you see the Lesson options box, there you will be able to customize the lesson.
+ Post configuration : Select enable config layout to choose layout that you want to displayed in front end.
+ Lesson options : Fill in duration time of lesson.
+ Discussion : select all option to user can comment in this lesson.
+ Lesson settings: - Access : User only view lesson when registed users or logged in users or every one.
- Course : Select course that lesson will be displayed in the course.
Step 9 - When your Lesson is ready, click Publish.
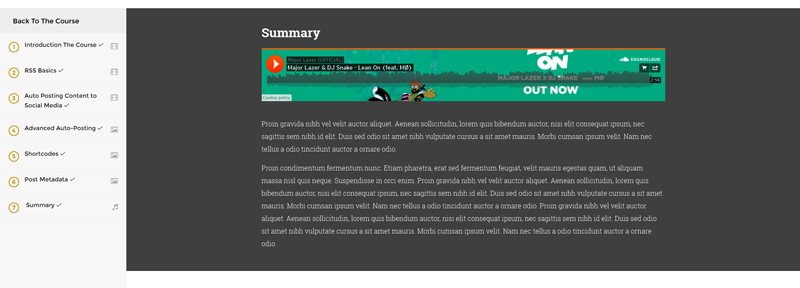
Front end look like:
Buddy press
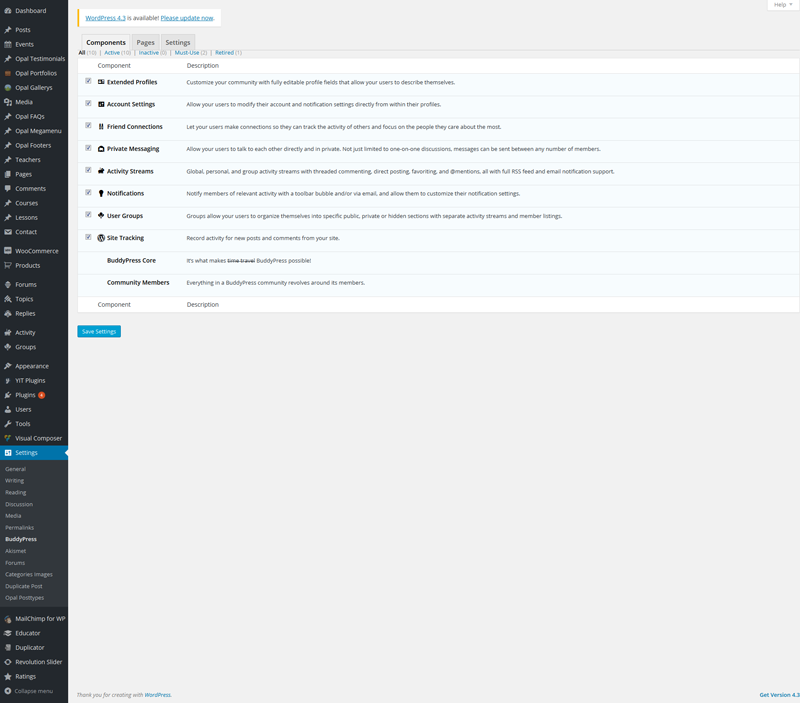
1. Buddy press Settings
Step 1 - Log in to your WordPress Administration Panel (Dashboard)..
Step 2 - Click on Settings > Buddypress.
Step 3 -Components : Select any box if you want to display in your site.
Step 4 - Pages
+ Directories :Associate a WordPress Page with each BuddyPress component directory.
+ Registration : Associate WordPress Pages with the following BuddyPress Registration pages.

Step 5 - Settings: Check any box config if you want to displayed in your site(Main settings, Profile settings,Group settings, Activity settings).

Step 6: when you ready click button "Save change".
Set Up Blog Page
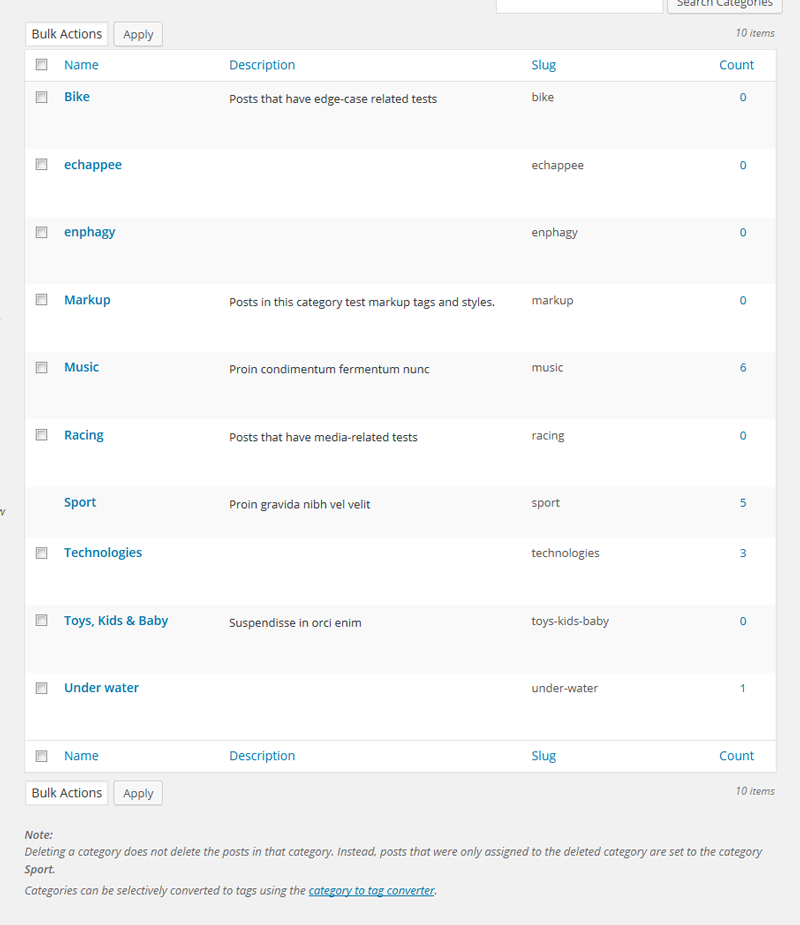
1.Create post category
Step 1 - Log in to your WordPress Administration Panel (Dashboard).
Step 2 - Click the 'Posts' tab.
Step 3 - Click the 'Categories' sub-tab.
Step 4 - Start filling in name of post categories that the name is how it appears on your site.
Step 5 - Filling Slug :The “slug” is the URL-friendly version of the name. It is usually all lowercase and contains only letters, numbers, and hyphens.
Step 6 - Parent: select parent for blog.
Step 7 - Description: fill in about this blog categories.
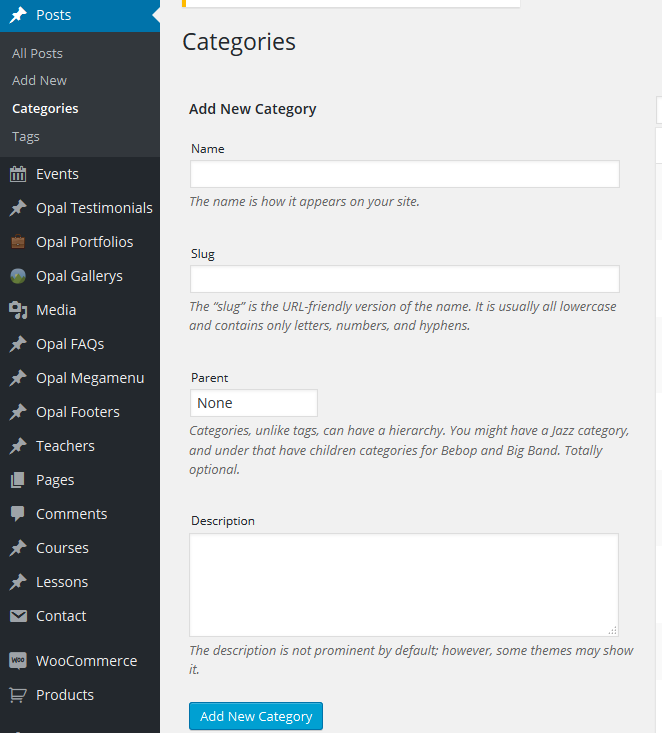
Finally: Click button "Add new category" to create categories.
Here all blog categories has created.
2. Create the blog post
Step 1 - Log in to your WordPress Administration Panel (Dashboard).
Step 2 - Click the 'Posts' tab.
Step 3 - Click the 'Add New' sub-tab.
Step 4 - Start filling in the blanks: enter your post title in the upper field, and enter your post body content in the main post editing box below it.
Step 5 - As needed, select a category, add tags, post format, fill in the meta setings below the editor.
Step 6 - Upload a featured image for your Post.
Step 7 - Select Post Format. You can create blog post with a lot of Formats like link, gallery, image ..... Select format on Format box from in right sidebar.
Step 8 - Scroll down until you see the Post Configuration box, there you will be able to customize the post.
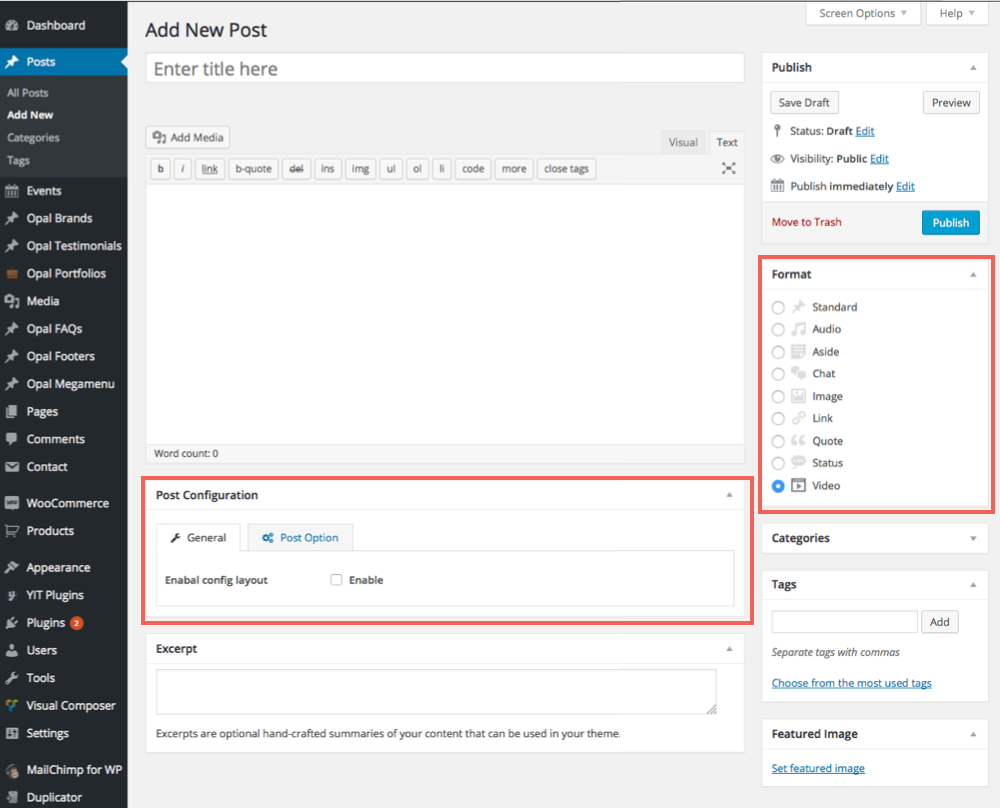
Step 9 - When your post is ready, click Publish.
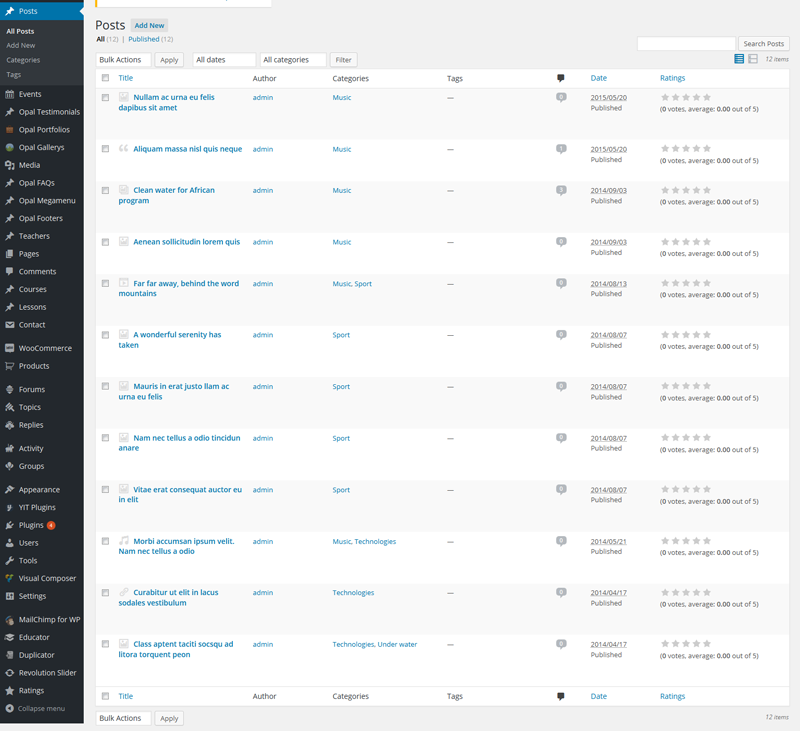
3. Manager current all blogs
Navigate to Posts → All Posts
You can see all informations of you blog post, add new, edit or delete them.
4. Create Blog Page
Option 1. Create Blog Page with Visual Element
Step 1 - Log in to your WordPress Administration Panel (Dashboard)..
Step 2 - Click on Pages > Add New.
Step 3 - Give your page a name then Change the Editor to Backend Editor ( you need to have the Visual Composer plugin activated ).
Step 4 - Click on the Add Element button.
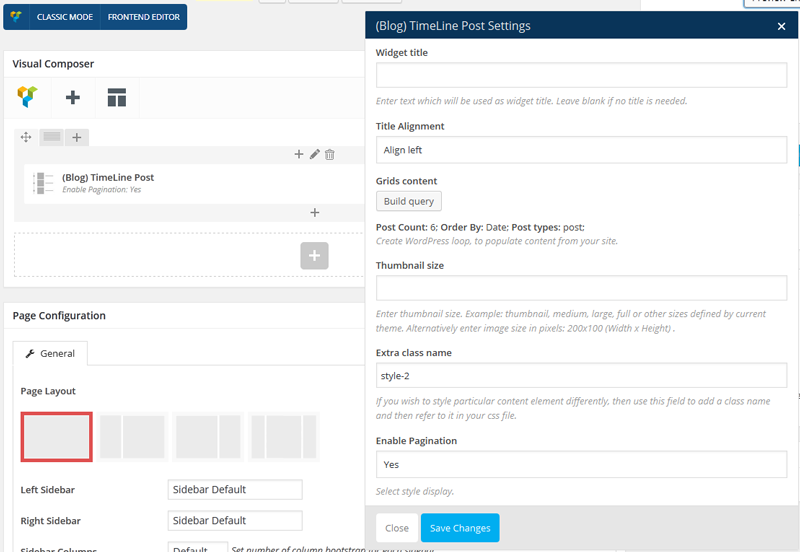
Step 5 - Select the WPO New Elements.
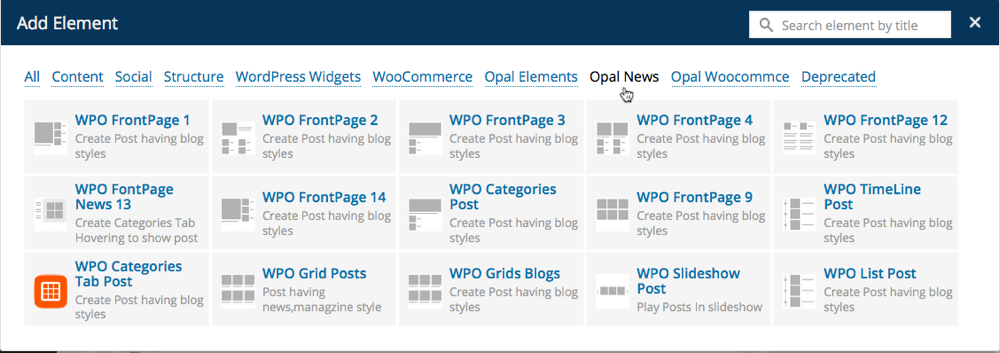
For example we choose WPO TimeLine Post with Page Attributes : Default Template and Enable Pagination.
Front end look like :

Option 2. Create Blog page with Blog template
Step 1 - Log in to your WordPress Administration Panel (Dashboard)..
Step 2 - Click on Pages > Add New.
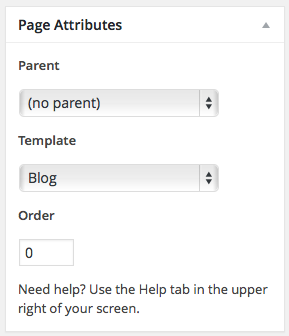
Step 3 - From Page Attribubtes -> Select Template : Blog.
Step 4 - Set up Page configuration
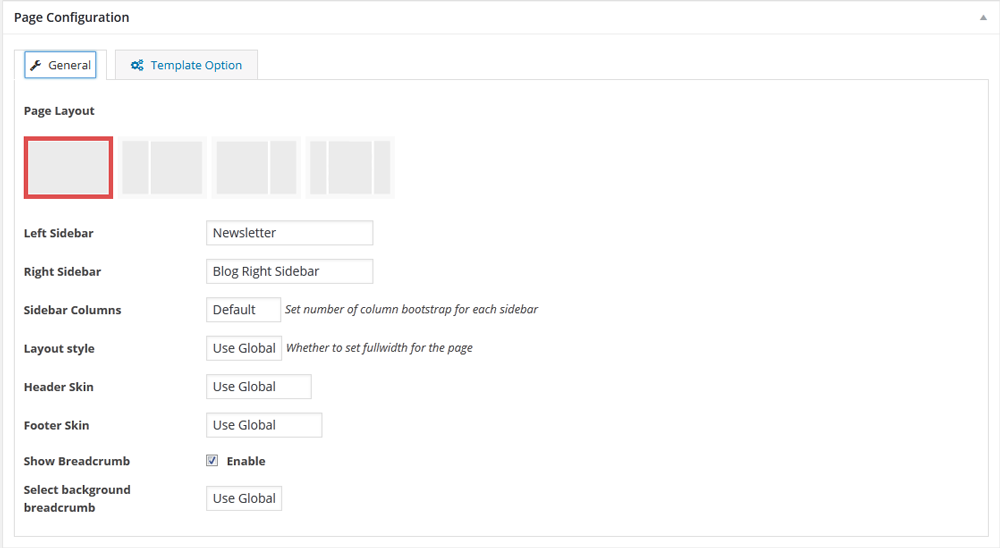
- Page Layout - Select if you want the page to have a Right Sidebar / Left Sidebar / No Sidebar.
- Left Sidebar - Select content if you want the page to have content.
- Right Sidebar - Select content if you want the page to have content.
- Layout Style - Select style for page to have a Full width, Boxed or use Global.
- Header Skin - Select skin specific for Header on page or use Global.
- Footer Skin - Select skin specific for Footer on page or use Global.
- Show Breadcrumbs - Select if you want to show the subtitle and breadcrumbs.
- Select Background Breadcrumbs - Select background for breadcrumbs or use Global.
Step 5 - Set up Template Option
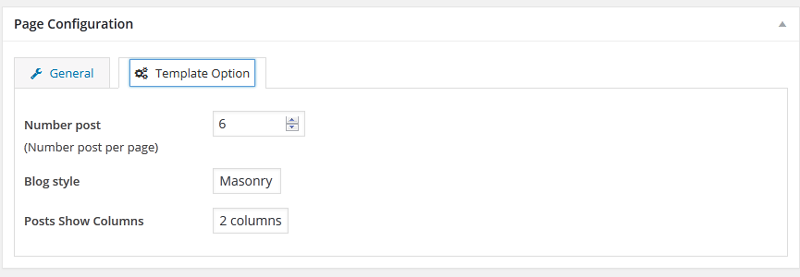
- Number Post - Select number of post you want to show for each pages.
- Blog style - Select blog style for that page. You can select Masonry, List, Grid, Full Width and much more.
- Posts Show Columns - Select number of post to display on each row.
Follow that image to know front end of Blog Masonry 2 columns

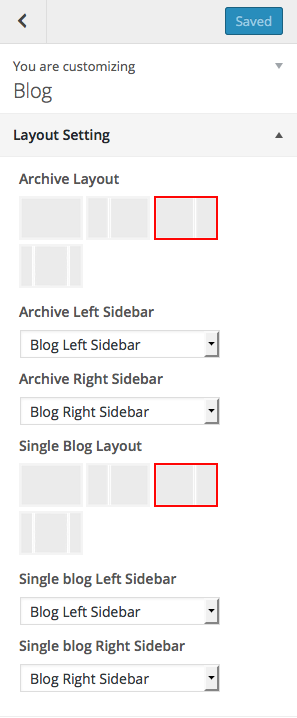
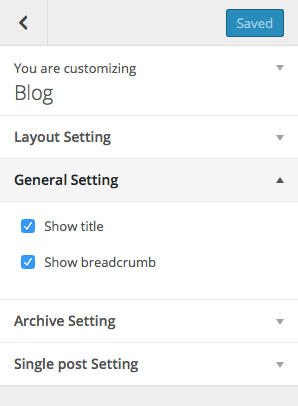
5. Blog Global Configure
Step 1 - From your admin Dashboard navigate to : Apperance > Customize > Blog
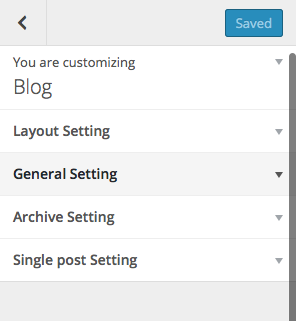
Step 2 - Set up Layout Setting
You can set Global (default) layout for archive blog page and single blog post then select content sidebar to display.
Step 3 - Set up General Setting
- Show title : Enable or disable title of blog post and page.
- Show breabcrumb : enable or disable breadcrumb of blog post and page.
Step 4 - Set up Archive Setting
- Archive style: select style for archive blog page.
- Select column: select number of column to display on archive page blog.
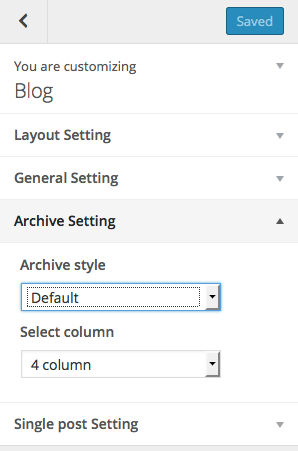
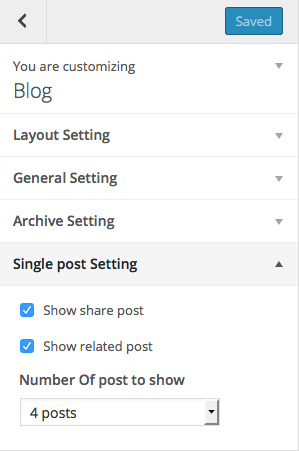
Step 5 - Set up Single Post Setting
- Show share post : enable or disable share post function
- Show related post : enable or disable related post
- Number of post to show : select number of related post to show
Set Up Portfolio
1.Create Portfolio category
Step 1 - Log in to your WordPress Administration Panel (Dashboard).
Step 2 - Click the 'Opal portfolios' tab.
Step 3 - Click the 'Categories' sub-tab.
Step 4 - Start filling in name of portfolio categories that the name is how it appears on your site.
Step 5 - Filling Slug :The “slug” is the URL-friendly version of the name. It is usually all lowercase and contains only letters, numbers, and hyphens.
Step 6 - Parent: select parent for portfolio.
Step 7 - Description: fill in about this portfolio categories.

Finally: Click button "Add new category" to create categories.
Here all portfolio categories has created.
2. Create Portfolio Post
Step 1 - Log in to your WordPress Administration Panel (Dashboard)..
Step 2 - Click the 'Opal Portforlios' tab.
Step 3 - Click the 'Add New Portforlio' sub-tab.
Step 4 - Start filling in the blanks: enter your Portforlio title (1) in the upper field, and enter your portfolio body content (2) in the main post editing box below it.
Step 5 - As needed, select a category (5), add tags (4), feature image(6), fill in the meta setings below the editor.

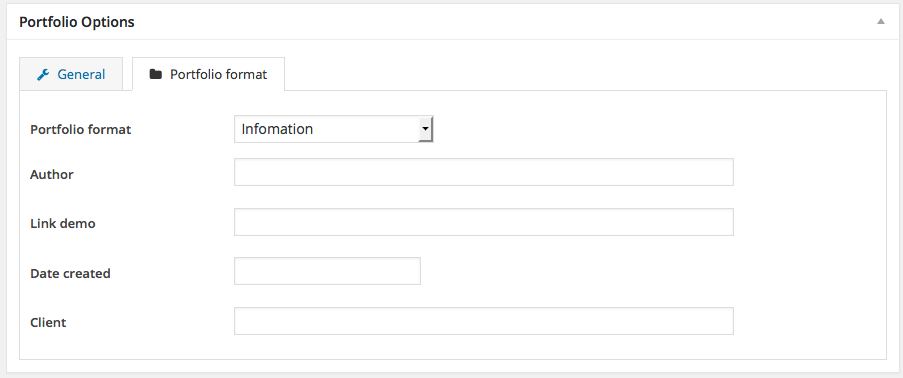
Step 6 - Take care about Portfolio Options (3) . You can enable layout for each Portfolio by check on box and select layout + sidebar.
Step 7 - Select Portfolio Format. You can create portforlio post with a lot of Formats like gallery, video, information or fullscreen .....
Step 8 - When your portfolio is ready, click Publish.
3. Create Portfolio Page
Step 1 - Log in to your WordPress Administration Panel (Dashboard)..
Step 2 - Click on Pages > Add New.
Step 3 - Give your page a name then Change the Editor to Backend Editor ( you need to have the Visual Composer plugin activated ).
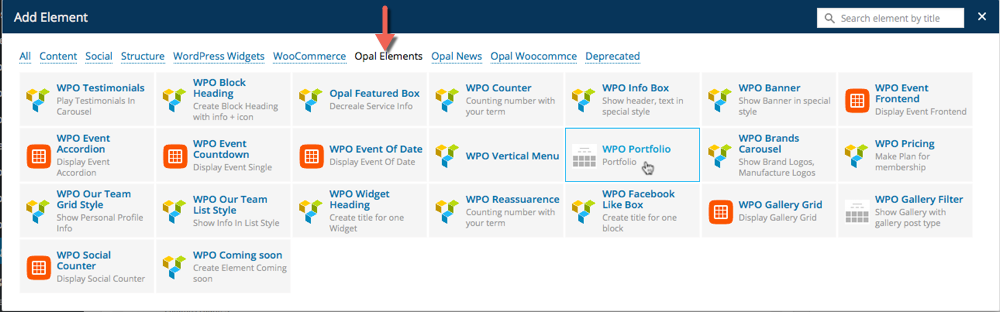
Step 4 - Click on the Add Element button.
Step 5 - Select the Opal Elements. Then choose WPO Portfolio.
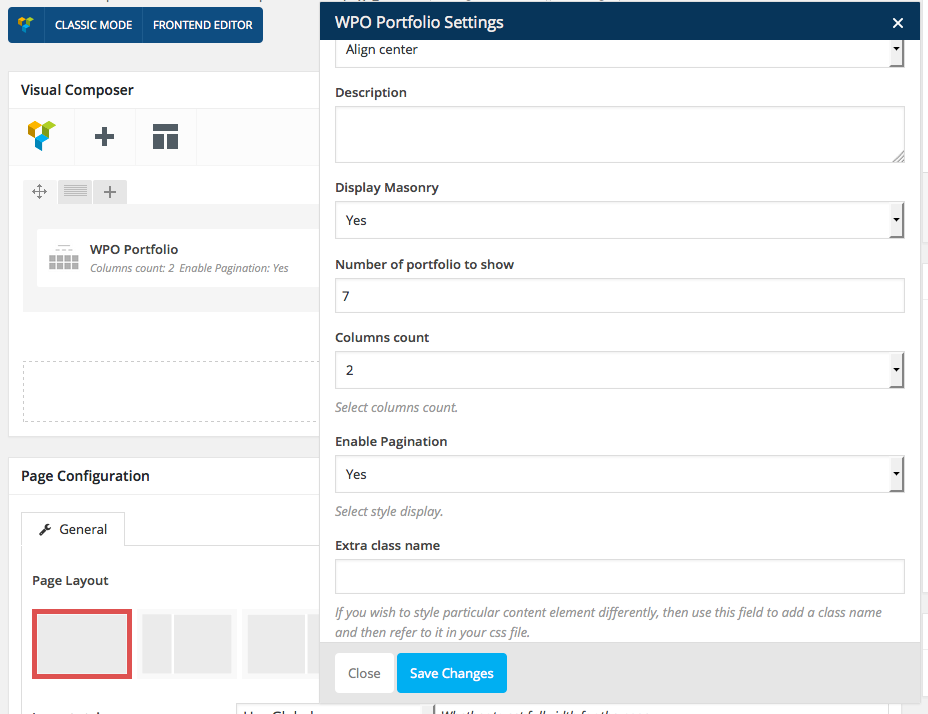
Step 6 - Set up WPO Portfolio element setting. You need focus on some attribute.
- Display Masonry : select to enable masonry view. If no your portfolio page will be displayed like Grid view.
- Number of portfolio to show : select number of portfolio to show on one page.
- Columns count : select column of portfolio page.
- Enable Pagination : select enable or disable pagination.
Front - end look like for that setting :

How to create portfolio Full Page. :
Do the same from step 1 to step 6 to create Portfolio Page. Take a notice about Page configuration : select Layout style full width.

4. Portfolio Global Configure
Step 1 - From your admin Dashboard navigate to : Apperance > Customize > Portfolio.

Step 2 - Set up Portfolio Layout Setting
You can set Global (default) layout for archive Layout page then select content sidebar to display:
- Show title : Enable or disable title of Portfolio page.
- Show Breadcrumb : Enable or disable breadcrumb of Portfolio page.
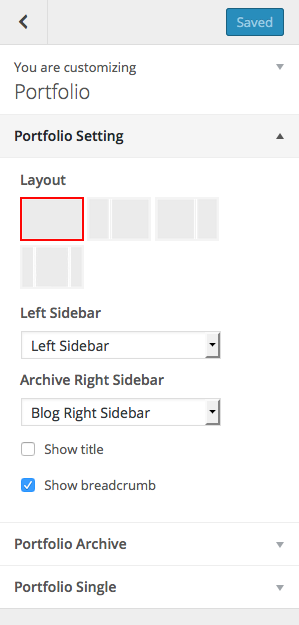
Step 3 - Set up Portfolio Single Setting
- Show share portfolio : enable or disable share post function.
- Show related post : enable or disable related post.

Event
1.Create Event category
Step 1 - Log in to your WordPress Administration Panel (Dashboard).
Step 2 - Click the 'Events' tab.
Step 3 - Click the 'Event Categories' sub-tab.
Step 4 - Start filling in name of event categories that the name is how it appears on your site.
Step 5 - Filling Slug :The “slug” is the URL-friendly version of the name. It is usually all lowercase and contains only letters, numbers, and hyphens.
Step 6 - Parent: select parent for event.
Step 7 - Image : Upload image to display on categories.
Step 8 - Description: fill in about this event categories.
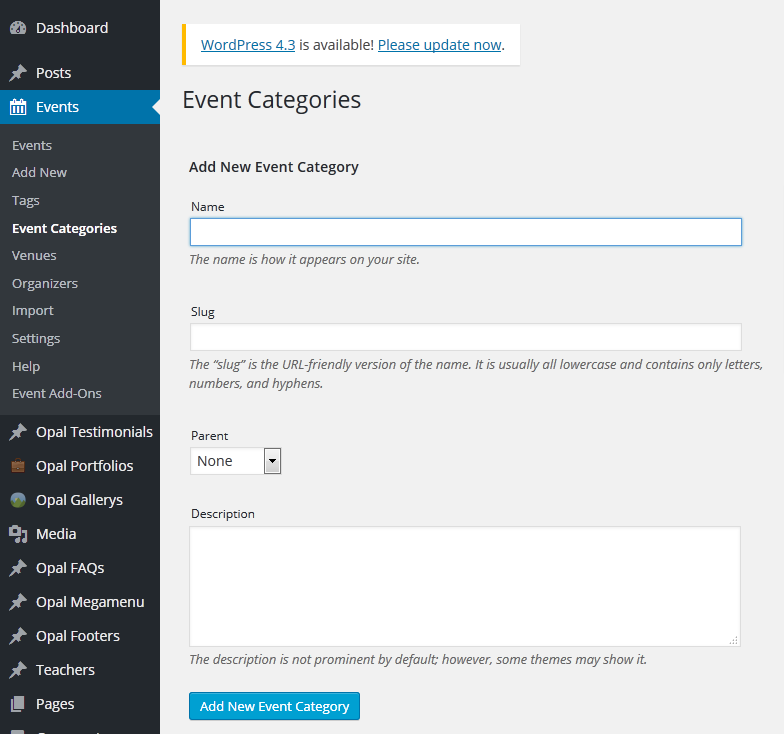
Finally: Click button "Add new category" to create categories.
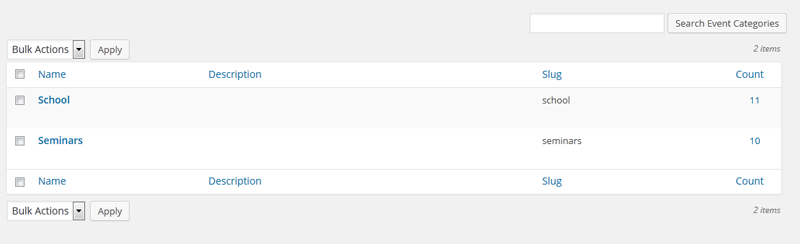
Here all event categories has created.
2. Create Event
Step 1 - Log in to your WordPress Administration Panel (Dashboard)..
Step 2 - Click the 'Events' tab.
Step 3 - Click the 'Add New' sub-tab.
Step 4 - Start filling in the blanks: enter your Event title in the upper field, and enter your event body content in the main post editing box below it.
Step 5 - As needed, select a category , add tags , feature image and event options fill in the meta setings below the editor.
Step 6 - The events calendar : set up time for this event.
Step 7 - Location :set up a defined location your event will display a Google Rich Snippet on the search results.
Step 8 - Organizers : set up Organizers for event.
Step 9 - Event Website : fill in link website for event.
Step 10 - Event Cost : fill in cost for event.
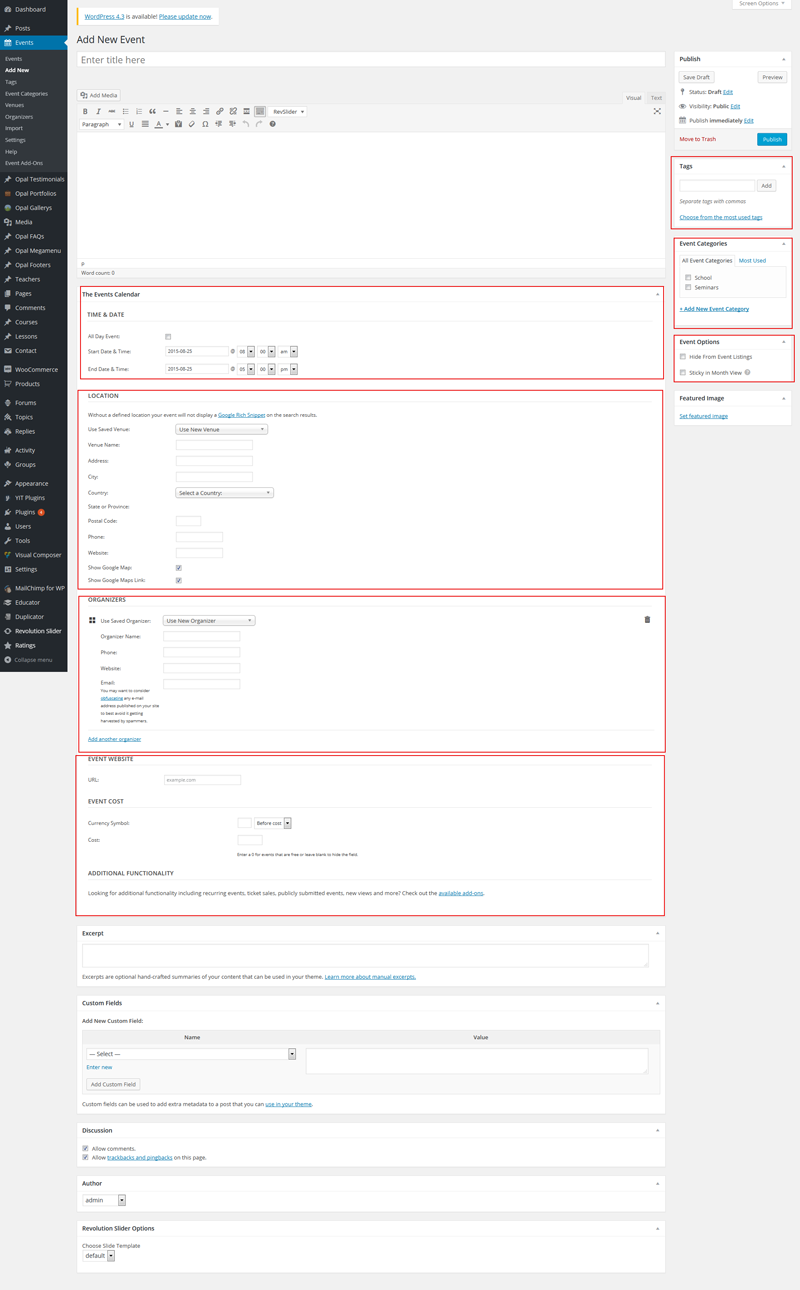
Finally: When your event is ready, click Publish.
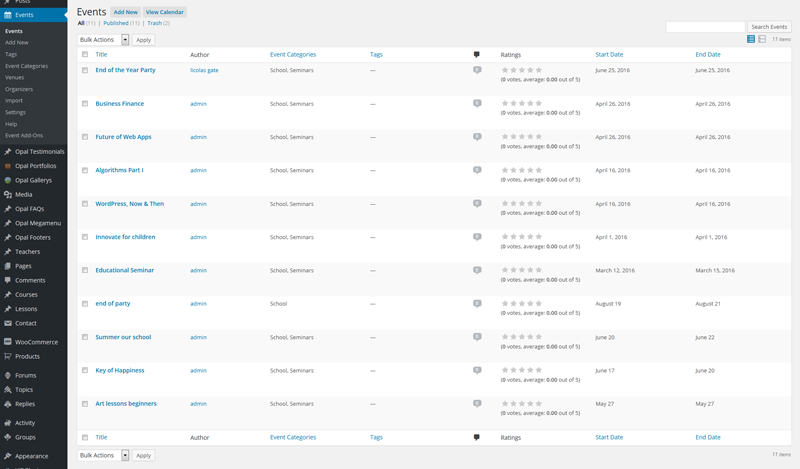
Here all event categories has created. You can edit or trash or view , clone events in here.
3. Event Setting
Step 1 - Log in to your WordPress Administration Panel (Dashboard)..
Step 2 - Click the 'Events' tab.
Step 3 - Click the 'Settings' sub-tab.
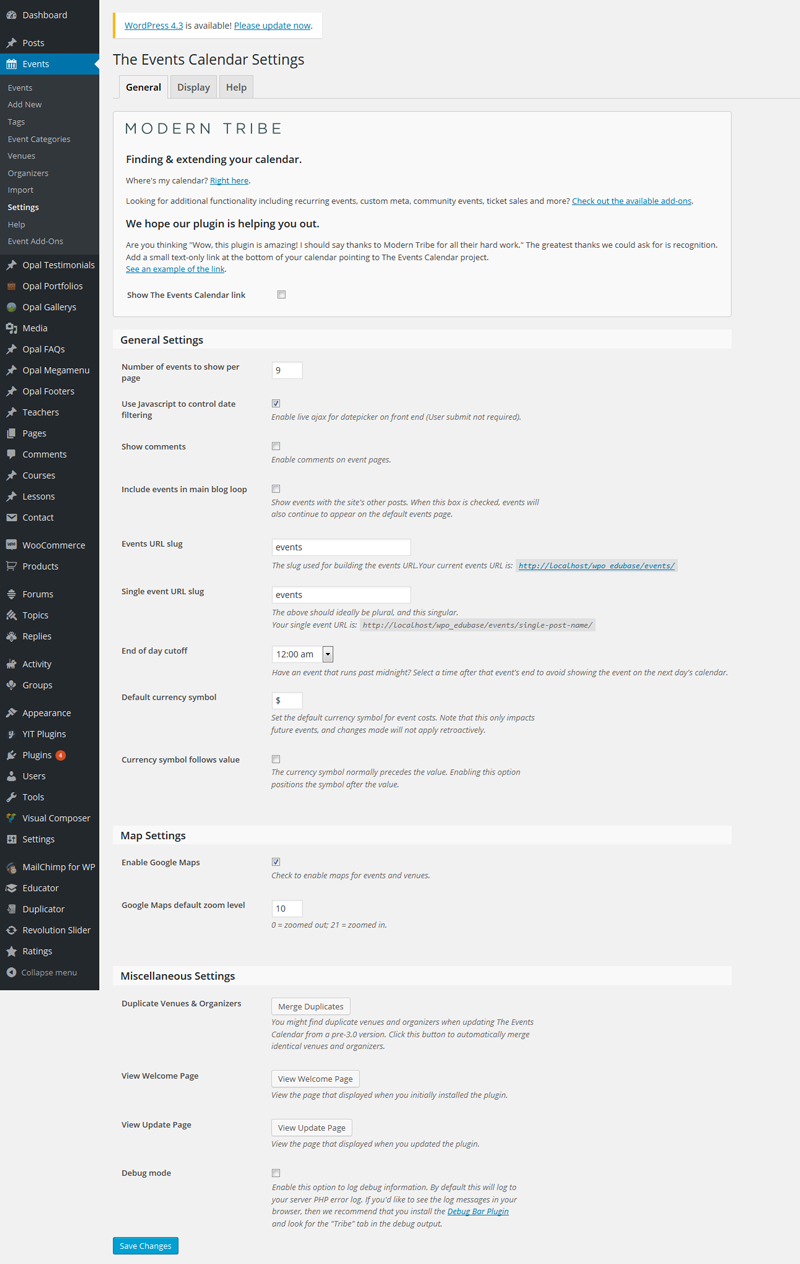
In the Events calendar settings you can see 3 tabs in here.
In general: + Number of events to show per page : Allow page to display number of event when you config.
+ Use Javascript to control date filtering : Enable live ajax for datepicker on front end (User submit not required).
+ Show comments : Enable comments on event pages.
+ Include events in main blog loop : Show events with the site's other posts. When this box is checked, events will also continue to appear on the default events page.
+ Events URL slug :The slug used for building the events URL.
+ End of day cutoff : Have an event that runs past midnight? Select a time after that event's end to avoid showing the event on the next day's calendar.
+ .....
In Display : The settings below control the display of your calendar. If things don't look right, try switching between the three style sheet options or pick a page template from your theme.
Set Up Footer
1. Set Up Footer Default
Step 1 - From your admin Dashboard navigate to : Apperance > Widget.
Step 2 - Drag content from Footer 1 to Footer 4 sidebar.
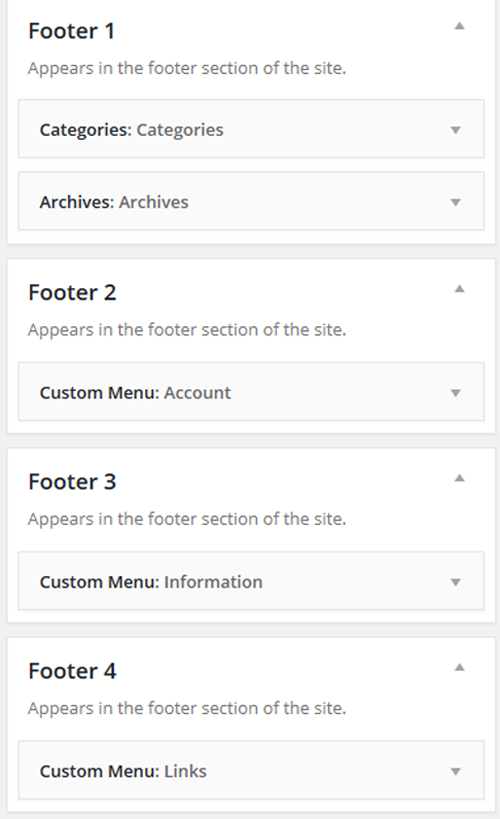
Step 3 - Navigate to : Apperance > Customize > Theme And Layouts Setting
Select Footer Styles Builder is : Default.
2. Set Up Opal Footer
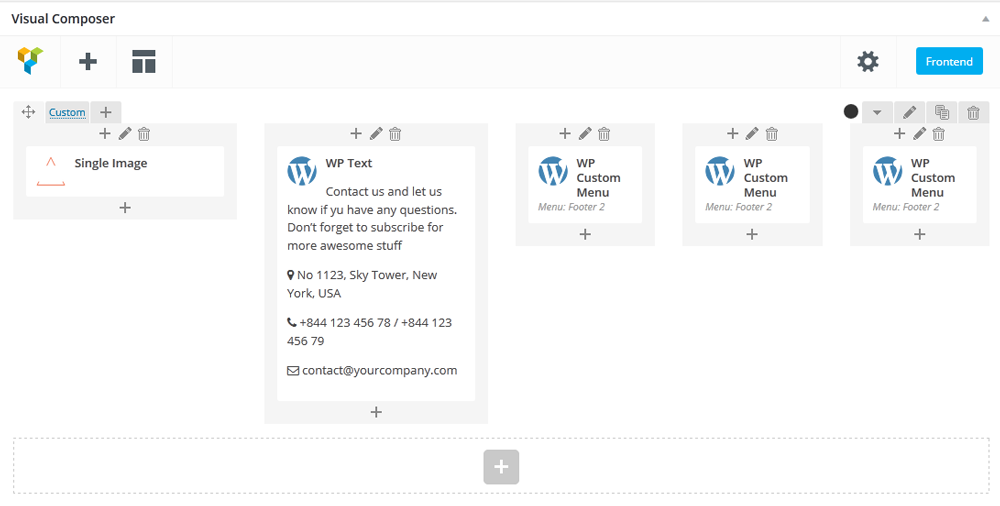
Step 1 - From admin Dashboard, navigate to Opal Footer > Add Profile Footer.
Step 2 - Using Visual Composer backend editor mode then add element to your Footer .
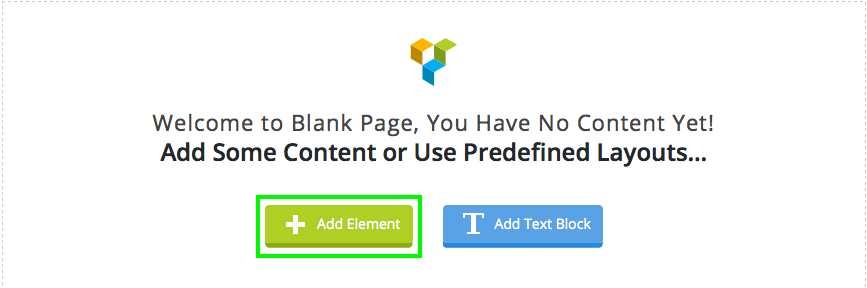
Step 3 - Build your footer style with unlimited layout.
Some version footer layouts for you.
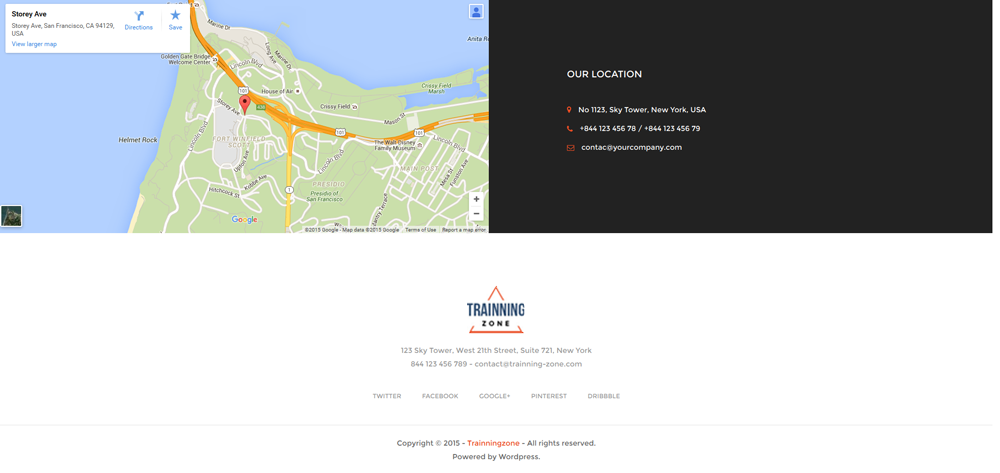
a. Footer 1.
Front end look like :
Visual Element Layout setting
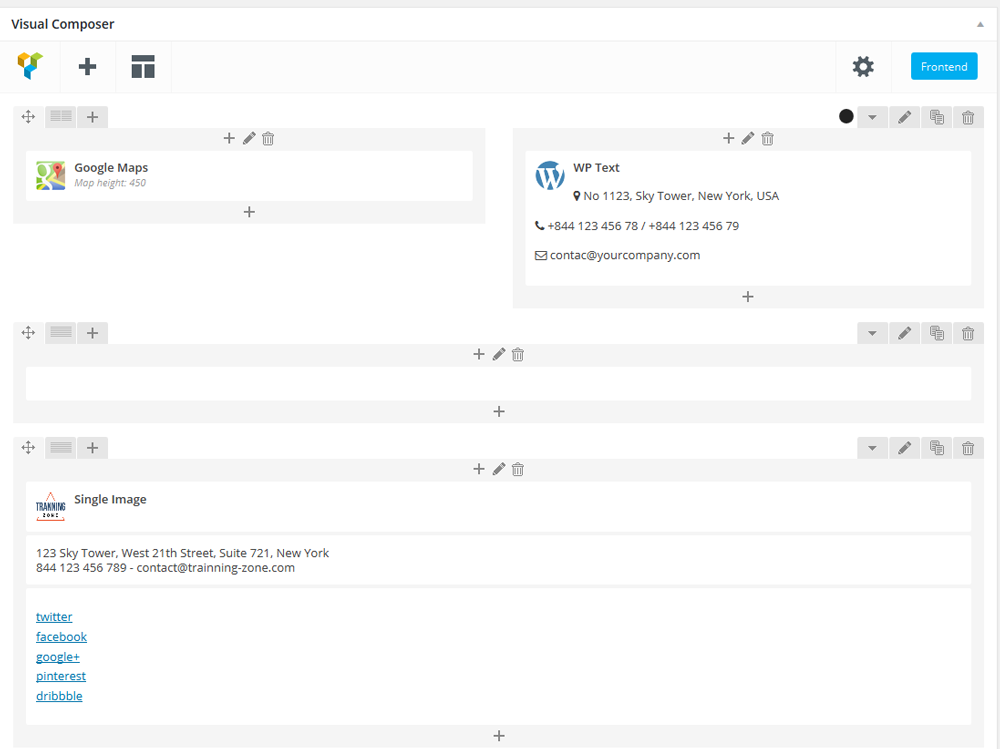
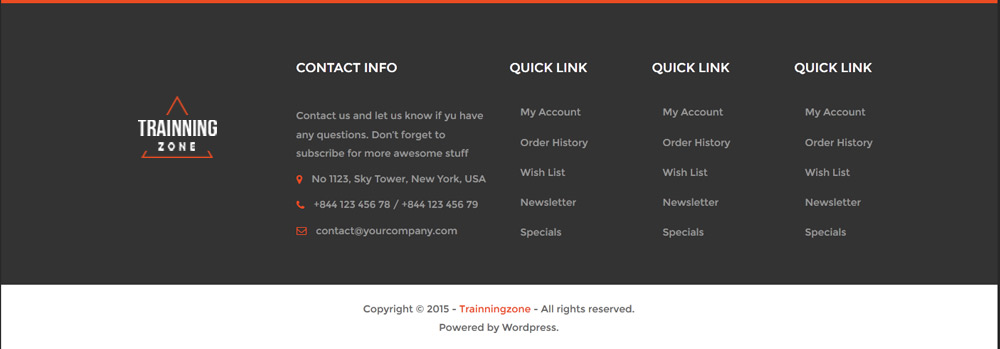
b. Footer 2 .
Front end look like :
Visual Element Layout setting
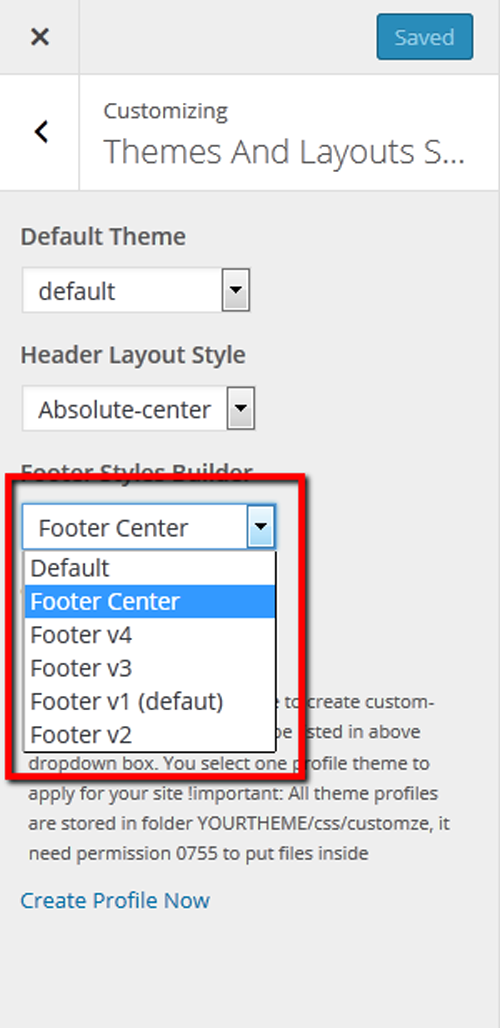
Step 4 - After create your footer profile. Navigate to : Apperance > Customize > Theme And Layout Setting.
Choose your footer for all page.
*********** If you want specific Footer for one of your pages. Please go to your page configuration. Select Footer version you want to display only on that page.
Create Testimonials
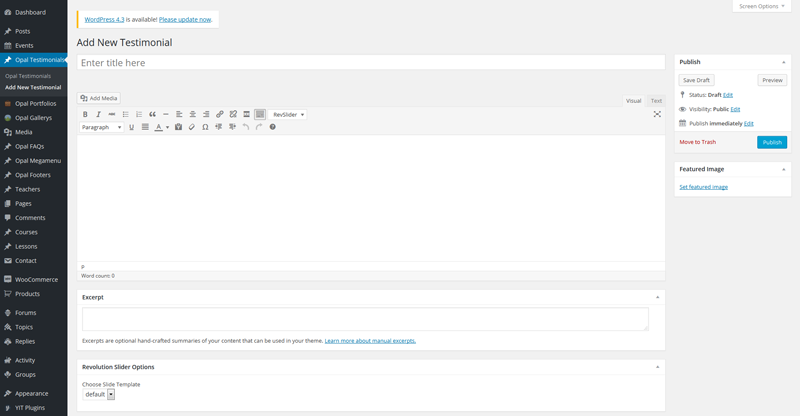
Step 1: Go to Opal Testimonial from Dashboard then create content of Testimonials.
a- Click the 'Add New Testimonial' sub-tab.
b - Start filling in the blanks: enter your post title in the upper field, and enter your post body content in the main post editing box below it.
c - Upload a featured image for your Post.
d - When your Testimonial is ready, click Publish.
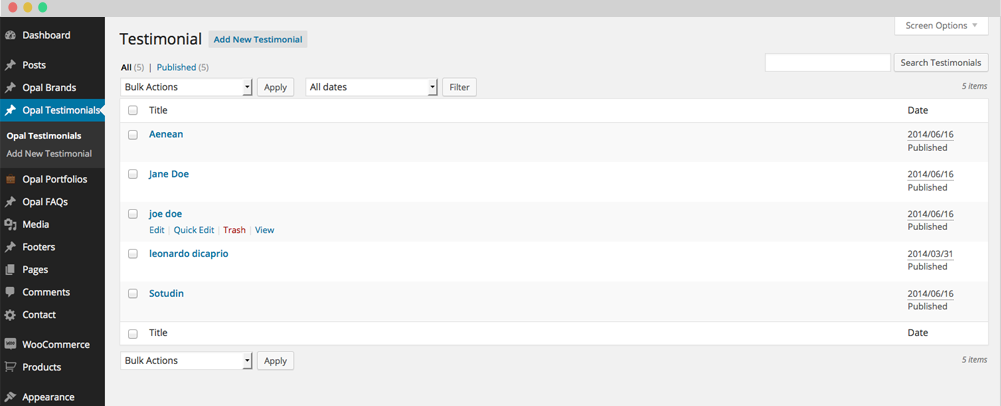
Click to " Opal testimonials" to see all testimonials.
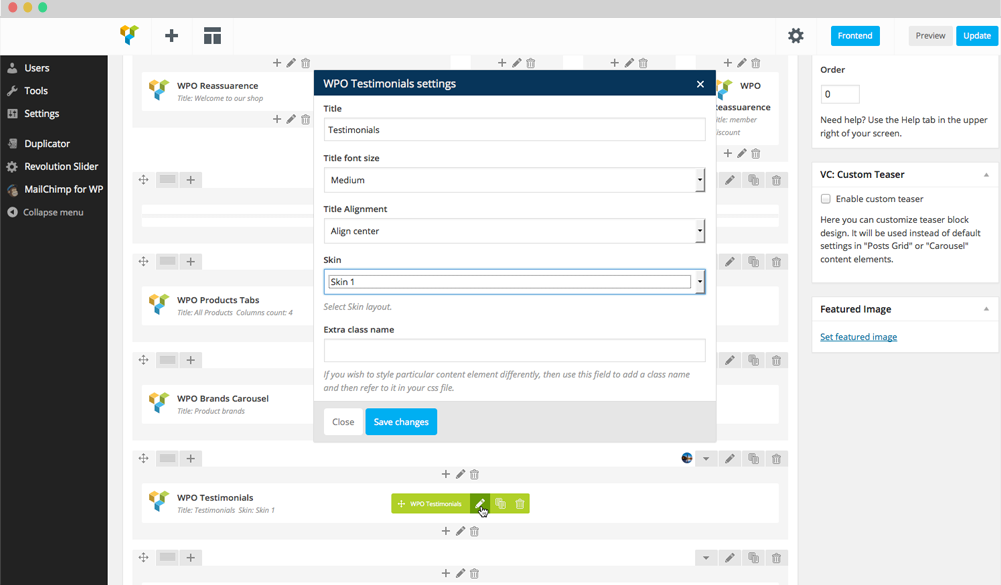
Step 2: Drag WPO Testimonial elements by using Visual Composer on page you want to display testimonials.
You can choose some setting like title, skin ....
Create Paralax
With Visual Composer you can create Parallax Sections
Step 1: From your admin dashboard. Goto Page.
Step 2 : Click on the Edit This Row (pencil icon) beside row you want to make it become Parallax Sections.
Step 3: In General Tab, select option Parallax.
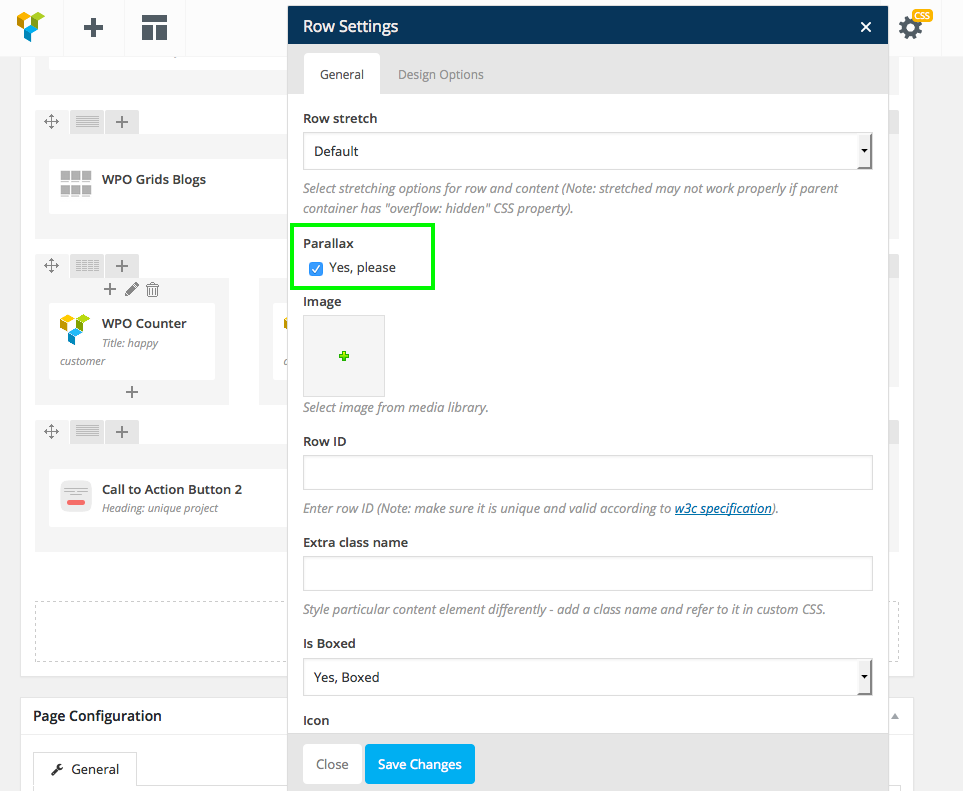
Step 4: In Design options tab, ADD padding and REMOVE margin for better result, add a Background Image change to Cover and then Saves changes.
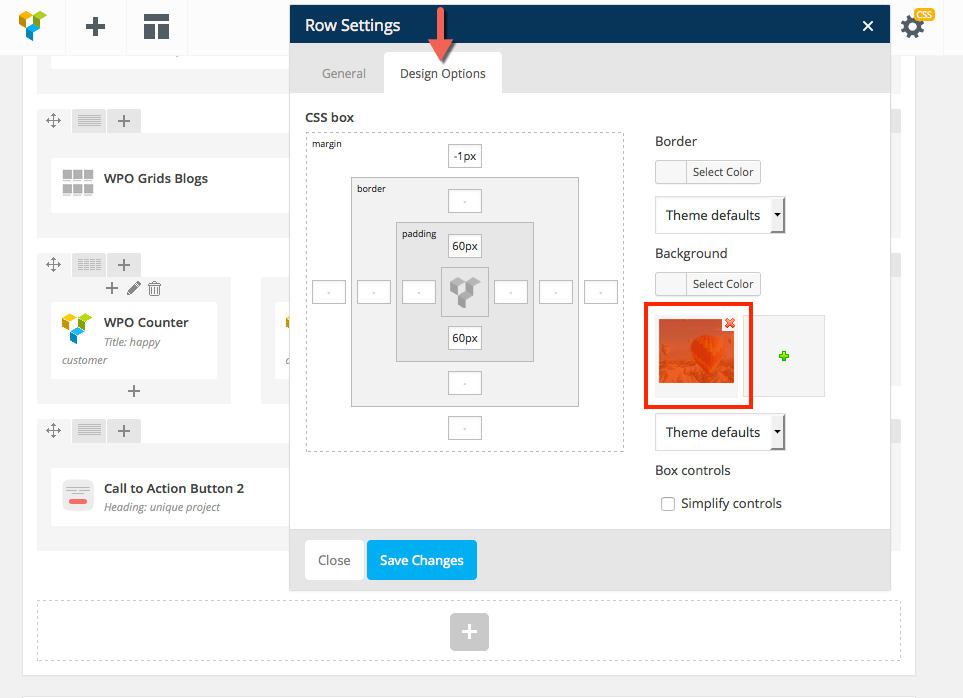
Step 5: Update or Publish your page and you should now have a section with parallax background.
Create Newsletter
We are using MailChimp for WP plugin for Newsletter subscribe. You can read more about MailChimp from here
Follow that step below to help you can collect email of subscribers.
Step 1 - Signup for Mailchimp account then create your lists to collect email.
Step 2 - Install and active plugin MailChimp for WP.
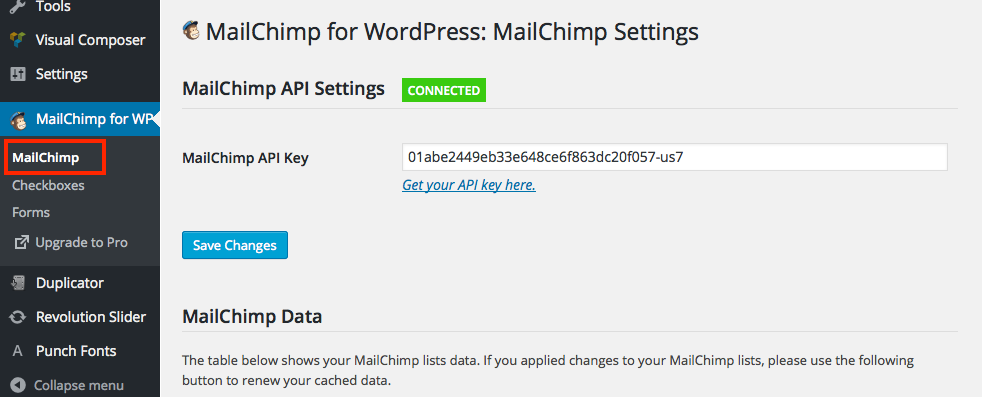
Step 3 - Navigate to MailChimp for WP > MailChimp then connect with your mailchimp account you created from step 1
Step 4 - Create mailchimp form to collect email. Navigate to Forms
Import HTML Code below on section Form mark-up Source.
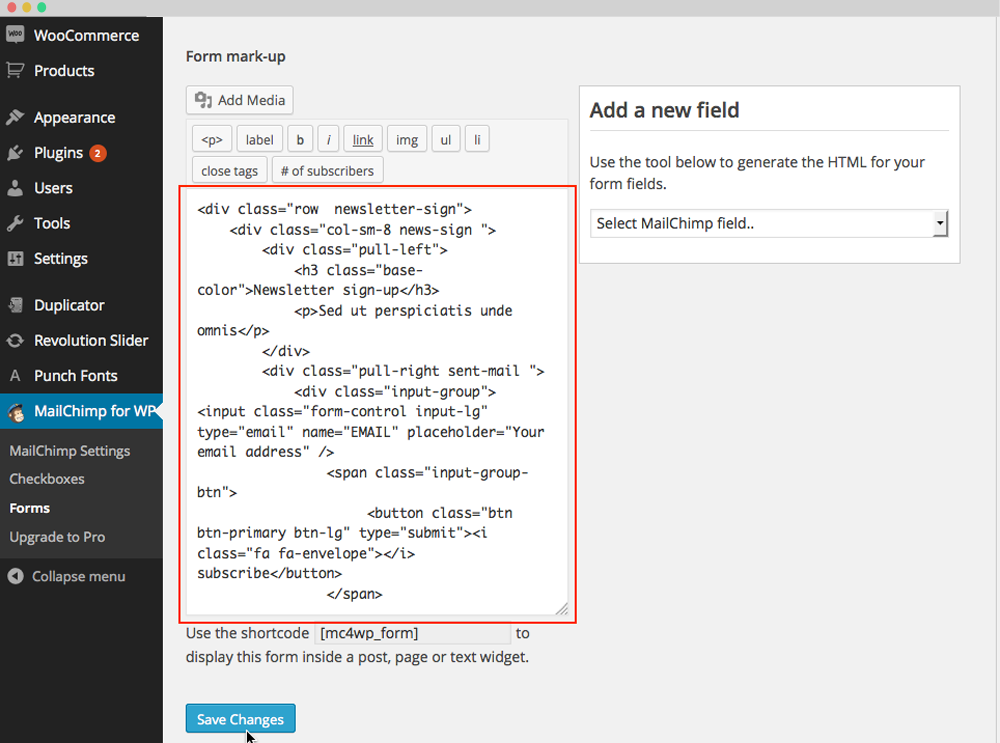
Source :
<h3 class="box-heading">keep in touch</h3>
Sign up to newsletter
</div>
<div class="input-group group-input-form col-md-5">
<input type="email" id="mc4wp_email" name="EMAIL" required placeholder="Your email address" class="form-control" />
<span class=" input-group-btn">
<input type="submit" value="Subscribe" class="btn hightlight btn-default" />
</span>
</div>
</div>
Step 5 - After creating from of your plugin. You must set position where you want to display.
Going Appearance -> Widgets then drag mailchimp widget to Newsletter Sidebar. You can bring that sidebar to every position you want. ( You can drag to left, right sidebar for each page. You can drag to Footer position.... )
Create Contact Page
1. Create Contact Form.
Make sure you install and active Contact Form 7 plugin to continue reading.
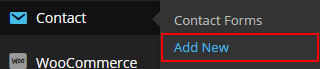
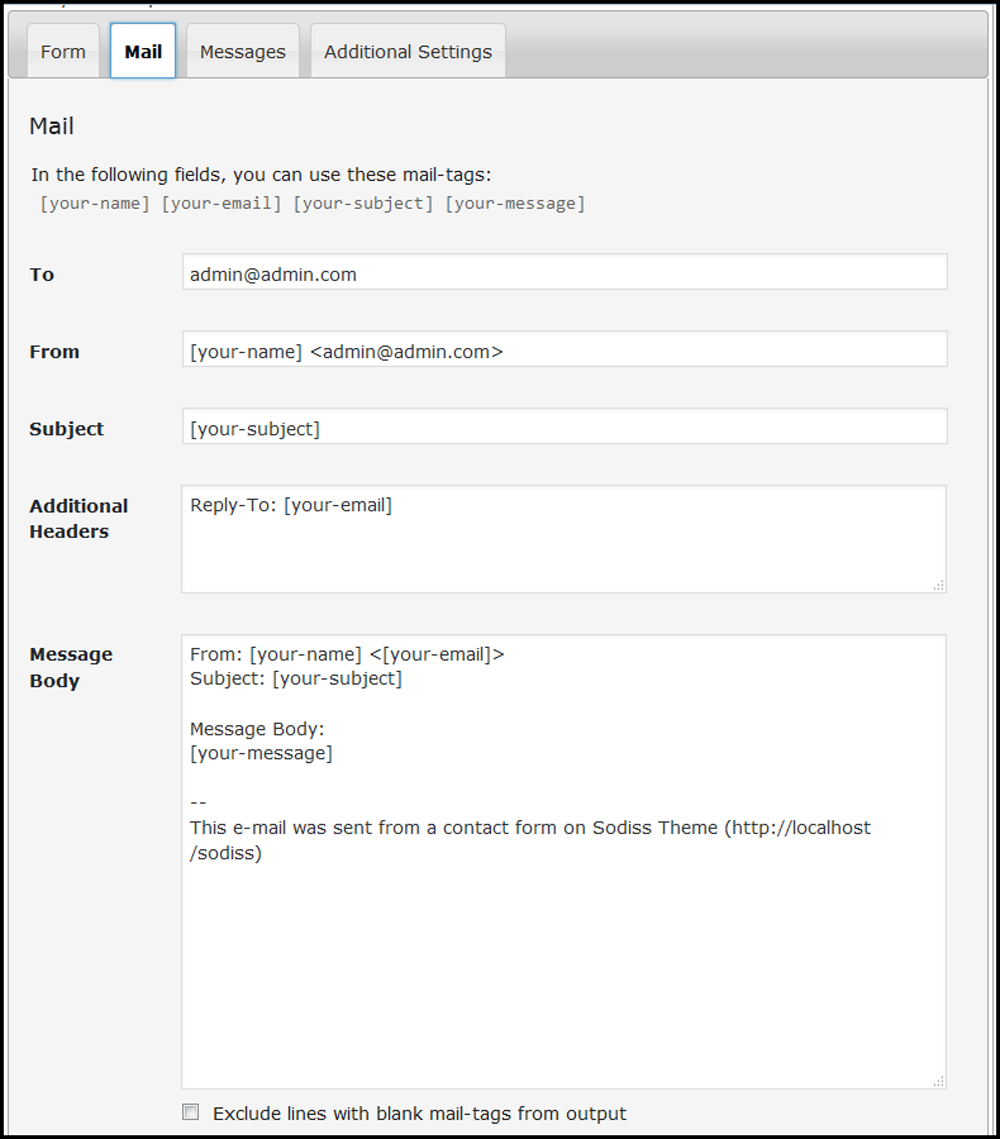
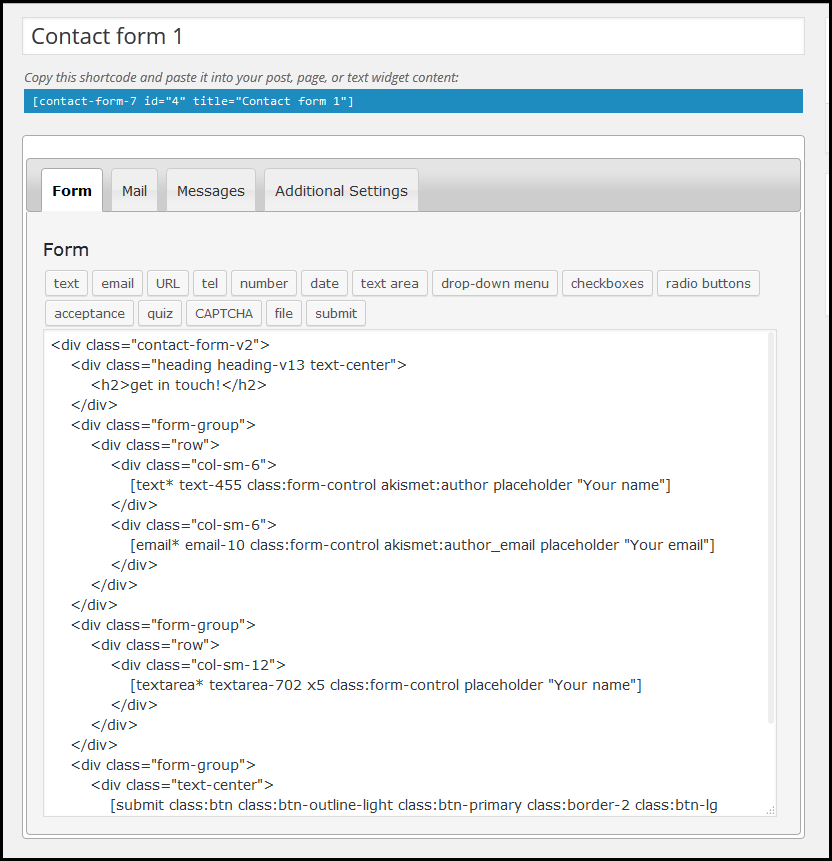
Step 1 - Log in to your WordPress Dashboard, go to Contact > Add New
Step 2 - Give a Name to your form and change Mail Info
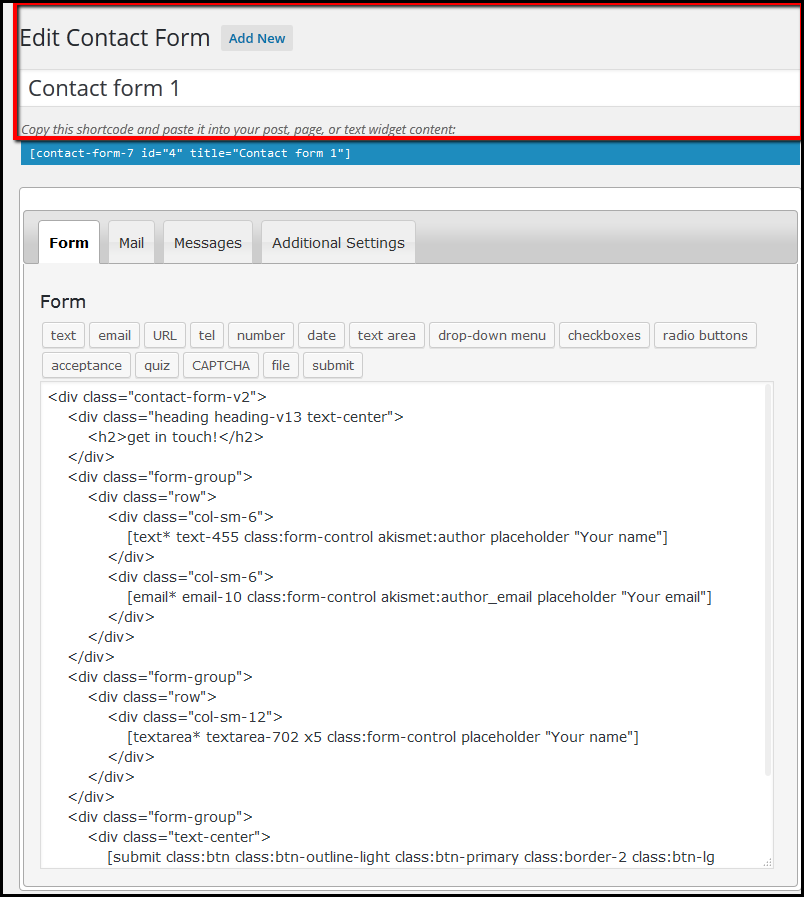
Step 3 - Edit the Form field to change the Form Layout
2. Create Contact Page
Step 1 - Log in to your WordPress Administration Panel (Dashboard)..
Step 2 - Click on Pages > Add New.
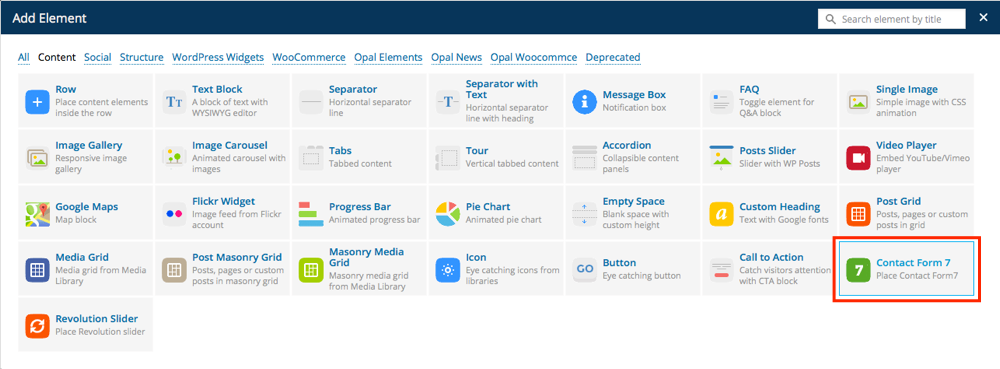
Step 3 - Give your page a name then Change the Editor to Backend Editor ( you need to have the Visual Composer plugin activated ).
Step 4 - Click on the Add Element button.
Step 5 - Select the Contact Form 7 element.
Step 6 - The Contact Form 7 Settings should appear. Select the Form you want to use you can also customize the Color and change the fields layout and button design
Step 7 - Update / Publish your page
Create Coming Soon Page
Step 1 - Log in to your WordPress Administration Panel (Dashboard)..
Step 2 - Click on Pages > Add New.
Step 3 - Give your page a name then Change the Editor to Backend Editor ( you need to have the Visual Composer plugin activated ).
Step 4 - Click on the Add Element button.
Step 5 - Drag elements to build your page. Do not forget to use WPO Coming Soon Element to set date and time.
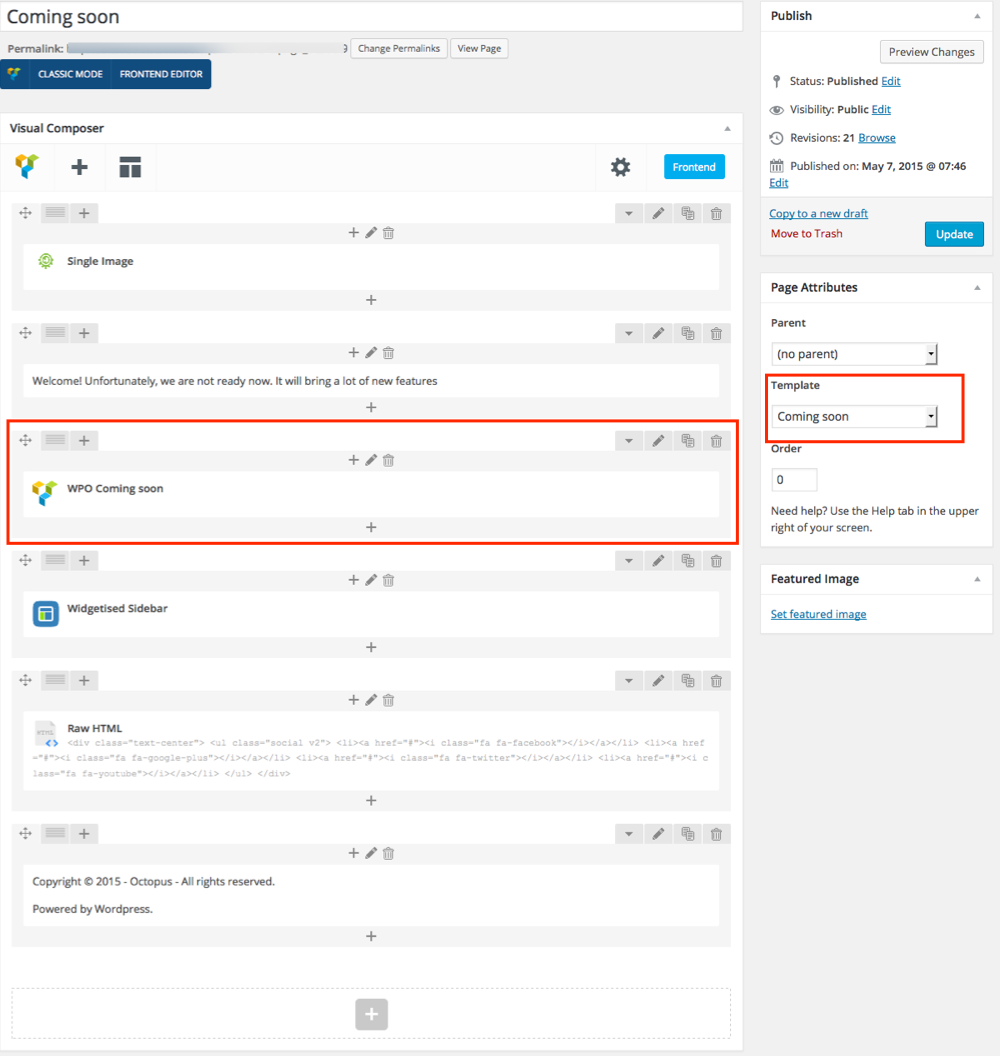
Step 6 - On Page Attribute section. Select template : Coming Soon
Step 7 - Update / Publish your page
Here coming soon page:

Create Under Construction
Step 1 - Log in to your WordPress Administration Panel (Dashboard)..
Step 2 - Click on Pages > Add New.
Step 3 - Give your page a name then Change the Editor to Backend Editor ( you need to have the Visual Composer plugin activated ).
Step 4 - Click on the Add Element button.
Step 5 - Drag elements to build your page. Do not forget to use WPO Coming Soon Element to set date and time.
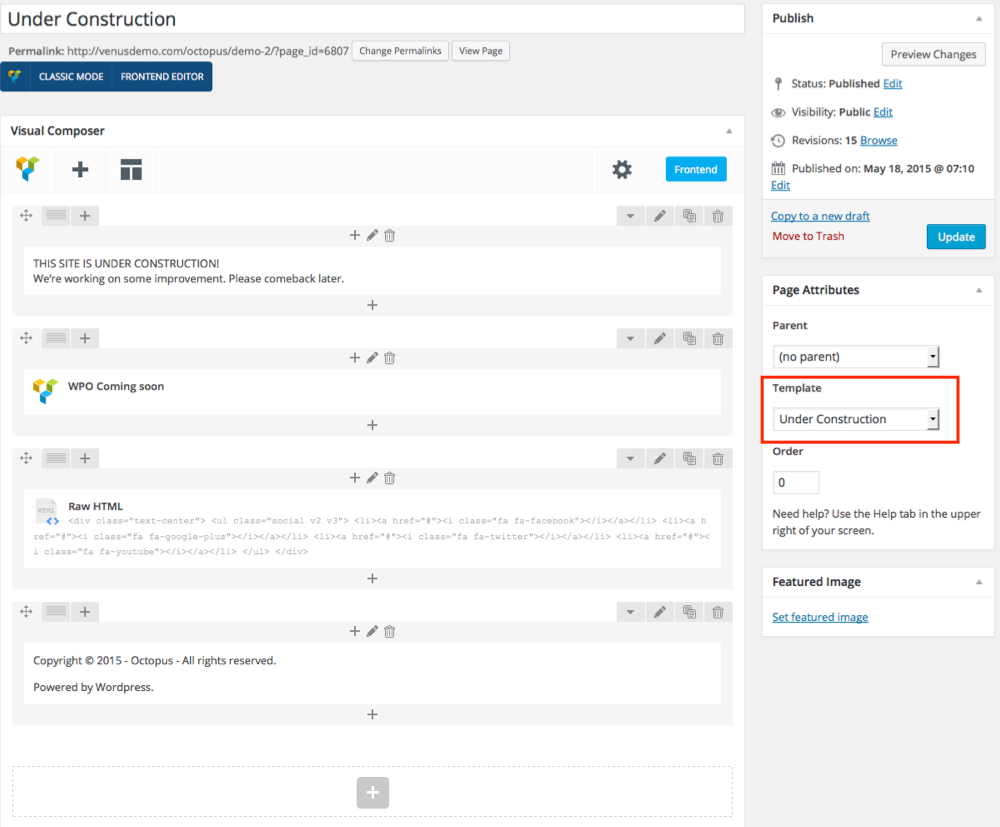
Step 6 - On Page Attribute section. Select template : Under Construction.
Step 7 - Update / Publish your page.
Here under construction page :

Customize Configure
Trainingzone Theme use Customizer provides an ultra effective and intuitive way to customize theme layout & setting with real-time preview. Bring all of settings to customizer, you do not need to using another theme option anymore
To access Customizer go to your admin Dashboard Navigate to Appearance >> Customize
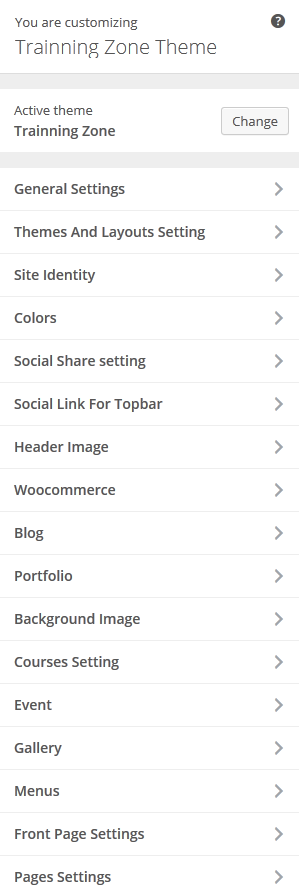
1. General Setting : Manage general setting like your logo,favicon, copyright, ....
2. Theme And Layout Setting: select your header style, footer style for global
3.Social Sharing Setting: select social channel apperance to sharing
4. Social link for topbar : Set up link for social to display on topbar
5. Header Image : create customize image for breadcrumb and title section
6. WooCommerce : manage setting of WooCommerce function
7. Blog : manage global setting for Blog
8. Portfolio : manage global setting for Portfolio
9. Event :manage setting of Event
10.Courses Setting : manage setting for Courses
How to translate the theme
The easiest way to translate theme to the language of your choice is to use "WPML" plugin.
- To begin, be sure you have the WPML Plugin installed and activated, along with the WPML String Translation plugin.
- To set up WPML the first time, follow their Getting Started Guide.To begin translating, select WPML (in the Dashboard menu) -> String Translation. You should see a list of the strings in the theme (there should be only four), with blue translation links to the right. Click these links to reveal the list of languages you use on your blog and the associated translations.
- How to set and translate main features of the theme
- Using translation management http://wpml.org/documentation/translating-your-contents/using-the-translation-editor/
- Translation Management & Features – http://wpml.org/documentation/translating-your-contents/using-the-translation-editor/translation-management-features/
- Translating URL slugs – http://wpml.org/documentation/getting-started-guide/translating-page-slugs/
- How to scan strings coming from the theme
- http://wpml.org/documentation/getting-started-guide/theme-localization/
- How to translate strings using String Translation
- http://wpml.org/documentation/getting-started-guide/string-translation/
- If adjustment is needed for WPML language switcher please also add this
- http://wpml.org/documentation/getting-started-guide/language-setup/custom-language-switcher/
- If you need more help with WPML plugin. Please go WPML Forum
FAQs
1. How to update Theme
a. Update Theme via WordPress
Updating the theme via WordPress is very similar to the install process via WordPress. Make sure you had backup all of your customization in our theme.
Follow the steps below to update your theme via WordPress:
Step 1 - Download latest theme package on ThemeForest
Step 2 - Log into your WordPress Dashboard.
Step 3 - Go to Appearance > Themes.
Step 4 - Deactivate the Trainingzone Theme by simply activating a different theme. Once you activate a different theme, you can delete the Trainingzone theme.

Step 5 - Delete the Trainingzone Theme. Do not worry, your content will not be lost!
Step 6 - Then simply upload the newest “Trainingzone_Theme.zip” file in the Appearance > Themes section. Click on the Install Themes tab at the top and choose to upload the zip file. You have this step explained in section: Theme Installation via WordPress.
b. Update theme via FTP
Updating the theme via FTP is very similar to the install process via FTP.
Follow the steps below to update your theme via FTP:
Step 1 - Go to .../wp-content > themes location on your server using a FTP client and backup your "Trainingzone" theme folder by saving it to your computer, or you can choose to simply delete it. Your content will not be lost.
Step 2 - Download the new version of Trainingzone theme from your Themeforest and retrieve Trainingzone folder by unpacking the zip that you download from Themeforest and Trainingzone_Theme.zip.
Step 3 - Then simply drag and drop the new "Trainingzone" theme folder into .../wp-content > themes location. Choose to “Replace” the current one if you did not delete it.
Step 4 - Log into your WordPress Dashboard, go to Appearance > Themes and activate the new Trainingzone theme.
2. How to create Child Theme
What is a Child Theme?
A child theme is a theme that inherits the functionality of another theme, called the parent theme. Child themes allow you to modify, or add to the functionality of that parent theme. A child theme is the best, safest, and easiest way to modify an existing theme, whether you want to make a few tiny changes or extensive changes. Instead of modifying the theme files directly, you can create a child theme and override within.
Why use a Child Theme?
if you modify an existing theme and it is updated, your changes will be lost. With a child theme, you can update the parent theme (which might be important for security or functionality) and still keep your changes. It’s a great way to get started if you are just learning WordPress theme development.
How to create Create child ?
Follow that documentation to create Child Theme Child Themes - Codex
Using that plugin to create Child Theme : One Click Child Theme
3. How to Speed Optimization
If you think your website takes too much time to load maybe you should.
- Install a Cache Plugin for WordPress. We recommend W3 Total Cache.
- Install an Image Compress Plugin. We recommend WP Smush It.
- Install a Database Optimizer Plugin We recommend WP Optimize
- Reduce the number of posts on the page
- Reduce the number of unnecessary plugins.
- Use more icons and less images.
Finally
Thank you for reading!
We hope you can create the best website with our themes.
One again, thank you so much for using our theme. As i said at the beginning, i'd be glad to help you if you have any questions relating to this theme. No guarantees, but i'll do my best to assist. If you have a more general question relating to the themes.
Do not hesitant to contact us via email : [email protected] or if you want more information,please send to: [email protected] or submit ticket via Opal Forum or send direct message from ThemeForest Dashboad
Please take a screenshot photo with descriptions about your problem. More details about your problems help us more easier to figure out and respond you sooner.
*******************Note*********************************************************************************************************
SCOPE OF SUPPORT
Please remember you have purchased a very affordable theme and you have not paid for a full-time web design agency. Occasionally we will help with small tweaks, but these requests will be put on a lower priority due to their nature. Support is also 100% optional and we provide it for your connivence, so please be patient, polite and respectful. Our support covers fixing bugs and reported issues, providing updates to ensure compatibility with new software versions. Unfortunately we cannot provide support for customizations or 3rd party plugins. If you need help with customizations of your theme, please contact with us with your requirement. Our technical team will help you with some fees.
Before seeking support, please...
* Make sure your question is a valid Theme Issue and not a customization request.
* Make sure you have read through the documentation and any related video guides before asking support on how to accomplish a task.
* Make sure to double check the theme FAQs.
* Try disabling any active plugins to make sure there isn't a conflict with a plugin. And if there is this way you can let us know.
* If you have customized your theme and now have an issue, back-track to make sure you didn't make a mistake. If you have made changes and can't find the issue, please provide us with your changelog.
* Almost 80% of the time we find that the solution to people's issues can be solved with a simple "Google Search". You might want to try that before seeking support. You might be able to fix the issue yourself much quicker than we can respond to your request.
* Make sure to state the name of the theme you are having issues with when requesting support via ThemeForest.
SUPPORT SCHEDULE
Our working time is 8:30am - 5:30pm from Monday to Friday (GMT+7). So if you email us or submit ticket besides this working time, we are really sorry that we are not able to respond you soon. We will try to reply you as fast as we can. Especially if you email or submit ticket at weekend, please be patient and we will respond to you right when we are back on Monday.