Dear all customer’s
Today , Opal Team will guide with you how to translate language in your theme.
In our guide has guided you translate language by WPML , now we will show you a way translate language by Loco Translate.
1.Check you can switch language
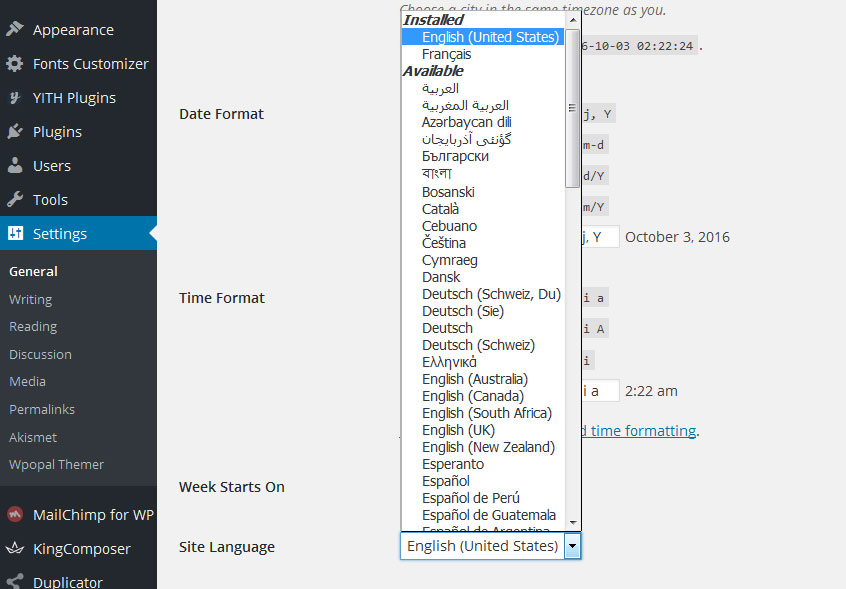
Please go to Dashboard->> Setting->> General Setting and choose language that you want to translate.

2.Set up the folders
Before you do any translating, make sure the following folder exists on your site, and is writeable by the web server:
wp-content/languages/loco/themes
If you have automatic updates enabled then the "wp-content/languages" folder probably exists already. The "loco" subfolder is there to protect your custom translations from automatic translation updates. This is critical if you want to avoid your files being deleted behind your back.
Loco Translate also lets you save translations inside the theme’s own folder, but this is provided for theme developers only. Files inside the theme folder will get deleted by WordPress updates, so don’t save anything in there unless you know what you’re doing.
If you’re not familiar with changing file permissions see our guide to filesystem access, and ask your hosting provider or system administrator if you have any doubts.
3. Install plugin
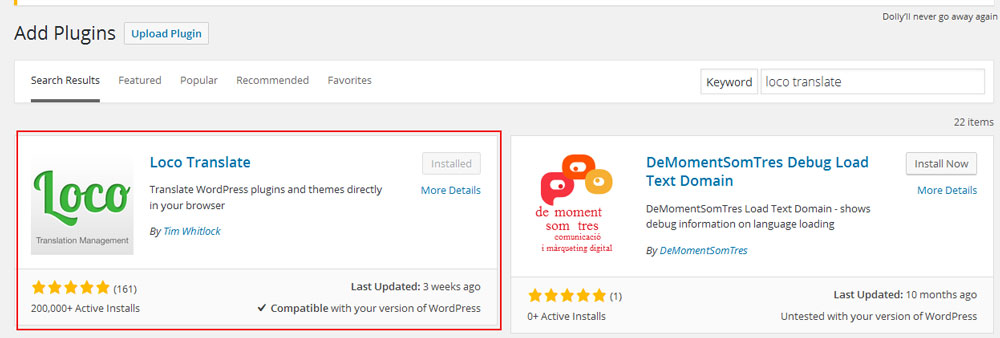
Go to Plugin->> Add New->> and enter name of plugin : Loco Translate , install and active this plugin

4.Find the theme in the translation dashboard
Please go to Loco Translate in left sidebar, and choose Theme sub tab, choose name of theme and you will see form ->> click to “New Language”

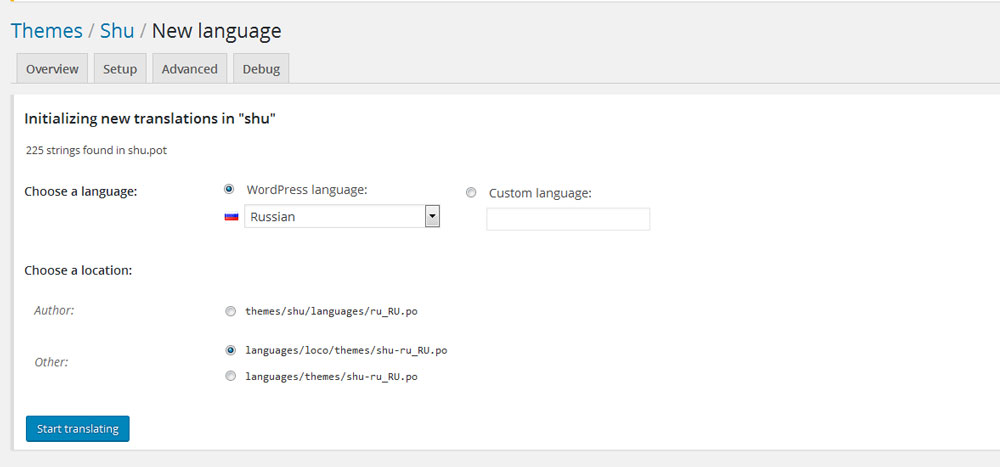
To start translating the theme into another language click this button and you’ll be taken to a new screen where you can choose the language you want.
Select a language from the dropdown list of common languages. In this example we’ll select ‘Russian’. You could achieve the same result by entering "RU" into the text field instead, but we won’t talk about language codes right now.

If you’ve set up your folders correctly you should see a location marked as “Custom”. You should select this so you new translations are safe from automatic updates.
With the language and folder location selected, click the “Start translating” button and you’ll be taken to the editor screen for translating the theme.
Then translate language:
Once on the editor screen you’ll see all the strings the theme has defined in its template file. Untranslated strings are shown in bold blue. To start with they will all be untranslated.
The basics of the editor should be fairly intuitive. Select the English string at the top and enter your translation in the pane at the bottom. You can ignore most of the editor buttons for now. We’re just going to enter a translation and save it.

5.Check the files exist
If everything has gone well, you now have Greek translation files on your server for the Omega theme. Take a look in the folder you set up earlier and you should see two new files:
wp-content/languages/loco/themes/shu-ru_RU.po
wp-content/languages/loco/themes/shu-ru_RU.mo
Checking they exist is good for our sanity and helps you see how it all works. The PO file is a human-readable source file. The MO file is the binary file that the Shu theme will ask WordPress to load.
Loco Translate has now completed its job. It has compiled a MO file and saved it to disk with the correct name. This is all it does. What happens next is down to WordPress and the theme.
6.Viewing the translated theme
Go to Front-end you will se result when you finish translate language:

Thanks for joining with us.
