Some days ago, Opal WordPress was happy and enjoyable to release a new theme Edubase Course, Learning and Event WordPress Theme. This is the first theme we build about the subject of education. Because theme has some complicated functions, so customers usually meet matters in the process of installing. Yesterday we guided you How to install Data Demo and today we will continue to share you How to create Courses and Lessons in Edubase Theme. This problem also causes many difficulties for users when they access it at the first time. Hoping through this blog, you can understand more clearly and set up theme perfectly. Please follow the below steps!
Education, Events & Courses WordPress Themeis a beautiful, clean, and professional theme created for educational establishments like colleges and schools, as well as online learning, training and courses. It is suitable for University, Colleges and Educational websites.
Firstly, to install this theme you must have a working version of WordPress already installed. Make sure your installed WordPress version is 4.0 or higher. You also need to have PHP 5.3 or higher versions (recommended is php 5.3+) and MySQL 5.0 in order for Opal Theme to function correctly. If you need help installing WordPress, follow the instructions in WordPress Codex or you can watch the Instructional Video created by Woo Themes.
1. Create Courses
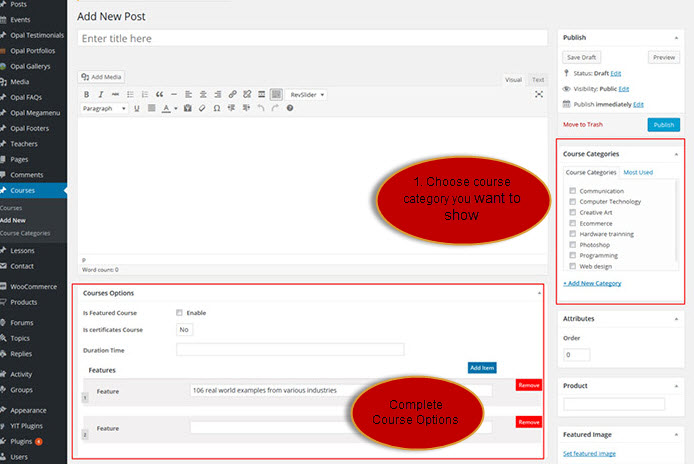
Step 1: Before creating courses to introduce candidates and students, you have to Course Categories you want to show.
Simply from Dashboard go to Course and click Course Categories then you need to complete some necessary items such as Name, Slug, Parent, Description, Icon and Upload/Add image.
Remember to Add New Category
For Example This is some Course Categories you can create:
Step 2: Then creating Course Categories it is time for you to Add a New Course
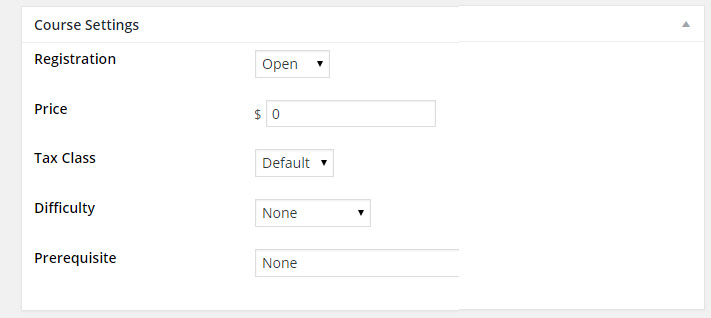
Remember to complete Course Setting ( Price, Difficulty: Level of students, Prerequisite: Type of Courses)
Front Page like this:
2. Create Lessons
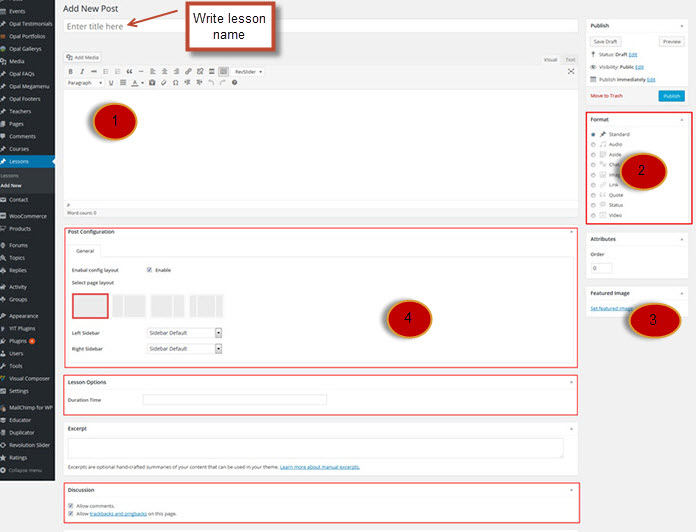
Please From Dashboard go to Lesson and Add New
Step 1 – Start filling in the blanks: enter your post title in the upper field, and enter your post body content in the main post editing box below it.
Step 2 – Select Lesson Format. You can create lesson with a lot of Formats like link, gallery, image ….. Select format on Format box from in right sidebar.
Step 3 – Upload a featured image for your Lesson.
Step 4 – Scroll down until you see the Lesson options box, there you will be able to customize the lesson.
+ Post configuration : Select enable config layout to choose layout that you want to displayed in front end.
+ Lesson options : Fill in duration time of lesson.
+ Discussion : select all options so that user can comment in this lesson.
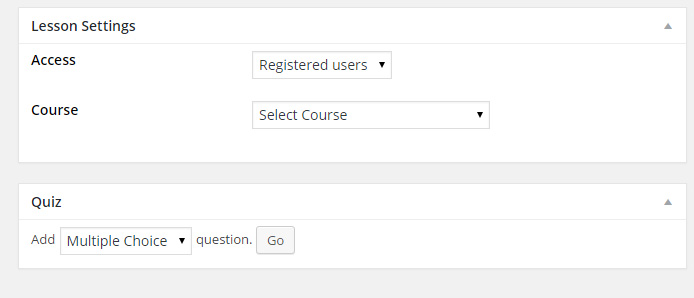
Remember to Set up Lesson Settings including
– Access : User only view lesson when registered users or logged in users or every one.
– Course : Select course that lesson will be displayed in the course.
Front page like this:
Hoping through our above tutorial, you know How to create Courses and Lessons in Edubase Theme perfectly. In the process of reading it, you meet any difficulties, please leave a below comment or contact us directly via email or skype, we will update it immediately. Your suggestions are really meaningful and precious with us helping us to be more perfect. Hoping your website will be longer with customers. Remember to follow our social channels such as Facebook, Twitter, Linkedin, Youtube, Pinterest to get the newest information!
Thanks so much!


